Showing posts with label tricks and tips. Show all posts
Showing posts with label tricks and tips. Show all posts
Saturday 3 November 2012
Make Your Linux Read Papers For You
Fed up of reading text files and PDF papers? Is you eye power degrading day by day and can't hold even few minutes on screen? Don't worry, you can easily make your linux system speak and read all those papers for you.
There are several text to speech tools available for linux but in this post, I will be using festival, a Text-to-speech (TTS) tool written in C++. Also, Ubuntu and its derivation are most likely to include by default espeak, a multi-lingual software speech synthesizer.
For ubuntu and debian based system, type the following to install festival:
Moreover, you can also install a pidgin plugin that uses festival:
For now, you just need to install festival. Once you have installed festival, you can make it read text files for you. If you go through the online manual of festival, it says:
"Festival works in two fundamental modes, command mode and text-to-speech mode (tts-mode). In command mode, information (in files or through standard input) is treated as commands and is interpreted by a Scheme interpreter. In tts-mode, information (in files or through standard input) is treated as text to be rendered as speech. The default mode is command mode, though this may change in later versions."
To read a text file, you can use the command below:
The festival will start in text-to-speech (tts) mode and will read your text files for you. But now, we want to read PDF files and if you try to read PDF files directly (festival --tts paper.pdf), festival is most likely to speak the cryptic terms since it actually reads the content of PDF including its header (You know PDF is different than simple text file). So we will use a pdftotext command to convert our pdf file and then pipe the output to the festival so that festival reads the PDF files for us. You can use the syntax as below to read PDF files.
If you want to skip all those table of contents and prefaces or if you are in the middle of PDF, you can use the switches of pdftotext to change the starting and ending pages. For example, if I wish to read page 10 - 14 of a PDF, I would do:
Enjoy learning. I hope this post helps you ;)
Read more...
There are several text to speech tools available for linux but in this post, I will be using festival, a Text-to-speech (TTS) tool written in C++. Also, Ubuntu and its derivation are most likely to include by default espeak, a multi-lingual software speech synthesizer.
For ubuntu and debian based system, type the following to install festival:
samar@samar-Techgaun:~$ sudo apt-get install festival
Moreover, you can also install a pidgin plugin that uses festival:
samar@samar-Techgaun:~$ sudo apt-get install pidgin-festival
For now, you just need to install festival. Once you have installed festival, you can make it read text files for you. If you go through the online manual of festival, it says:
"Festival works in two fundamental modes, command mode and text-to-speech mode (tts-mode). In command mode, information (in files or through standard input) is treated as commands and is interpreted by a Scheme interpreter. In tts-mode, information (in files or through standard input) is treated as text to be rendered as speech. The default mode is command mode, though this may change in later versions."
To read a text file, you can use the command below:
samar@samar-Techgaun:~$ festival --tts mypaper.txt
The festival will start in text-to-speech (tts) mode and will read your text files for you. But now, we want to read PDF files and if you try to read PDF files directly (festival --tts paper.pdf), festival is most likely to speak the cryptic terms since it actually reads the content of PDF including its header (You know PDF is different than simple text file). So we will use a pdftotext command to convert our pdf file and then pipe the output to the festival so that festival reads the PDF files for us. You can use the syntax as below to read PDF files.
samar@samar-Techgaun:~$ pdftotext paper.pdf - | festival --tts
If you want to skip all those table of contents and prefaces or if you are in the middle of PDF, you can use the switches of pdftotext to change the starting and ending pages. For example, if I wish to read page 10 - 14 of a PDF, I would do:
samar@samar-Techgaun:~$ pdftotext -f 10 -l 14 paper.pdf - | festival --tts
Enjoy learning. I hope this post helps you ;)
Read more...
Bookmark this post: | 
|
Tuesday 30 October 2012
Download MakeUseOf.com Guides - Google Dork
Well makeuseof.com guides are good read for the average computer users and sometimes the guide from them can be quite useful for startup in particular topic. But, I hate the ways we need to follow to download so here's a simple google dork to find PDFs from makeuseof.com
MakeUseOf.Com provides three methods to download the guides: social media sharing, 99 cent payment, and subscription to their newsletter. I hate when sites impose such things and here is how you can get those PDFs directly.
Go to google and type the following in search box:
or, CLICK HERE!!!
Enjoy free MakeUseOf.Com guides ;)
Read more...
MakeUseOf.Com provides three methods to download the guides: social media sharing, 99 cent payment, and subscription to their newsletter. I hate when sites impose such things and here is how you can get those PDFs directly.
Go to google and type the following in search box:
site:amazonaws.com inurl:makeuseof.com
or, CLICK HERE!!!
Enjoy free MakeUseOf.Com guides ;)
Read more...
Bookmark this post: |
|
Sunday 21 October 2012
Enable Auto Correction Of Path In Bash
While using the cd command, its normal to make mistakes while typing the directory path. You can enable auto-correction while typing directory path by enabling a particular shell option.
Minor spelling mistakes will be corrected automatically if the particular shell option cdspell using the SHell OPTions command invoked with shopt command.
When you enable the cdspell shell option, the errors checked for are missing characters, repeated characters, and transposed characters. Once the error is encountered, the corrected path is printed and directory is changed successfully.
The line shopt -s cdspell enables the auto-correction while using cd command. The session above shows some of the corrections performed once we enabled the cdspell shell option.
If you want to turn on this particular setting, then add the appropriate line using the command below:
I hope this counts as useful tips to beginner linux guys ;)
Read more...
Minor spelling mistakes will be corrected automatically if the particular shell option cdspell using the SHell OPTions command invoked with shopt command.
When you enable the cdspell shell option, the errors checked for are missing characters, repeated characters, and transposed characters. Once the error is encountered, the corrected path is printed and directory is changed successfully.
samar@samar-Techgaun:~$ shopt -s cdspell
samar@samar-Techgaun:~$ cd Desktp
Desktop
samar@samar-Techgaun:~/Desktop$ cd ../Deskotp/
../Desktop/
samar@samar-Techgaun:~/Desktop$ cd ../Desktoop
../Desktop
samar@samar-Techgaun:~/Desktop$
samar@samar-Techgaun:~$ cd Desktp
Desktop
samar@samar-Techgaun:~/Desktop$ cd ../Deskotp/
../Desktop/
samar@samar-Techgaun:~/Desktop$ cd ../Desktoop
../Desktop
samar@samar-Techgaun:~/Desktop$
The line shopt -s cdspell enables the auto-correction while using cd command. The session above shows some of the corrections performed once we enabled the cdspell shell option.
If you want to turn on this particular setting, then add the appropriate line using the command below:
samar@samar-Techgaun:~$ echo "shopt -s cdspell" >> ~/.bash_profile
I hope this counts as useful tips to beginner linux guys ;)
Read more...
Bookmark this post: |
|
Monday 15 October 2012
Useful Nautilus Shortcuts
Nautilus is a default file manager for GNOME Desktop and is used as the default file manager in several linux distros such as Ubuntu. I love nautilus because its simple, friendly, and clean, supports local as well as remote file systems over different protocols. Moreover, there are several useful shortcuts that make life easier while using nautilus.
Below is the list of the most helpful shortcuts for navigation and file management in the nautilus:
Ctrl + r: Refresh the current view
Ctrl + h: Toggle show/hide mode for hidden files
F9: Show/Hide the side pane
Ctrl + l: Activate location/url bar (You can then provide path to local or remote filesystems or quickly copy the absolute paths)
Alt + Up Arrow: Move up one directory level
Alt + Down Arrow: Move down one directory level (the directory to be entered should be selected for this to work)
Alt + Left Arrow: Go back to the previous folder in view
Alt + Right Arrow: Go forward
Ctrl + Shift + n: Create a new empty directory
Ctrl + (+ / -): Zoom in (+) or zoom out (-)
Ctrl + 0: Zoom to normal state
Alt + Enter: View selected file/folder properties
F2: Rename selected file/folder
Ctrl + Shift + Drag file/folder: Create symbolic link to file/folder
Ctrl + f: Search for files/folders
Ctrl + s: Select files based upon templates (eg. select all pdf files using *.pdf)
Ctrl + 1: Toggle view as icons
Ctrl + 2: Toggle view as lists
Ctrl + 3: Toggle compact view
Ctrl + w: Close current nautilus window
Ctrl + Shift + w: Current all open nautilus windows
Ctrl + T: Open new tab
Alt + HOME: Navigate to HOME folder
F6: Toggle between side pane and central pane
Know more shortcuts? Share as the comments :)
Read more...
Bookmark this post: |
|
Saturday 13 October 2012
How To Exclude Directory While Compressing With Tar
Quite a handy and useful tip here. Several times, you want to compress files and folders but there might be cases when you want to compress your data excluding some of the directories. Tar command makes the process easier by providing us a exclusion switch.
I was actually backing up data I had downloaded in the remote server and wanted a copy of backup tar file in my system as well. But all those images that resided in the folders deep inside were not necessary for me. So all I did was something like below:
The above command effectively excludes all the sub directories from testdirectory having the string image (eg. image, images, images_old in my case) and creates the backup.tar file. Moreover, the --exclude switch also co-operates the regular expressions so you can specify the regex to filter the directories. As an example, the command below excludes the directories a, b, c, d, and e while creating the tarball.
You can exploit this switch for ease several times in your daily works. I hope this helps :)
Read more...
I was actually backing up data I had downloaded in the remote server and wanted a copy of backup tar file in my system as well. But all those images that resided in the folders deep inside were not necessary for me. So all I did was something like below:
adm@RServ:~$ tar cvf backup.tar test --exclude=image*
The above command effectively excludes all the sub directories from testdirectory having the string image (eg. image, images, images_old in my case) and creates the backup.tar file. Moreover, the --exclude switch also co-operates the regular expressions so you can specify the regex to filter the directories. As an example, the command below excludes the directories a, b, c, d, and e while creating the tarball.
adm@RServ:~$ tar cvf backup.tar test --exclude=[a-e]
You can exploit this switch for ease several times in your daily works. I hope this helps :)
Read more...
Bookmark this post: |
|
Empty Trash From Command Line In Ubuntu
CLI is such a sexy piece so why bother using GUI, even for cleaning up your trash. In this post, you will see how you can empty trash in Ubuntu from command line.
The trash you see in GUI is nothing but just the view for the files deleted by users which are temporarily moved to the special location of user's home directory. For any user, the trash location is ~/.local/share/Trash/. That is, whatever a user deletes gets saved in this location.
I hope this becomes useful :)
Read more...
The trash you see in GUI is nothing but just the view for the files deleted by users which are temporarily moved to the special location of user's home directory. For any user, the trash location is ~/.local/share/Trash/. That is, whatever a user deletes gets saved in this location.
samar@samar-Techgaun:~$ rm -rf ~/.local/share/Trash/
I hope this becomes useful :)
Read more...
Bookmark this post: |
|
Add Google Search Support In Gnome-Terminal
Gnome-terminal is my favorite thing in my system and recently I came to know that I could add google search support in gnome-terminal which is totally awesome. Ubuntu Tweak already includes the google search support but if you want google search in your terminal without the whole ubuntu tweak, you can follow this guide.
All you need to do is add the PPA and you can easily install the gnome-terminal with google search support. Fire up the terminal and enter the following commands:

Credits: Ubuntu Tweak
Read more...
All you need to do is add the PPA and you can easily install the gnome-terminal with google search support. Fire up the terminal and enter the following commands:
sudo add-apt-repository ppa:tualatrix/personal
sudo apt-get update
sudo apt-get install gnome-terminal
sudo apt-get update
sudo apt-get install gnome-terminal

Credits: Ubuntu Tweak
Read more...
Bookmark this post: |
|
Tuesday 2 October 2012
Binary, Hex, Octal and Decimal Conversion Under Linux
Base conversions are easy with linux CLI. No need of fancy GUI-based calculator to perform base conversions when there is our favorite linux terminal.
We will be using bc, a calculator language that supports arbitrary precision numbers with interactive execution of statements. We will exploit the pipelining feature of shell and will let the bc process our query to convert the numbers from one base to other.
As seen in all the examples above, the conversion to decimal numbers does not require you to specify the obase as obase defaults to decimal. The same thing applies for ibase i.e. ibase defaults to decimal base by default as seen in the examples below.
Now lets try some conversion with decimal numbers as the input base.
Below are few more examples of base conversions to clarify the use of the command.
I hope this is helpful ;-)
Read more...
We will be using bc, a calculator language that supports arbitrary precision numbers with interactive execution of statements. We will exploit the pipelining feature of shell and will let the bc process our query to convert the numbers from one base to other.
From binary to decimal
The syntax is obvious and we will follow the similar syntax for all the conversions. In this first example, we are converting the binary number 1101101 from input base binary to decimal(obase defaults to decimal unless specified).
samar@samar-Techgaun:~$ echo "ibase=2;1101101" | bc
109
109
From octal to decimal
samar@samar-Techgaun:~$ echo "ibase=8;1101101" | bc
295489
295489
From Hexadecimal to decimal
samar@samar-Techgaun:~$ echo "ibase=16;A1F3DF" | bc
10613727
10613727
From N-base to decimal
All you need to do is provide the appropriate ibase value (eg. ibase=4 for 4-base to decimal conversion).
samar@samar-Techgaun:~$ echo "ibase=16;A1F3DF" | bc
10613727
10613727
As seen in all the examples above, the conversion to decimal numbers does not require you to specify the obase as obase defaults to decimal. The same thing applies for ibase i.e. ibase defaults to decimal base by default as seen in the examples below.
Now lets try some conversion with decimal numbers as the input base.
From decimal to binary
samar@samar-Techgaun:~$ echo "obase=2;109" | bc
1101101
1101101
From decimal to octal
samar@samar-Techgaun:~$ echo "obase=8;295489" | bc
1101101
1101101
From decimal to hexadecimal
samar@samar-Techgaun:~$ echo "obase=16;10613727" | bc
A1F3DF
A1F3DF
From decimal to N-base
All you need to do is provide the appropriate obase value (eg. obase=4 for decimal to 4-base conversion).
samar@samar-Techgaun:~$ echo "obase=4;121" | bc
1321
1321
Below are few more examples of base conversions to clarify the use of the command.
From binary to octal
samar@samar-Techgaun:~$ echo "ibase=2;obase=8;1111" | bc
17
17
From hexadecimal to binary
samar@samar-Techgaun:~$ echo "ibase=16;obase=2;AFBE" | bc
1010111110111110
1010111110111110
I hope this is helpful ;-)
Read more...
Bookmark this post: |
|
Wednesday 12 September 2012
Disable Guest Account Login In Ubuntu 12.04
Security is an important issue and I do not want anyone to access my machine, not even as the guest. Like almost every operating systems, I could see guest logon option in Ubuntu 12.04 which was turned on by default. This post provides the steps to enable or disable the guest account login in Ubuntu 12.04.
Fire up your terminal and type the following command:
Now add a new line at the end containing the string as below:
Now reboot your system or type the following in your terminal:
The guest account will no longer be active. If you want to enable the guest login again, just remove the line you added or change the value to true. I hope this helps :)
Read more...
Fire up your terminal and type the following command:
samar@samar-Techgaun:~$ sudo nano /etc/lightdm/lightdm.conf
Now add a new line at the end containing the string as below:
allow-guest=false
Now reboot your system or type the following in your terminal:
samar@samar-Techgaun:~$ sudo /etc/init.d/lightdm restart
The guest account will no longer be active. If you want to enable the guest login again, just remove the line you added or change the value to true. I hope this helps :)
Read more...
Bookmark this post: |
|
How To Fix Bootmgr Missing In UNetBootin
Sometimes while working with the LiveUSBs using UNetBootin, you might face the issue that says the Bootmgr is missing and it also says, Press Ctrl + ALT + DELETE TO Restart. This post will help you to fix this particular issue.
First off, format your USB as a FAT32 since it happens commonly because your USB drive is formatted as NTFS and UNetBootin seems to have issues with NTFS filesystems. If formatting to FAT32 also does not work, then try formatting as FAT filesystem.
If you still get boot errors from USB, it is possible that the partition is not marked as active. Assuming you're on windows, you can use the diskpart tool to make the partition active. See the process below:
The above command will display the disks and their sizes as well. Choose the appropriate disk as below:
Replace the value 1 in above command to select the correct USB drive. Then again list the partitions but usually you can select the partition for USBs as below and then activate it:
The active command will mark the currently selected partition as active. Now reboot and enjoy booting from LiveUSB.
Read more...
First off, format your USB as a FAT32 since it happens commonly because your USB drive is formatted as NTFS and UNetBootin seems to have issues with NTFS filesystems. If formatting to FAT32 also does not work, then try formatting as FAT filesystem.
If you still get boot errors from USB, it is possible that the partition is not marked as active. Assuming you're on windows, you can use the diskpart tool to make the partition active. See the process below:
list disk
The above command will display the disks and their sizes as well. Choose the appropriate disk as below:
select disk 1
Replace the value 1 in above command to select the correct USB drive. Then again list the partitions but usually you can select the partition for USBs as below and then activate it:
select partition 1
active
active
The active command will mark the currently selected partition as active. Now reboot and enjoy booting from LiveUSB.
Read more...
Bookmark this post: |
|
Tuesday 11 September 2012
How To Enable Native PDF Viewer In Firefox 15
Firefox 14 added a native HTML5 and javascript based PDF reader to read PDF files within the browser but it is disabled by default in Firefox 15 since it is not totally ready. If you don't mind few minor glitches, you can experience the native PDF viewer in Firefox 15 through about:config
Browser developers are integrating many functionalities in the browsers themselves. PDF viewer is no exception and Mozilla is still working for fully functional PDF viewer based on HTML5 and javascript which is called as pdf.js. Pdf.js is still in Beta phase and Mozilla has not declared it as 100% usable so it is disabled by default in firefox 15.
Type about:config in the URL bar (and ignore warning if it appears). Then search for pdfjs. A particular preference pdfjs.disabled will be listed on the search result whose value is by default set to true.
You will just need to double click on this preference row and it will be set to false. This will enable the native PDF viewer in Firefox 15.

You'll possibly have to restart your browser to see the effect in action.
I have been using the native PDF viewer and haven't faced any glitches or problem still. I hope this is helpful :)
Read more...
Bookmark this post: |
|
Sunday 2 September 2012
How To Search Manual Pages In Linux
Linux system consists of hundreds of binaries, several syscalls, and other stuffs that do have manual page. What if you want to locate or find the commands by searching through the manual pages? In this post, I am going to talk about one such useful command to search through the manual page names and short descriptions.
The command I am talking about is the apropos command. The best way to learn any linux command is to read its corresponding manual and go through the help (-h or --help) so lets poke through the help of apropos itself.
Particularly, the -e switch is quite useful to filter out your search. See the example below:
Each command has its associated short description and the apropos command searches the short description section of appropriate manual page for the provided keyword. You can also specify the search keywords in the form of regular expression for more flexibility. I hope this command counts as useful one :)
Read more...
The command I am talking about is the apropos command. The best way to learn any linux command is to read its corresponding manual and go through the help (-h or --help) so lets poke through the help of apropos itself.
samar@Techgaun:~$ apropos -h
Usage: apropos [OPTION...] KEYWORD...

  -d, --debug                emit debugging messages
  -v, --verbose              print verbose warning messages
  -e, --exact                search each keyword for exact match
  -r, --regex                interpret each keyword as a regex
  -w, --wildcard             the keyword(s) contain wildcards
  -a, --and                  require all keywords to match
  -l, --long                 do not trim output to terminal width
  -C, --config-file=FILE     use this user configuration file
  -L, --locale=LOCALE        define the locale for this search
  -m, --systems=SYSTEM       use manual pages from other systems
  -M, --manpath=PATH         set search path for manual pages to PATH
  -s, --section=SECTION      search only this section
  -?, --help                 give this help list
      --usage                give a short usage message
  -V, --version              print program version

Mandatory or optional arguments to long options are also mandatory or optional
for any corresponding short options.

The --regex option is enabled by default.

Report bugs to cjwatson@debian.org.
Particularly, the -e switch is quite useful to filter out your search. See the example below:
samar@Techgaun:~$ apropos -e tar
bf_tar (1)           - shell script to write a tar file of a bogofilter direc...
bf_tar-bdb (1)       - shell script to write a tar file of a bogofilter direc...
git-tar-tree (1)     - Create a tar archive of the files in the named tree ob...
lz (1)               - gunzips and shows a listing of a gzip'd tar'd archive
mxtar (1)            - Wrapper for using GNU tar directly from a floppy disk
ptar (1)             - a tar-like program written in perl
tar (1)              - The GNU version of the tar archiving utility
tar (5)              - format of tape archive files
tgz (1)              - makes a gzip'd tar archive
uz (1)               - gunzips and extracts a gzip'd tar'd archive
Each command has its associated short description and the apropos command searches the short description section of appropriate manual page for the provided keyword. You can also specify the search keywords in the form of regular expression for more flexibility. I hope this command counts as useful one :)
Read more...
Bookmark this post: |
|
Thursday 30 August 2012
How To Enable SPDY 3 In Firefox 15
Firefox 15 now supports version 3 of SPDY, an open networking protocol designed to reduce latency of web pages but is not turned on by default. This post will provide the instruction to enable SPDY 3.
Type in address bar, about:config and then search for spdy. Now you will see a particular preference name network.http.spdy.enabled.v3 which is by default set to false.
All you have to do is double click on that preference name to change its value to true. This will enable version 3 of SPDY in your firefox 15.
Note that SPDY v3 will bring support for flow control, update the compression dictionary, and remove wasted space from certain frames, along with other minor bug fixes.
Also, note that the version 3 of SPDY is included for the first time in firefox 15 and might not be fully stable.
Read more...
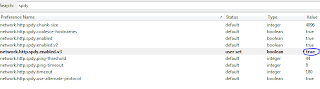
Type in address bar, about:config and then search for spdy. Now you will see a particular preference name network.http.spdy.enabled.v3 which is by default set to false.
All you have to do is double click on that preference name to change its value to true. This will enable version 3 of SPDY in your firefox 15.

Note that SPDY v3 will bring support for flow control, update the compression dictionary, and remove wasted space from certain frames, along with other minor bug fixes.
Also, note that the version 3 of SPDY is included for the first time in firefox 15 and might not be fully stable.
Read more...
Bookmark this post: |
|
How To Automatically Start Firefox In Private Browsing Mode
In this post, I will provide the instructions for few of the methods to automatically start firefox in private browsing mode.
Go to Edit -> Preferences and then select the Privacy tab. From the History dropdown list, choose the Firefox will Use custom settings for history and then check the Always use the private browsing mode option.
The second method involves changing the firefox configuration which can be accessed by typing about:config in the address bar. The first method described above essentially changes one particular preference name browser.privatebrowsing.autostart in background and this second method involves doing that background job manually on our own.
Once you open about:config configuration page, search for private and from the resulting list, modify the boolean value of browser.privatebrowsing.autostart to true by double clicking on it.
I hope this helps. If you got any other method, please drop it as a comment. :)
Read more...
Method 1
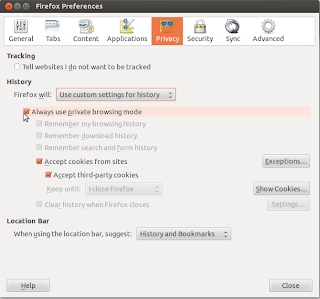
Go to Edit -> Preferences and then select the Privacy tab. From the History dropdown list, choose the Firefox will Use custom settings for history and then check the Always use the private browsing mode option.

Method 2
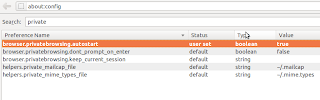
The second method involves changing the firefox configuration which can be accessed by typing about:config in the address bar. The first method described above essentially changes one particular preference name browser.privatebrowsing.autostart in background and this second method involves doing that background job manually on our own.

Once you open about:config configuration page, search for private and from the resulting list, modify the boolean value of browser.privatebrowsing.autostart to true by double clicking on it.
I hope this helps. If you got any other method, please drop it as a comment. :)
Read more...
Bookmark this post: |
|
Monday 27 August 2012
How To Manually Install Flash Player 11 In Linux
This post will provide a step by step instructions for installing flash player 11 plugin in ubuntu 11.04 and other different versions and distros. This will be helpful for everybody who are having trouble with the software center like I had.
Make sure no firefox process is running and then fire up the terminal and type the following commands in order:
Once you have finished copying the shared object and other necessary files in their respective target directories, you can open the firefox and you're good to go. :)
Read more...
Make sure no firefox process is running and then fire up the terminal and type the following commands in order:
mkdir -p ~/flash && cd ~/flash
wget http://archive.canonical.com/pool/partner/a/adobe-flashplugin/adobe-flashplugin_11.2.202.238.orig.tar.gz
tar -zxvf adobe-flashplugin_11.2.202.238.orig.tar.gz
sudo cp -r libflashplayer.so /usr/lib/firefox/plugins
sudo cp -r usr/* /usr
wget http://archive.canonical.com/pool/partner/a/adobe-flashplugin/adobe-flashplugin_11.2.202.238.orig.tar.gz
tar -zxvf adobe-flashplugin_11.2.202.238.orig.tar.gz
sudo cp -r libflashplayer.so /usr/lib/firefox/plugins
sudo cp -r usr/* /usr
Once you have finished copying the shared object and other necessary files in their respective target directories, you can open the firefox and you're good to go. :)
Read more...
Bookmark this post: |
|
Friday 17 August 2012
Bypass Android Pattern Lock In Easy Steps
Android devices has this security feature known as pattern lock which prevents the access of other people in your device. One of the senior members at XDA has revealed a way to bypass this pattern lock feature completely.
There have been several attempts on finding different methods for bypassing pattern unlocking in the android devices. Early methods were tracking the smudges on the screen and guessing since human are more likely to use the patterns they have already seen.
This method, posted in XDA developers forum by m.sabra, requires the USB debugging to be enabled in the android device and then you can use ADB (Android Debug Bridge), a part of Android SDK to easily bypass the pattern unlock with few lines of commands. The user has revealed two methods for bypassing this, the first one involves running few SQLite queries and the second one requires deleting the associated key.
You will need to download the Android SDK in order to continue with this hack.
Method 1:
AND/OR
Method 2:
You can either choose one of the methods or perform both of the methods (method 1 first and method 2 second). Be sure to reboot once you perform any of the above mentioned methods.
Users have said that this method is not working on the latest Android Jelly Bean and other custom ROMs such as Cyanogen Mod. But, earlier android versions are vulnerable to this hack.
Even if the USB debugging is disabled, you can still run these methods if custom recovery was installed in the android device. You will have to mount the working partition. Just go to 'Mounts and Storage' and mount /data. Then you can follow the above methods to bypass the lock.
Read more...
There have been several attempts on finding different methods for bypassing pattern unlocking in the android devices. Early methods were tracking the smudges on the screen and guessing since human are more likely to use the patterns they have already seen.
This method, posted in XDA developers forum by m.sabra, requires the USB debugging to be enabled in the android device and then you can use ADB (Android Debug Bridge), a part of Android SDK to easily bypass the pattern unlock with few lines of commands. The user has revealed two methods for bypassing this, the first one involves running few SQLite queries and the second one requires deleting the associated key.
You will need to download the Android SDK in order to continue with this hack.
Method 1:
adb shell
cd /data/data/com.android.providers.settings/databases
sqlite3 settings.db
update system set value=0 where name='lock_pattern_autolock';
update system set value=0 where name='lockscreen.lockedoutpermanently';
.quit
cd /data/data/com.android.providers.settings/databases
sqlite3 settings.db
update system set value=0 where name='lock_pattern_autolock';
update system set value=0 where name='lockscreen.lockedoutpermanently';
.quit
AND/OR
Method 2:
adb shell rm /data/system/gesture.key
You can either choose one of the methods or perform both of the methods (method 1 first and method 2 second). Be sure to reboot once you perform any of the above mentioned methods.
Users have said that this method is not working on the latest Android Jelly Bean and other custom ROMs such as Cyanogen Mod. But, earlier android versions are vulnerable to this hack.
Even if the USB debugging is disabled, you can still run these methods if custom recovery was installed in the android device. You will have to mount the working partition. Just go to 'Mounts and Storage' and mount /data. Then you can follow the above methods to bypass the lock.
Read more...
Bookmark this post: |
|
Monday 13 August 2012
Download Youtube Videos From Command-Line With Youtube-dl
youtube-dl is a small command-line program to download videos from YouTube.com and few more sites. All it requires is the Python interpreter version 2.5 or higher, and it is not platform specific.
This small tool is simple and offers everything you would love to have, but not the GUI. It supports several websites listed as below:
Supported sites
YouTube.com.
YouTube.com playlists (playlist URLs in "view_play_list" form).
YouTube.com searches
YouTube.com user videos, using user page URLs or the specifc "ytuser" keyword.
metacafe.com.
Google Video.
Google Video searches ("gvsearch" keyword).
Photobucket videos.
Yahoo! video.
Yahoo! video searches ("ybsearch" keyword).
Dailymotion.
DepositFiles.
blip.tv.
vimeo.
myvideo.de.
The Daily Show / Colbert Nation.
The Escapist.
A generic downloader that works in some sites.
You can download the tool from GitHub. For more information about the tool, check the documentation. The standalone executable for windows is also available for download from the same github repository.
Read more...
Bookmark this post: |
|
Saturday 28 July 2012
How To Easily Install EasyInstall In 64 bit Windows
Easy Install(easy_install) is a python module (easy_install) bundled with setuptools that lets you automatically download, build, install, and manage Python packages. Easy Install gives you a quick and painless way to install packages remotely by connecting to the cheeseshop or even other websites via HTTP. It is somewhat analogous to the CPAN and PEAR tools for Perl and PHP, respectively. This How To will guide you in installing the easy_install utility easily in windows.
First download the ez_setup.py file.
Run the above script by typing in command prompt the following:
Once the script finishes, new directory "Scripts" will be created in the python installation directory and it will contain the easy_install.exe file in that directory.
Now all you have to do is add the Scripts path to system's Environment Variables to access this tool easily.
Right click on computer, go to properties, Advanced System Settings, Environment Variables, System Variables and edit the "Path" variable by adding correct path to the Scripts directory.
I hope this helps :)
Read more...
First download the ez_setup.py file.
Run the above script by typing in command prompt the following:
python.exe ez_setup.py
Once the script finishes, new directory "Scripts" will be created in the python installation directory and it will contain the easy_install.exe file in that directory.
Now all you have to do is add the Scripts path to system's Environment Variables to access this tool easily.
Right click on computer, go to properties, Advanced System Settings, Environment Variables, System Variables and edit the "Path" variable by adding correct path to the Scripts directory.
I hope this helps :)
Read more...
Bookmark this post: |
|
Wednesday 18 July 2012
Why Alias Command With Itself
Aliasing the command to itself to suppress the original functionality of the command and provide it new added sets of functionality can come quite handy for linux users and administrators.
If you have been using linux shell for a while, I'm pretty sure you are now familiar with the `ls` command, if not I think you have just learnt to use man pages. Probably you've been using `ls -l` command to list files with the files size as well. Too bad, you won't just be able to instantly make the sense of the file size displayed using this command so why not alias `ls` command to always provide human readable file sizes. So here is my alias:
This is what I always want to see as the output with `ls` command. The same kind of alias can be used with `du` and `df` commands. There are number of other cases where aliasing a command with itself is good choice.
Another example is the less command. By default, you need to press q to exit less which can be quite annoying if the entire content can fit in a single screen. However, adding -F flag will gracefully quit after displaying the content if the content fits in a single screen. So I have my alias for less as below:
If something shoots in your mind, feel free to share here as a comment :)
Read more...
If you have been using linux shell for a while, I'm pretty sure you are now familiar with the `ls` command, if not I think you have just learnt to use man pages. Probably you've been using `ls -l` command to list files with the files size as well. Too bad, you won't just be able to instantly make the sense of the file size displayed using this command so why not alias `ls` command to always provide human readable file sizes. So here is my alias:
alias ls='ls -lh'
This is what I always want to see as the output with `ls` command. The same kind of alias can be used with `du` and `df` commands. There are number of other cases where aliasing a command with itself is good choice.
Another example is the less command. By default, you need to press q to exit less which can be quite annoying if the entire content can fit in a single screen. However, adding -F flag will gracefully quit after displaying the content if the content fits in a single screen. So I have my alias for less as below:
alias lesss='less -F'
If something shoots in your mind, feel free to share here as a comment :)
Read more...
Bookmark this post: |
|
Friday 13 July 2012
Stack-based Directory Switching For Easy Reversal
So how many times have you used the `cd` command repeatedly to go back and forth of two or more directories. Probably you are already familiar to the `cd -` command which lets you switch between the current and the previous directory. But, many times this current and previous directory switching restriction will not suffice and hence a better option in such case is to use the `pushd` command instead of `cd`.
For example, just use the `pushd somedirA`, `pushd somedirB`, ... and like that. Now if you need to switch back, you can just use `popd` command and you'll be switching back easily. The `pushd` command saves the current directory path and then cds to the supplied path.
If you dig more, you'll come to know about the -n and -N switches you can combine with these commands so I will let you explore on this. Also, you can use the `dirs` command to view the stack of directories. If you are some computer student or enthusiast, you have already gotten an idea from a famous data structure called stack. Anyway, I hope this comes handy sometimes like it does to me :)
Read more...
Bookmark this post: |
|
Subscribe to:
Posts (Atom)