Showing posts with label ubuntu. Show all posts
Showing posts with label ubuntu. Show all posts
Wednesday 30 January 2013
Search Text Over Multiple PDF Files In Linux
You can use the old grep command or the small script using the pdftotext command to search text over multiple pdf files but we are talking about a simple utility that lets us to search text in PDF files.
The pdfgrep tool lets you perform grep style search over multiple pdf files easily from the terminal. It depends upon the poppler package and under ubuntu, you can just type the command below to install pdfgrep.
Once pdfgrep is installed, you can perform any kind of search like you would do while using the grep command. Enjoy grepping the PDF files :)
Read more...
The pdfgrep tool lets you perform grep style search over multiple pdf files easily from the terminal. It depends upon the poppler package and under ubuntu, you can just type the command below to install pdfgrep.
samar@\Techgaun:~$ sudo apt-get install pdfgrep
Once pdfgrep is installed, you can perform any kind of search like you would do while using the grep command. Enjoy grepping the PDF files :)
Read more...
Bookmark this post: | 
|
Tuesday 29 January 2013
Swasthani.com Swasthani Ripper
Yesterday I came to know that I can listen Swasthani online at this site, www.swasthani.com and I decided to write a swasthani audio downloader. Since it would be useful for everyone, here is the script.
From the site itself, Sri Swasthani Brata Katha is a very popular ritual observed in Nepal in the Poush month (January – February) during winter. Goddess Sri Swasthani, known to grant wishes of her devotees, is worshipped for the whole month of Poush. The Swasthani Brat Katha (story) is recited everyday. The month long telling of the tales are dedicated to the Goddess and the stories that are mainly narrated are those of Swasthani Devi, Lord Shiva and other Gods.
Save the above file as swasthani, then chmod for executable permission and run it. If you have problem copying above code, you can check the Swasthani Downloader at GitHub. Enjoy listening Swasthani, geeks :)
Read more...
From the site itself, Sri Swasthani Brata Katha is a very popular ritual observed in Nepal in the Poush month (January – February) during winter. Goddess Sri Swasthani, known to grant wishes of her devotees, is worshipped for the whole month of Poush. The Swasthani Brat Katha (story) is recited everyday. The month long telling of the tales are dedicated to the Goddess and the stories that are mainly narrated are those of Swasthani Devi, Lord Shiva and other Gods.
#!/bin/bash
###############################################
# Swasthani.com Swasthani Ripper       #
# Samar @ http://www.techgaun.com       #
###############################################
if [[ ! -f /tmp/swasthani.txt ]]
then
 wget http://www.swasthani.com/ -O - | egrep '<li class="leaf( first| last)?"><a href="/swasthani/' | grep -o '<a .*href=.*>' | sed -e 's/<a /\n<a /g' | sed -e 's/<a .*href=['"'"'"]//' -e 's/["'"'"'].*$//' -e '/^$/ d' > /tmp/swasthani.txt
fi

while read -r line
do
 wget "http://www.swasthani.com$line" -O - | egrep 'data="soundFile=http://www.swasthani.com/system/files/' | cut -d\" -f6 | cut -d= -f2 | wget -nc -i -
done </tmp/swasthani.txt
Save the above file as swasthani, then chmod for executable permission and run it. If you have problem copying above code, you can check the Swasthani Downloader at GitHub. Enjoy listening Swasthani, geeks :)
Read more...
Bookmark this post: |
|
How To Check Which Groups You Belong To
In this post, you will get to know about a simple command that lets you know what groups the particular user belongs to. Users and groups are the one of the several concepts employed in the Linux systems for access control.
From the man page, the groups command does is:
Print group memberships for each USERNAME or, if no USERNAME is specified, for the current process (which may differ if the groups database has changed).
So if you are interested in finding what group a particular user is in, run the command as below. Replace samar with your USERNAME and you are good to go:
I hope this proves useful :)
Read more...
From the man page, the groups command does is:
Print group memberships for each USERNAME or, if no USERNAME is specified, for the current process (which may differ if the groups database has changed).
So if you are interested in finding what group a particular user is in, run the command as below. Replace samar with your USERNAME and you are good to go:
samar@Techgaun:~$ groups samar
samar : samar adm cdrom sudo vboxusers ....
samar : samar adm cdrom sudo vboxusers ....
I hope this proves useful :)
Read more...
Bookmark this post: |
|
Thursday 10 January 2013
Create Backup Of List Of Apps Installed In Ubuntu
When my laptop's HDD was near to death, I had created backup of the list of all applications and packages I'd installed in my Ubuntu so that I would be able to install them easily in my new system in new HDD. I had forgotten about it but today suddenly remembered and am sharing this simple technique.
Fire up the terminal and type the following:
Now the list of packages will be saved in the installed_apps file and you can use it for future reference. I hope this is useful ;)
Read more...
samar@Techgaun:~$ sudo dpkg --get-selections > installed_apps
Now the list of packages will be saved in the installed_apps file and you can use it for future reference. I hope this is useful ;)
Read more...
Bookmark this post: |
|
Tuesday 27 November 2012
Basic Guide To Crontab
Well it has been a busy week and now I am back with this basic guide to running cron jobs in linux.
Cron is a time-based job scheduling program which comes shipped with most linux distributions and enables users to execute commands or set of scripts automatically at the specified time. Cron is particularly important for system administration and maintenance though it can be used for any general purpose such as scheduling your porn downloads. My post is based on the Vixie Cron, a popular implementation of Cron by Paul Vixie which is by default the cron program in Ubuntu. Other implementations of the cron are anacron, fcron, and dcron.
The cron daemon runs automatically during the startup and consults the crontabs (shorthand for cron tables) for jobs to executed. Crontabs are nothing but files containing the commands to be run at the specified time, however there is a particular (& simple to remember) syntax for cronjobs to be run. You could directly edit these cron tables files but that's not the recommended way. You should always use the crontab editor to add/update jobs to the crontabs.
Cron searches its spool area (located at /var/spool/cron/crontabs) for crontab files which are named after the user accounts from /etc/passwd. As a matter of precaution, you should not directly manipulate the files in there. Additionally, cron reads the /etc/crontab file and all the files in /etc/cron.d. Also, there are other folders: /etc/cron.daily, /etc/cron.hourly, /etc/cron.monthly, and /etc/cron.weekly. And, the name of folders are obvious so if you put the scripts in one of these folders, your script will run either daily or hourly or monthly or weekly.
Since you got several files associated with cron, you have bunch of options on running the cron jobs in your system. First lets start with the crontab tool which is used to install, deinstall or list the tables used to drive the cron daemon. If the /etc/cron.allow file exists, then you must be listed (one user per line) therein in order to be allowed to use this command. If the /etc/cron.allow file does not exist but the /etc/cron.deny file does exist, then you must not be listed in the /etc/cron.deny file in order to use this command.
The crontab command provides following options:
crontab can be configured to use any of the editors.
To list the user's crontab, use the following command:
To delete existing cron table, type:
To install new cron table, type:
If you are wishing to add commands that require root privilege for execution, make sure you prepend sudo in the above command to add such commands to crontabs. The cron table expects each line of cron job in the following format:
These columns take the values in the range below:
Apart from these values, the cron entries accept other special characters. In each of these five columns:
Now we know the format of how should each line of cron entry should look like, lets see some examples.
The information below is taken directly from man 5 crontab and can serve as a good reference for special strings in place of the 5 columns:
Now that you are feeling better with cronjobs, we will see how we can add cronjobs in the /etc/crontab file. The different thing about this crontab file is that there is an extra column for user field so that the particular cron entry is executed as the specified user.
The format for cron entry is similar to what we've seen already, with an extra column for user.
You can use any text editor such as nano or vi to edit the /etc/crontab file.
Finally, once you update crons, make sure to restart the cron daemon to ensure your new cron entries get read by the daemon.
I hope this primer for crontab helps you in your job scheduling job :D
Read more...
Cron is a time-based job scheduling program which comes shipped with most linux distributions and enables users to execute commands or set of scripts automatically at the specified time. Cron is particularly important for system administration and maintenance though it can be used for any general purpose such as scheduling your porn downloads. My post is based on the Vixie Cron, a popular implementation of Cron by Paul Vixie which is by default the cron program in Ubuntu. Other implementations of the cron are anacron, fcron, and dcron.
The cron daemon runs automatically during the startup and consults the crontabs (shorthand for cron tables) for jobs to executed. Crontabs are nothing but files containing the commands to be run at the specified time, however there is a particular (& simple to remember) syntax for cronjobs to be run. You could directly edit these cron tables files but that's not the recommended way. You should always use the crontab editor to add/update jobs to the crontabs.
Cron searches its spool area (located at /var/spool/cron/crontabs) for crontab files which are named after the user accounts from /etc/passwd. As a matter of precaution, you should not directly manipulate the files in there. Additionally, cron reads the /etc/crontab file and all the files in /etc/cron.d. Also, there are other folders: /etc/cron.daily, /etc/cron.hourly, /etc/cron.monthly, and /etc/cron.weekly. And, the name of folders are obvious so if you put the scripts in one of these folders, your script will run either daily or hourly or monthly or weekly.
Since you got several files associated with cron, you have bunch of options on running the cron jobs in your system. First lets start with the crontab tool which is used to install, deinstall or list the tables used to drive the cron daemon. If the /etc/cron.allow file exists, then you must be listed (one user per line) therein in order to be allowed to use this command. If the /etc/cron.allow file does not exist but the /etc/cron.deny file does exist, then you must not be listed in the /etc/cron.deny file in order to use this command.
The crontab command provides following options:
        -e edit user's crontab
 -l list user's crontab
 -r delete user's crontab
 -i prompt before deleting user's crontab
crontab can be configured to use any of the editors.
To list the user's crontab, use the following command:
$ crontab -l
To delete existing cron table, type:
$ crontab -ir
To install new cron table, type:
$ crontab -e
If you are wishing to add commands that require root privilege for execution, make sure you prepend sudo in the above command to add such commands to crontabs. The cron table expects each line of cron job in the following format:
m h dom mon dow command
i.e.
minute hour day_of_month month day_of_week command_to_run
i.e.
minute hour day_of_month month day_of_week command_to_run
These columns take the values in the range below:
  Minute (0 - 59)
  Hour (0 - 23)
  Day of month (1 - 31)
  Month (1 - 12)
  Day of the week (0 - 6, 0 representing sunday, 6 saturday)
Apart from these values, the cron entries accept other special characters. In each of these five columns:
- An asterisk (*) stands for "every".
- Slashes (/) are used to describe increments of ranges eg. */15 in minutes column would execute the specified command regularly and repeatedly after 15 minute.
- Commas (,) are used to separate items of a list. eg. using 1,2,3 in the 5th field (day of week) would mean Mondays, Tuesday, and Wednesday.
- Hyphens (-) are used to define ranges. For example, 2-5 in the 5th field would indicate Tuesday to Friday.
Now we know the format of how should each line of cron entry should look like, lets see some examples.
Run backup at 5 a.m every Monday
0 5 * * 1 /bin/mybackup
Run backup at 12:01 a.m monday-thursday
1 0 * * 1-4 /bin/mybackup
Run backup at 12:01 a.m on monday and thursday
1 0 * * 1,4 /bin/mybackup
Run backup every minute
* * * * * /bin/mybackup
Run backup every 15 minutes repeatedly
*/15 * * * * /bin/mybackup
The information below is taken directly from man 5 crontab and can serve as a good reference for special strings in place of the 5 columns:
              @reboot        Run once, at startup.
              @yearly        Run once a year, "0 0 1 1 *".
              @annually      (same as @yearly)
              @monthly       Run once a month, "0 0 1 * *".
              @weekly        Run once a week, "0 0 * * 0".
              @daily         Run once a day, "0 0 * * *".
              @midnight      (same as @daily)
              @hourly        Run once an hour, "0 * * * *".
Now that you are feeling better with cronjobs, we will see how we can add cronjobs in the /etc/crontab file. The different thing about this crontab file is that there is an extra column for user field so that the particular cron entry is executed as the specified user.
The format for cron entry is similar to what we've seen already, with an extra column for user.
m h dom mon dow user command
You can use any text editor such as nano or vi to edit the /etc/crontab file.
Finally, once you update crons, make sure to restart the cron daemon to ensure your new cron entries get read by the daemon.
$ sudo service cron restart
I hope this primer for crontab helps you in your job scheduling job :D
Read more...
Bookmark this post: |
|
Friday 23 November 2012
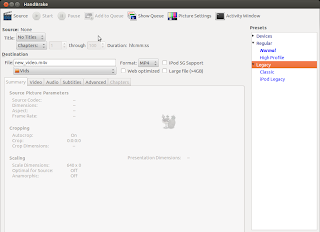
Video Transcoding With HandBrake In Linux
HandBrake is a GPL-licensed, multiplatform, multithreaded video transcoder available for major platforms: linux, mac, and windows. HandBrake converts video from nearly any format to a handful of modern ones.

Handbrake can save output in two containers, MP4 and MKV and I've been using it as a MKV transcoder for a while and I'm quite satisfied with it. Even though the official wiki says its not a ripper, I can see it to be quite useful DVD ripper.
Handbrake is available in CLI (HandBrakeCLI) and GUI (ghb) mode. Hence this offers the flexibility to choose the appropriate version according to your linux personality. As of now, we can install HandBrake from PPA and the latest version is v. 0.9.8 released back in July this year.
HandBrake can be installed from PPA. Issue the following commands in your terminal
Or if you wish to install the GUI version, type:
I recommend using the CLI version since you can transcode/convert videos much more efficiently if you use the CLI version. But if you are not comfortable with the command line interfaces, the GUI version of HandBrake is also quite good.
Only problem I have felt is the naming convention of the commands for both the GUI and CLI versions of the tool. In order to run two versions of this tool, you need to type HandBrakeCLI for CLI version and ghb for the GUI version. The problem here is with the naming convention for the binaries. I mean, the names handbrake-cli and handbrake-gtk would be more straightforward than these badly chosen names. Otherwise, the tool does pretty good job of video conversion and can be good alternative if you are not comfortable with ffmpeg. Note that ffmpeg is also capable of video conversions of different formats and is a great tool. :)
Read more...
Handbrake can save output in two containers, MP4 and MKV and I've been using it as a MKV transcoder for a while and I'm quite satisfied with it. Even though the official wiki says its not a ripper, I can see it to be quite useful DVD ripper.
Handbrake is available in CLI (HandBrakeCLI) and GUI (ghb) mode. Hence this offers the flexibility to choose the appropriate version according to your linux personality. As of now, we can install HandBrake from PPA and the latest version is v. 0.9.8 released back in July this year.
HandBrake can be installed from PPA. Issue the following commands in your terminal
$ sudo add-apt-repository ppa:stebbins/handbrake-releases
$ sudo apt-get update
$ sudo apt-get install handbrake-cli
$ sudo apt-get update
$ sudo apt-get install handbrake-cli
Or if you wish to install the GUI version, type:
$ sudo apt-get install handbrake-gtk
I recommend using the CLI version since you can transcode/convert videos much more efficiently if you use the CLI version. But if you are not comfortable with the command line interfaces, the GUI version of HandBrake is also quite good.

Only problem I have felt is the naming convention of the commands for both the GUI and CLI versions of the tool. In order to run two versions of this tool, you need to type HandBrakeCLI for CLI version and ghb for the GUI version. The problem here is with the naming convention for the binaries. I mean, the names handbrake-cli and handbrake-gtk would be more straightforward than these badly chosen names. Otherwise, the tool does pretty good job of video conversion and can be good alternative if you are not comfortable with ffmpeg. Note that ffmpeg is also capable of video conversions of different formats and is a great tool. :)
Read more...
Bookmark this post: |
|
Saturday 3 November 2012
Make Your Linux Read Papers For You
Fed up of reading text files and PDF papers? Is you eye power degrading day by day and can't hold even few minutes on screen? Don't worry, you can easily make your linux system speak and read all those papers for you.
There are several text to speech tools available for linux but in this post, I will be using festival, a Text-to-speech (TTS) tool written in C++. Also, Ubuntu and its derivation are most likely to include by default espeak, a multi-lingual software speech synthesizer.
For ubuntu and debian based system, type the following to install festival:
Moreover, you can also install a pidgin plugin that uses festival:
For now, you just need to install festival. Once you have installed festival, you can make it read text files for you. If you go through the online manual of festival, it says:
"Festival works in two fundamental modes, command mode and text-to-speech mode (tts-mode). In command mode, information (in files or through standard input) is treated as commands and is interpreted by a Scheme interpreter. In tts-mode, information (in files or through standard input) is treated as text to be rendered as speech. The default mode is command mode, though this may change in later versions."
To read a text file, you can use the command below:
The festival will start in text-to-speech (tts) mode and will read your text files for you. But now, we want to read PDF files and if you try to read PDF files directly (festival --tts paper.pdf), festival is most likely to speak the cryptic terms since it actually reads the content of PDF including its header (You know PDF is different than simple text file). So we will use a pdftotext command to convert our pdf file and then pipe the output to the festival so that festival reads the PDF files for us. You can use the syntax as below to read PDF files.
If you want to skip all those table of contents and prefaces or if you are in the middle of PDF, you can use the switches of pdftotext to change the starting and ending pages. For example, if I wish to read page 10 - 14 of a PDF, I would do:
Enjoy learning. I hope this post helps you ;)
Read more...
There are several text to speech tools available for linux but in this post, I will be using festival, a Text-to-speech (TTS) tool written in C++. Also, Ubuntu and its derivation are most likely to include by default espeak, a multi-lingual software speech synthesizer.
For ubuntu and debian based system, type the following to install festival:
samar@samar-Techgaun:~$ sudo apt-get install festival
Moreover, you can also install a pidgin plugin that uses festival:
samar@samar-Techgaun:~$ sudo apt-get install pidgin-festival
For now, you just need to install festival. Once you have installed festival, you can make it read text files for you. If you go through the online manual of festival, it says:
"Festival works in two fundamental modes, command mode and text-to-speech mode (tts-mode). In command mode, information (in files or through standard input) is treated as commands and is interpreted by a Scheme interpreter. In tts-mode, information (in files or through standard input) is treated as text to be rendered as speech. The default mode is command mode, though this may change in later versions."
To read a text file, you can use the command below:
samar@samar-Techgaun:~$ festival --tts mypaper.txt
The festival will start in text-to-speech (tts) mode and will read your text files for you. But now, we want to read PDF files and if you try to read PDF files directly (festival --tts paper.pdf), festival is most likely to speak the cryptic terms since it actually reads the content of PDF including its header (You know PDF is different than simple text file). So we will use a pdftotext command to convert our pdf file and then pipe the output to the festival so that festival reads the PDF files for us. You can use the syntax as below to read PDF files.
samar@samar-Techgaun:~$ pdftotext paper.pdf - | festival --tts
If you want to skip all those table of contents and prefaces or if you are in the middle of PDF, you can use the switches of pdftotext to change the starting and ending pages. For example, if I wish to read page 10 - 14 of a PDF, I would do:
samar@samar-Techgaun:~$ pdftotext -f 10 -l 14 paper.pdf - | festival --tts
Enjoy learning. I hope this post helps you ;)
Read more...
Bookmark this post: |
|
Saturday 27 October 2012
Accelerate Your Softwares Update Speed Using Apt-fast
Long ago, I had posted about apt-fast script which used axel to create multiple HTTP connections and increase the download speed of software updates and packages. In this post, you will get the details for installing apt-fast from PPA.
apt-fast is a shellscript wrapper for apt-get and aptitude that can drastically improve apt download times by downloading packages in parallel, with multiple connections per package.
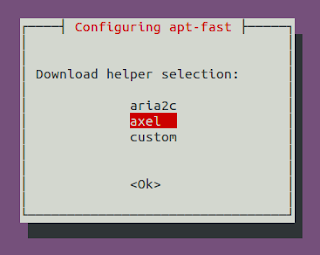
As a pre-requisite, we will first install axel, a simple yet very useful command line download accelerator. Alternatively, you can also use aria accelerator with apt-fast.
Then you will have to add a PPA for apt-fast, update the database, and install apt-fast.
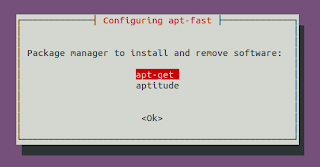
You need to configure few options afterwards as below:
For manual installation and grabbing the source code, check the GitHub.
Once you install apt-fast, you can install softwares and perform updates from the repos using the command below:
I hope this becomes useful :)
Read more...
As a pre-requisite, we will first install axel, a simple yet very useful command line download accelerator. Alternatively, you can also use aria accelerator with apt-fast.
samar@samar-Techgaun:~$ sudo apt-get install axel
Then you will have to add a PPA for apt-fast, update the database, and install apt-fast.
samar@samar-Techgaun:~$ sudo add-apt-repository ppa:apt-fast/stable
samar@samar-Techgaun:~$ sudo apt-get update
samar@samar-Techgaun:~$ sudo apt-get install apt-fast
You need to configure few options afterwards as below:


For manual installation and grabbing the source code, check the GitHub.
Once you install apt-fast, you can install softwares and perform updates from the repos using the command below:
samar@samar-Techgaun:~$ sudo apt-fast install package_name
I hope this becomes useful :)
Read more...
Bookmark this post: |
|
Subscribe to:
Posts (Atom)