Showing posts with label web. Show all posts
Showing posts with label web. Show all posts
Sunday 11 November 2012
Wappalyzer - Browser Extension To Identify Web Servers
Wappalyzer is a very useful browser extension that reveals the web technologies and server softwares used behind to empower any webpage. This extension identifies different CMS, e-commerce portals, blogging platforms, web servers, frameworks, analytic tools, etc.
This very useful browser extension is available for Mozilla Firefox and Google Chrome. It is quite useful in server fingerprinting and identification steps. Wappalyzer tracks and detects several hundred applications under several categories.
Wappalyzer for Mozilla Firefox
Wappalyzer for Google Chrome
Wappalyzer @ GitHub
Once you install the addon and reload the browser, you will see the icons for identified applications on the right side of address bar (near to the bookmark & reload icon) in Mozilla Firefox. You can click in that area for more details.
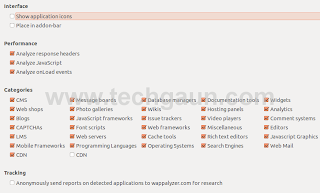
One particular setting you would like to disable is the tracking and gathering of anonymous data which is *said* to be used for research purposes. You can turn off the tracking by going to the addon's preference page. Screenshot below shows the preference page in Mozilla Firefox.
Read more...
This very useful browser extension is available for Mozilla Firefox and Google Chrome. It is quite useful in server fingerprinting and identification steps. Wappalyzer tracks and detects several hundred applications under several categories.
Wappalyzer for Mozilla Firefox
Wappalyzer for Google Chrome
Wappalyzer @ GitHub
Once you install the addon and reload the browser, you will see the icons for identified applications on the right side of address bar (near to the bookmark & reload icon) in Mozilla Firefox. You can click in that area for more details.
One particular setting you would like to disable is the tracking and gathering of anonymous data which is *said* to be used for research purposes. You can turn off the tracking by going to the addon's preference page. Screenshot below shows the preference page in Mozilla Firefox.

Read more...
Bookmark this post: | 
|
Thursday 30 August 2012
How To Automatically Start Firefox In Private Browsing Mode
In this post, I will provide the instructions for few of the methods to automatically start firefox in private browsing mode.
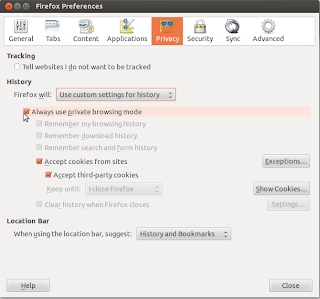
Go to Edit -> Preferences and then select the Privacy tab. From the History dropdown list, choose the Firefox will Use custom settings for history and then check the Always use the private browsing mode option.
The second method involves changing the firefox configuration which can be accessed by typing about:config in the address bar. The first method described above essentially changes one particular preference name browser.privatebrowsing.autostart in background and this second method involves doing that background job manually on our own.
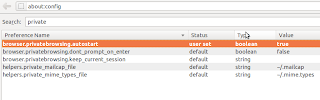
Once you open about:config configuration page, search for private and from the resulting list, modify the boolean value of browser.privatebrowsing.autostart to true by double clicking on it.
I hope this helps. If you got any other method, please drop it as a comment. :)
Read more...
Method 1
Go to Edit -> Preferences and then select the Privacy tab. From the History dropdown list, choose the Firefox will Use custom settings for history and then check the Always use the private browsing mode option.

Method 2
The second method involves changing the firefox configuration which can be accessed by typing about:config in the address bar. The first method described above essentially changes one particular preference name browser.privatebrowsing.autostart in background and this second method involves doing that background job manually on our own.

Once you open about:config configuration page, search for private and from the resulting list, modify the boolean value of browser.privatebrowsing.autostart to true by double clicking on it.
I hope this helps. If you got any other method, please drop it as a comment. :)
Read more...
Bookmark this post: |
|
Monday 27 August 2012
How To Manually Install Flash Player 11 In Linux
This post will provide a step by step instructions for installing flash player 11 plugin in ubuntu 11.04 and other different versions and distros. This will be helpful for everybody who are having trouble with the software center like I had.
Make sure no firefox process is running and then fire up the terminal and type the following commands in order:
Once you have finished copying the shared object and other necessary files in their respective target directories, you can open the firefox and you're good to go. :)
Read more...
Make sure no firefox process is running and then fire up the terminal and type the following commands in order:
mkdir -p ~/flash && cd ~/flash
wget http://archive.canonical.com/pool/partner/a/adobe-flashplugin/adobe-flashplugin_11.2.202.238.orig.tar.gz
tar -zxvf adobe-flashplugin_11.2.202.238.orig.tar.gz
sudo cp -r libflashplayer.so /usr/lib/firefox/plugins
sudo cp -r usr/* /usr
wget http://archive.canonical.com/pool/partner/a/adobe-flashplugin/adobe-flashplugin_11.2.202.238.orig.tar.gz
tar -zxvf adobe-flashplugin_11.2.202.238.orig.tar.gz
sudo cp -r libflashplayer.so /usr/lib/firefox/plugins
sudo cp -r usr/* /usr
Once you have finished copying the shared object and other necessary files in their respective target directories, you can open the firefox and you're good to go. :)
Read more...
Bookmark this post: |
|
Saturday 16 June 2012
IP Address Based Restriction Using Htaccess File
Sometimes you need to restrict access to files in your webserver to certain IP address or IP range only. In such case, you can apply a simple .htaccess rule and this post provides an information on how to make IP based restriction Using .htaccess.
First, be sure to enable use of htaccess in apache in your distro.
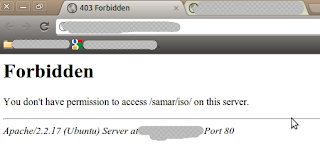
An example of .htaccess file that will block requests from all IP addresses but the subnet of 192.168.0.0/16 is as below:
Similarly, an example of .htaccess file that will allow requests from all IP addresses but the subnet of 192.168.0.0/16 is as below:
You can also specify the individual IP addresses instead of the entire subnet according to your need. Also, note that there should be no space after the comma between allow,deny.
Once you create the .htaccess file, make sure you've provided proper permission to it.
Once you have made the .htaccess file and provided the proper permission, you might need to restart the apache server(but per directory .htaccess does not require reloading the apache in most cases) so that new configurations will show an effect.
I hope this comes handy :)
Read more...
First, be sure to enable use of htaccess in apache in your distro.

An example of .htaccess file that will block requests from all IP addresses but the subnet of 192.168.0.0/16 is as below:
<limit GET>
order deny,allow
deny from all
allow from 192.168
</limit>
order deny,allow
deny from all
allow from 192.168
</limit>
Similarly, an example of .htaccess file that will allow requests from all IP addresses but the subnet of 192.168.0.0/16 is as below:
<limit GET>
order allow,deny
allow from all
deny from 192.168
</limit>
order allow,deny
allow from all
deny from 192.168
</limit>
You can also specify the individual IP addresses instead of the entire subnet according to your need. Also, note that there should be no space after the comma between allow,deny.
Once you create the .htaccess file, make sure you've provided proper permission to it.
samar@Techgaun:/var/www/samar$ chmod 0644 .htaccess
Once you have made the .htaccess file and provided the proper permission, you might need to restart the apache server(but per directory .htaccess does not require reloading the apache in most cases) so that new configurations will show an effect.
samar@Techgaun:/var/www/samar$ sudo service apache2 reload
I hope this comes handy :)
Read more...
Bookmark this post: |
|
Sunday 3 June 2012
Check Your Plugins To Keep Firefox Updated and Safe
Mozilla foundation is now providing an online tool to check if the plugins you've installed are up to date or not using simple interface. The objective of this service is to keep your third-party plugins up to date which helps Firefox run safely and smoothly.
The service lets you check all the plugins and update the outdated ones from a simple UI in two major steps:
Step 1: Click Update to update a plugin.
Step 2: Complete all recommended updates before restarting your browser.
Head on to Firefox Browser Plugin Check & Updates.
Stay safe :)
Read more...
The service lets you check all the plugins and update the outdated ones from a simple UI in two major steps:
Step 1: Click Update to update a plugin.
Step 2: Complete all recommended updates before restarting your browser.
Head on to Firefox Browser Plugin Check & Updates.
Stay safe :)
Read more...
Bookmark this post: |
|
Monday 9 April 2012
Email Obfuscation Tricks In The Age Of Spammers
Every day thousands of spam emails are propelled to our e-mail addresses and the algorithms used by the spam bots are increasingly getting sophisticated and are able to harvest few kinds of obfuscated e-mail addresses already. While this race between spammers and web users goes on, we can still use several of the obfuscation tricks either to prevent bots from harvesting the emails or to fool bots to pick completely wrong e-mail adresses. Here, I am going to illustrate some useful obfuscation tricks I've come across over.
A very basic way of obfuscating emails is by replacing the characters such as @ and . with at and dot. Following are few samples:
And, below are some examples that would be nearly impossible to harvest :P. Just be more creative with them and no automated spam bot/email harvester out there will be able to get you :D. However, this might possibly create some kind of DoS like scenario for many legitimate users.
The unicode version:
samar@techgaun.com
will properly show as:
samar@techgaun.com
you can specify the following CSS property to use this obfuscation trick.
Edit: I found this link with some good examples so I thought I would rather refer you all to this webpage.
Read more...
The Very Basics
A very basic way of obfuscating emails is by replacing the characters such as @ and . with at and dot. Following are few samples:
samar[at]techgaun[dot]com
samar (at) techgaun (dot) com
samar (at) techgaun (dot) com
And, below are some examples that would be nearly impossible to harvest :P. Just be more creative with them and no automated spam bot/email harvester out there will be able to get you :D. However, this might possibly create some kind of DoS like scenario for many legitimate users.
<myfirstname> (at) techgaun (dot) com
<myfirstname> (at) <lastname> (dot) com
<myfirstname> (at) <lastname> (dot) com
Using Image
Another method is to create a small and appropriate image that will display your e-mail address. Should be more than enough, so just create a PNG/GIF of your e-mail address.Text Encodings
You could perform text encodings and javascript obfuscations, etc. An example of this is using ascii to unicode conversion and applying other level of obfuscations again to it.The unicode version:
samar@techgaun.com
will properly show as:
samar@techgaun.com
Obfuscations using CSS
Reverse Text Direction
CSS allows you to display the text in the reverse direction. For a HTML entity,<div class="email"> moc.nuaghcet@ramas</div>
you can specify the following CSS property to use this obfuscation trick.
.email
{
     unicode-bidi: bidi-override;
     direction: rtl;
     float: left;
}
Hidden Text Within E-mail address
Another method is to put some hidden html entity between the parts of e-mail address and then set its display style as none. The spam bots while trying to extract the data from such e-mail information are subjected to get wrong information. An example is:samar@tech<span class='display: none;'>nique</span>gaun.com
Edit: I found this link with some good examples so I thought I would rather refer you all to this webpage.
Read more...
Bookmark this post: |
|
Thursday 29 March 2012
Extracting All Hyperlinks From Webpages - Python
In this example, I am going to show how easily you can extract all the links in a webpage using python. If you are learning to write some small scale crawler, this can be a quick startup on how you can extract the links in any webpage.
Basically, we will send the http request to any webpage and we will read the HTML response except in the case when the connection can not be established. In such case, we will simply inform the user that we could not connect to the website.
For all these stuffs, we will import few modules and most important ones are re and urllib2 for regular expression stuff and HTTP request/response stuffs respectively.
We then write the regex for the hyperlinks for which we will make a search in the HTML data we get back after sending the request from the server. Note the <a href=[\'"]?([^\'" >]+). The small brackets are there to let us capture our necessary information i.e. the actual links.
Now you understood what we'll be doing, below is the python script to extract the hyperlinks from any webpage.
Now run the script as python extracter.py http://www.techgaun.com or any URL you wish to.
So isn't it a good start for writing your own simple web crawler? :P
Read more...
Basically, we will send the http request to any webpage and we will read the HTML response except in the case when the connection can not be established. In such case, we will simply inform the user that we could not connect to the website.
For all these stuffs, we will import few modules and most important ones are re and urllib2 for regular expression stuff and HTTP request/response stuffs respectively.
We then write the regex for the hyperlinks for which we will make a search in the HTML data we get back after sending the request from the server. Note the <a href=[\'"]?([^\'" >]+). The small brackets are there to let us capture our necessary information i.e. the actual links.
Now you understood what we'll be doing, below is the python script to extract the hyperlinks from any webpage.
#!/usr/bin/python

import re, urllib2
from sys import argv

if (len(argv) != 2):
    print "No URL specified. Taking default URL for link extraction"
    url = "http://www.techgaun.com"
else:
    url = str(argv[1])

links_regex = re.compile('<a href=[\'"]?([^\'" >]+)', re.IGNORECASE)
url_request = urllib2.Request(url)
try:
    response = urllib2.urlopen(url_request)
    html = response.read()
    links = links_regex.findall(html)
    print '\n'.join(links)
except urllib2.URLError:
    print "Can't Connect to the website"
Now run the script as python extracter.py http://www.techgaun.com or any URL you wish to.
So isn't it a good start for writing your own simple web crawler? :P
Read more...
Bookmark this post: |
|
Tuesday 28 February 2012
Reloading The Page Using Javascript
If you wish to put a nice little Reload this page link in your page, the javascript provides a reload() method that you can use for reloading the page.
The reload() method in window.location can be used to reload the page and works well in most of the browsers. An example snippet is shown below:
I hope this comes useful sometimes.
Read more...
The reload() method in window.location can be used to reload the page and works well in most of the browsers. An example snippet is shown below:
<!DOCTYPE html PUBLIC "-//W3C//DTD XHTML 1.0 Strict//EN"
 "http://www.w3.org/TR/xhtml1/DTD/xhtml1-strict.dtd">
<html xmlns="http://www.w3.org/1999/xhtml" xml:lang="en" lang="en">

<head>
 <title>Reload example</title>
 <meta http-equiv="content-type" content="text/html;charset=utf-8" />
 <meta name="generator" content="Geany 0.20" />
</head>

<body>
 <iframe height="300" width="300" src="http://wwwindow.location.reload(true)w.google.com"></iframe>
 <a href="javascript:window.location.reload(true);">Reload this page</a>.
</body>

</html>
I hope this comes useful sometimes.
Read more...
Bookmark this post: |
|
Subscribe to:
Posts (Atom)