Showing posts with label windows. Show all posts
Showing posts with label windows. Show all posts
Wednesday 29 June 2011
Search, Stream, and/or Download Audios/Videos From Youtube and Other Sites With GMediaFinder
GMediaFinder is a new GTK based desktop application that allows you to search, stream and download audios and videos from different sites. Both the windows and linux version of the tool are available and it can be great alternative to Minitube for linux.
It support fullscreen mode (double click on the video or F2/esc), visualisations and use the gstreamer engine to play sounds and videos. This tool also allows searching and streaming of audio and video from several other websites such as azmp3s.com, Tagoo, etc.
It is available for ubuntu through PPA so to install the tool, type the following commands in your terminal.
I hope this info is useful. :)
Read more...
It support fullscreen mode (double click on the video or F2/esc), visualisations and use the gstreamer engine to play sounds and videos. This tool also allows searching and streaming of audio and video from several other websites such as azmp3s.com, Tagoo, etc.
It is available for ubuntu through PPA so to install the tool, type the following commands in your terminal.
sudo apt-add-repository ppa:s-lagui/ppa
sudo apt-get update
sudo apt-get install gmediafinder
sudo apt-get update
sudo apt-get install gmediafinder
I hope this info is useful. :)
Read more...
Bookmark this post: | 
|
Friday 13 May 2011
Physical Memory Acquisition With MDD
MDD is a physical memory acquisition tool for imaging Windows based computers created by the innovative minds at ManTech International Corporation. MDD is capable of acquiring memory images from Win2000, XP, Vista and Windows Server.
This tool can be pretty useful to analyze the data present in RAM. Whenever we are running programs, RAM stores various range of information being used by the program. For example, if we are running a web browser, the RAM may contain the URLs being visited, form data, etc. So you can just guess we can extract a lot of information from RAM. Thus, MDD can be very useful tool to dump the physical memory into the file from which we can extract the required information.
You can read more and download the tool from MDD SourceForge Page.
Read more...
Bookmark this post: |
|
Saturday 16 April 2011
How to find MAC address of PC/device In Your Network
The MAC address of other PCs in LAN can be quite useful for some network protection bypassing such as internet access, etc. Today, I will show you how you can find the MAC address of any PC in your network.
Method 1: This method works in both windows and Linux. So open your terminal(in linux) or command prompt(in windows) and type:
Here, in place of <hostname>, type either computer's name or IP address whose MAC address you want to know.
Now, type the following command:
This will give you the arp entry cache of the specified hostname and this information also includes the MAC address of the PC. Sample output would be something like below:
You can clearly spot the MAC address in the above output.
Method 2: This method is pretty useful and I do frequently use this tool to gather NetBIOS information of PCs in network. The tool I use is nbtscan and nbtscan is a program for scanning IP networks for NetBIOS name information. It sends NetBIOS status query to each address in supplied range and lists received information in human readable form. For each responded host it lists IP address, NetBIOS computer name, logged-in user name and MAC address (such as Ethernet).
The tool is available for download for windows and different distros of Linux from HERE.
Also, you can install it under ubuntu by issuing following command from terminal.
Now, the usage of this tool is pretty straightforward.
This will give the NetBIOS information of the requested hostname. But, this isn't the only thing. We can also mass-scan the network by giving the IP range.
This scans all the devices within the range 192.168.0.1 - 192.168.0.255 and displays the NetBIOS information of the computers in network.
I hope this helps some of you. Thanks :)
Read more...
Method 1: This method works in both windows and Linux. So open your terminal(in linux) or command prompt(in windows) and type:
ping <hostname>
Here, in place of <hostname>, type either computer's name or IP address whose MAC address you want to know.
Now, type the following command:
arp -a <hostname>
This will give you the arp entry cache of the specified hostname and this information also includes the MAC address of the PC. Sample output would be something like below:
techgaun.local (192.168.0.49) at 90:fb:a6:27:b7:6a [ether] on eth1
You can clearly spot the MAC address in the above output.
Method 2: This method is pretty useful and I do frequently use this tool to gather NetBIOS information of PCs in network. The tool I use is nbtscan and nbtscan is a program for scanning IP networks for NetBIOS name information. It sends NetBIOS status query to each address in supplied range and lists received information in human readable form. For each responded host it lists IP address, NetBIOS computer name, logged-in user name and MAC address (such as Ethernet).
The tool is available for download for windows and different distros of Linux from HERE.
Also, you can install it under ubuntu by issuing following command from terminal.
sudo apt-get install nbtscan
Now, the usage of this tool is pretty straightforward.
nbtscan <hostname>
This will give the NetBIOS information of the requested hostname. But, this isn't the only thing. We can also mass-scan the network by giving the IP range.
nbtscan 192.168.0.1-255
This scans all the devices within the range 192.168.0.1 - 192.168.0.255 and displays the NetBIOS information of the computers in network.
I hope this helps some of you. Thanks :)
Read more...
Bookmark this post: |
|
Monday 21 March 2011
Netpoint Protocol installation and setup[How To]
Recently, I and my friends had to implement netpoint protocol to setup the server/client eLibrary environment in one of the schools in Nepal. In this post, I will list the steps to follow while setting up such terminals. By the way, the terminals we used were Sunde terminals. This is pretty short tutorial without going into details because I assume that the person who performs these installation has good knowledge of how computers work.
a) Install Windows XP(or any other windows version) in the server machine
b) Select and run one of the Sunde terminal clients. Its for downloading the necessary softwares to our server machine as the necessary softwares are hosted in the Sunde terminal clients.
c) Connect the server and client with ethernet cable and set static IP address for both the server and client.
d) Run the internet explorer and type the I.P. address of the sunde client in address bar.
e) You'll find a page from where you can download netpoint setup file and user guide as well. (Also, xRDP for linux is available for download).
f) Install the netpoint setup software in your server machine and it will have netpoint protocol and netpoint management GUI installed in it.
g) Now you'll have to add users and assign the newly created users to "Remote Desktop Users" group. For that, right click in My computer -> Manage and from there, you can add users and assign them to groups from "users and groups" section. I would let you figure out how to do this. Btw, create the users with passwords otherwise you'll have to perform group policy editing to allow logging in of remote users without passwords(to do that, use gpedit.msc)
h) If you want to setup DHCP server in your server, you could do so. Otherwise setting up the static IP would be enough. Now, set the static IPs for all the clients and also set the server IP in all those clients.
Your sunde terminals are now ready to go. If you get messages like "can not connect to server", ensure that server IP in the clients is correct and also make sure the physical things such as NIC, ethernet cable, etc. are working correctly. If you get the login window and can't login with the user, make sure those users are assigned to group "Remote Desktop Users". Also, sometimes you might need to turn firewall off in the server.
I might have missed some stuffs while writing this. If you face any problem, feel free to comment. And I am sorry that I could not provide you any screenshots. Maybe sometimes later when I got the next netpoint deployment(but its unlikely). Also, you can use Linux in the server and in that case, you will have to use xRDP or any other RDP protocol server software for linux.
Read more...
Bookmark this post: |
|
Friday 11 February 2011
Changing desktop background in windows 7 starter edition
Earlier, I was working on newly bought netbook of my friend and I was trying to change the desktop background which was not working. I tried to find the default wallpaper image and replace that image with the desired wallpaper image, but no luck. A quick google search revealed that it was actually the limitation of the windows 7 starter edition. With few more google search, I came across a win 7 starter edition's background changer tool by Oceanis. This tool was able to change the background easily.
You can get this tool from the link below:
Oceanis win 7 starter edition background changer
Edit: Alternative download link
Credits: Oceanis + www.sevenforums.com
Read more...
You can get this tool from the link below:
Oceanis win 7 starter edition background changer
Edit: Alternative download link
Credits: Oceanis + www.sevenforums.com
Read more...
Bookmark this post: |
|
Friday 10 December 2010
Rename file extension of multiple files at once
Sometimes, you might need to rename the file extension of multiple files and this can be simply accomplished from command line without the use of any tools.
In the command prompt, move to the proper directory containing the files whose extension is to be renamed. Then type as following in the command prompt.
The above command will rename all the jpg files in that folder to exe. Similar command rename exists in the linux to achieve the same effect. Hope this comes to be handy for you.
Read more...
In the command prompt, move to the proper directory containing the files whose extension is to be renamed. Then type as following in the command prompt.
ren *.jpg *.exe
The above command will rename all the jpg files in that folder to exe. Similar command rename exists in the linux to achieve the same effect. Hope this comes to be handy for you.
Read more...
Bookmark this post: |
|
Wednesday 1 December 2010
Speeding up opening of Acrobat Reader
Whenever you launch acrobat reader, it takes some extra times while loading the plugins and we rarely use those plugins(In fact, I rarely use them) so we can speed up the opening of acrobat reader.
The trick in speeding up the process of opening acrobat reader is by removing the plugins from plugins folder and putting them in the folder called optional. First, go to the acrobat reader installation directory which will be probably located somewhere at
There, you will see the folder called plugins. What you have to do is cut and paste all the items from plugins folder to optional folder. Make sure that you are not locking any of those files by opening the acrobat reader while doing cut/paste. Hope this helps you. :)
Read more...
The trick in speeding up the process of opening acrobat reader is by removing the plugins from plugins folder and putting them in the folder called optional. First, go to the acrobat reader installation directory which will be probably located somewhere at
C:\program files\adobe\
There, you will see the folder called plugins. What you have to do is cut and paste all the items from plugins folder to optional folder. Make sure that you are not locking any of those files by opening the acrobat reader while doing cut/paste. Hope this helps you. :)
Read more...
Bookmark this post: |
|
Sunday 21 November 2010
Enabling telnet in windows 7
AYesterday when I was on my saturday class in kathmandu, I needed to use telnet in order to find the ssh version of some server as the part of recon challenge for my friend. But I found that the windows 7 by default has no telnet client. After returning to KU, I played around with my friends laptop to find the way to enable telnet client.
Just go to the control panel and choose the programs and features option.
There, you'll find the option Turn Windows features on or off.
Check the telnet client and hit Ok.
Now you can use the telnet client in your windows 7. Have fun.
Read more...
Just go to the control panel and choose the programs and features option.
There, you'll find the option Turn Windows features on or off.
Check the telnet client and hit Ok.
Now you can use the telnet client in your windows 7. Have fun.
Read more...
Bookmark this post: |
|
Thursday 18 November 2010
Converting dynamic disk to basic with diskpart
For some reason I had to convert my virtual hard disk from dynamic to basic type and Disk management GUI didn't allow me to do so. So here I am going to show you how to accomplish this task with command line option with the diskpart.exe
First delete all the volumes in the disk from the disk management GUI tool(type diskmgmt.msc in run).
You'll have to follow the following steps in order to convert the disk type:
- type diskpart in the command prompt
- to view the available disk, type list disk
- now select your target disk, type select disk n where n = ID of the disk
- finally type convert basic to have your disk converted to the basic type.
Hope it will be useful sometimes.
Read more...
Bookmark this post: |
|
Thursday 7 October 2010
Toddler Keys- Protect your computer from children
Toddler Keys is a program that protect your computer from children by accident pressing wrong buttons or keys or mouse clicks.
It is a useful tool for parents that allows you to lock your computer keyboard, CD drive doors and power-off button. When the keyboard is used it will display images and play sounds every time a key is pressed, thereby preventing access to the desktop and applications, while adding some entertainment value for the kid.
To exit the locked screen, just type the word QUIT.
Download Toddler Keys
Go to Toddler Keys Home
Read more...
Bookmark this post: |
|
Saturday 2 October 2010
Removing the unwanted programs from startup
Many programs such as messengers and other utilities stick up to the startup. Because of the increase in the number of startup items in your system, the startup process might become slower gradually. Also, sometimes unnecessary programs and even virii and worms might be in the startup so it can come handy when you need to speed up your system.
There are different locations from where a program can run at startup. You can refer to my previous post HERE for the startup related information.
All the startup items entries is made on the microsoft configuration utility called msconfig which can be accessed by running the msconfig command through run box. Switch to the startup tab in the msconfig utility window which lists all the programs and shortcuts that run at the startup in the background.
From here, you can remove the unnecessary programs and virus/worms startup by unchecking them. Just be careful to work correctly and note that many virus/worms have the filename similar to that of the windows system files so you'll have to be careful while editing the startup from here.
Have fun. :)
Read more...
Bookmark this post: |
|
Friday 24 September 2010
Making a autorun in Pen[USB] drive [autorun.inf]
In this post, I shall be writing about creating autorun file in order to run or execute any program from your pendrive. Autorun.inf is a special file that can contain the information regarding the icon for drive, autorun programs, etc.
Using autorun.inf can also be useful for running the virii and worms automatically from the USB drive.
How to:
1) Open notepad
2) Type the following:
This autorun.inf file now should be saved in the root directory of your USB drive and you'll have your autorun file... :)
Now let me say the way of changing icon of the drive. In order to change the icon of your USB drive, type the following in autorun.inf file.
That's all. :)
Read more...
Using autorun.inf can also be useful for running the virii and worms automatically from the USB drive.
How to:
1) Open notepad
2) Type the following:
[autorun]
Icon=default
label=[YourLabelHere]
open=targetprogramname.exe
Icon=default
label=[YourLabelHere]
open=targetprogramname.exe
This autorun.inf file now should be saved in the root directory of your USB drive and you'll have your autorun file... :)
Now let me say the way of changing icon of the drive. In order to change the icon of your USB drive, type the following in autorun.inf file.
[autorun]
icon=[youricon.ico]
label=[YourLabelHere]
icon=[youricon.ico]
label=[YourLabelHere]
That's all. :)
Read more...
Bookmark this post: |
|
Thursday 16 September 2010
Installing GCC with Mingw Automated Installer
The beginners might always be stuck on how to install GCC suite in their windows so this post might prove useful for such beginners. GCC is a very popular open source compiler suite that is widely used by open source guys. Its pretty flexible, robust and secure compiler.
In order to install GCC in windows, you can either use CYGWIN port of windows or MINGW port for windows. Both are easy to install but in this post, I'm going to be specific about MINGW because thats what I'm using in my PC.
You'll have to download MINGW-GET installer.
Next run the installer file and you'll reach the following stage of your installation:
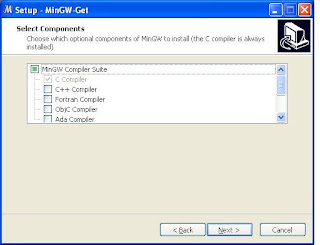
Select the required compilers from there and click on Next and finish the installation. The installer will download necessary files from its online repository and you'll have the GCC suite installed in your Windows.
Read more...
In order to install GCC in windows, you can either use CYGWIN port of windows or MINGW port for windows. Both are easy to install but in this post, I'm going to be specific about MINGW because thats what I'm using in my PC.
You'll have to download MINGW-GET installer.
Next run the installer file and you'll reach the following stage of your installation:
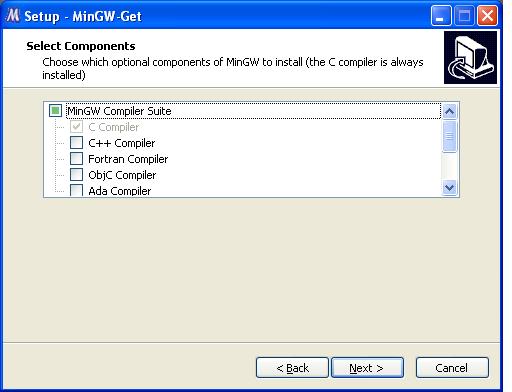
Select the required compilers from there and click on Next and finish the installation. The installer will download necessary files from its online repository and you'll have the GCC suite installed in your Windows.
Read more...
Bookmark this post: |
|
Wednesday 15 September 2010
Adding programs to Startup in Windows
This time, I am going to discuss on few methods of adding the programs to the startup in windows. My descriptions will be based on Windows XP machine and I hope you will find this information useful. Here I'll list out few such methods to add programs to startup in windows.
1. Startup folder: One of the simplest method of adding programs in startup, it provides easy and detectable method of adding any program to startup. For the user Administrator, the startup folder in Windows XP is located at:
So for any user you can find startup folder at
Replace the {Username} by the username you want.
2) Registry editing: Registry editing is another powerful method of adding programs in startup and is one of the most popular methods for adding virii and trojans in startup.
The following registry paths can contain the string to the path of the executable to be run at startup
Similarly, you'll find similar registry paths for HKEY_CURRENT_USER. All you have to do is add new string of type REG_SZ containing the path of the executable.
3) Autoexec.bat: Root folder of your windows installation will consist of a file called autoexec.bat which can be edited to add any program in startup. Open the autoexec.bat file and add the path of the executable in the autoexec.bat file.
There are other methods too such as editing win.ini and system.ini editing. I leave them for you to google. Have fun. :)
Read more...
1. Startup folder: One of the simplest method of adding programs in startup, it provides easy and detectable method of adding any program to startup. For the user Administrator, the startup folder in Windows XP is located at:
C:\Documents and Settings\Administrator\Start Menu\Programs
So for any user you can find startup folder at
C:\Documents and Settings\{Username}\Start Menu\Programs
Replace the {Username} by the username you want.
2) Registry editing: Registry editing is another powerful method of adding programs in startup and is one of the most popular methods for adding virii and trojans in startup.
The following registry paths can contain the string to the path of the executable to be run at startup
[HKEY_LOCAL_MACHINE\Software\Microsoft\Windows\CurrentVersion\Run]
[HKEY_LOCAL_MACHINE\Software\Microsoft\Windows\CurrentVersion\RunOnce]
[HKEY_LOCAL_MACHINE\Software\Microsoft\Windows\CurrentVersion\RunServices]
[HKEY_LOCAL_MACHINE\Software\Microsoft\Windows\CurrentVersion\RunServicesOnce]
[HKEY_LOCAL_MACHINE\Software\Microsoft\Windows\CurrentVersion\RunOnce]
[HKEY_LOCAL_MACHINE\Software\Microsoft\Windows\CurrentVersion\RunServices]
[HKEY_LOCAL_MACHINE\Software\Microsoft\Windows\CurrentVersion\RunServicesOnce]
Similarly, you'll find similar registry paths for HKEY_CURRENT_USER. All you have to do is add new string of type REG_SZ containing the path of the executable.
3) Autoexec.bat: Root folder of your windows installation will consist of a file called autoexec.bat which can be edited to add any program in startup. Open the autoexec.bat file and add the path of the executable in the autoexec.bat file.
There are other methods too such as editing win.ini and system.ini editing. I leave them for you to google. Have fun. :)
Read more...
Bookmark this post: |
|
Sunday 29 August 2010
Change default program installation folder in XP
Whenever you install any programs in your computer, the installation will be done in C:\program files folder. But what if you wanted to change this setting and make your programs install in the different drive or location by default. There is a simple registry hack in order to change the default installation folder.
First, start registry editor by typing regedit.exe in run menu. Then, go to the following:
Now, change the value of ProgramFilesDir to whatever you prefer. Now exit registry and reboot your system to have your default software installation folder changed from program files to that of your choice.
Thanks.
Read more...
First, start registry editor by typing regedit.exe in run menu. Then, go to the following:
HKEY_LOCAL_MACHINE\Software\Microsoft\Windows\CurrentVersion
Now, change the value of ProgramFilesDir to whatever you prefer. Now exit registry and reboot your system to have your default software installation folder changed from program files to that of your choice.
Thanks.
Read more...
Bookmark this post: |
|
Tuesday 24 August 2010
Batch Mini Antivirus - Remove virii effects
Batch Mini Antivirus is a tool written in the commandline batch. The tool was written by me around a year ago and this tool provides removing the effects of the most virii.
This tool will be more efficient if run in safe mode. This tool can be used to remove virii and their effects from hard drives and USB removable drives.
The program provides various options such as deleting autorun.inf, making all files and folders visible, checking and repairing bad sectors, deleting all files in drive of specific size, deleting suspicious hidden files(be careful with this), deactivating virii processes, repairing registry effects due to virii, and removing few virii from the system.
DOWNLOAD BATCH ANTIVIRUS FROM HERE
I hope you will find this tool useful. Please be sure to write your comments on this too.
Read more...
This tool will be more efficient if run in safe mode. This tool can be used to remove virii and their effects from hard drives and USB removable drives.
The program provides various options such as deleting autorun.inf, making all files and folders visible, checking and repairing bad sectors, deleting all files in drive of specific size, deleting suspicious hidden files(be careful with this), deactivating virii processes, repairing registry effects due to virii, and removing few virii from the system.

DOWNLOAD BATCH ANTIVIRUS FROM HERE
I hope you will find this tool useful. Please be sure to write your comments on this too.
Read more...
Bookmark this post: |
|
How to disable autorun in drives [gpedit.msc]
Autoplay begins reading from a drive as soon as you insert media in the drive. As a result, the setup file of programs and the music on audio media start immediately. The setting for turning off autoplay can be configured using a tool gpedit.msc which is a group policy editing tool for microsoft windows.
By default, Autoplay is disabled on removable drives, such as the floppy disk drive (but not the CD-ROM drive), and on network drives. If you enable this setting, you can also disable Autoplay on CD-ROM drives or disable Autoplay on all drives.
This setting disables Autoplay on additional types of drives. You cannot use this setting to enable Autoplay on drives on which it is disabled by default.
Follow the following procedure to disable autorun on drives
Go to start >run >gpedit.msc
A new window of group policy editor pops up.
Go to UserConfiguration > AdministrativeTemplates > System
Make sure the standard tab is being selected.
Then select TurnOffAutoplay > Properties > Enabled > AllDrives
This will disable autorun for all the drives. This can be effective from preventing the autorun of the virii in your system.
Read more...
Bookmark this post: |
|
Saturday 21 August 2010
Block websites locally in Windows and LINUX
Sometimes, you may want to block access to some websites from your computer. And this is easy to do both in Windows and LINUX.By simply editing a text file named hosts, you will be able to block the websites you want to prevent access to. This is useful for blocking websites at home to prevent kids from accessing wrong type of websites for them. Note that editing the file will require administrative privilege in both systems and in case of LINUX, I root the server(will post article on this one day, google for now) and edit the hosts file.
We can find a file hosts which stores IP address to host mapping for the quicker access to the site.
In Windows: C:\WINDOWS\system32\drivers\etc\hosts
In Linux: /etc/hosts
Now open the hosts file in the text editor like notepad(in case of windows) and gedit(in case of Linux) and map the incorrect IP address to the website address you want to block. See the screenshot below on Windows XP to be clear on doing this.
 I hope you will do some experiments on your own to do other cool stuffs with this knowledge.
Read more...
We can find a file hosts which stores IP address to host mapping for the quicker access to the site.
In Windows: C:\WINDOWS\system32\drivers\etc\hosts
In Linux: /etc/hosts
Now open the hosts file in the text editor like notepad(in case of windows) and gedit(in case of Linux) and map the incorrect IP address to the website address you want to block. See the screenshot below on Windows XP to be clear on doing this.

Read more...
Bookmark this post: |
|
Subscribe to:
Posts (Atom)