Saturday 31 December 2011
Details On The CON Issue In Windows
We can not create a folder with its name as "Con" in windows and many people are unaware of this fact and the reason behind this. So I am here to clarify everything about the CON issue in windows. I will also discuss about the way to create such folders in windows.
If you haven't tried yet, try creating the folder with the name con and you will find that the folder can not be renamed to con. This is not the only name that shows such unique behavior. Other such names that can not be the name of folders are CON, PRN, AUX, CLOCK$, NUL, COM0, COM1, COM2, COM3, COM4, COM5, COM6, COM7, COM8, COM9, LPT0, LPT1, LPT2, LPT3, LPT4, LPT5, LPT6, LPT7, LPT8, and LPT9(list taken from Wikipedia).
These words are the reserved words and date back to old MS-DOS days. These names were reserved for MS-DOS device files and hence to prevent any kind of ambiguity, these names are not allowed for normal files and folders.
But there's way. Now comes the role of Universal Naming Convention(or Uniform Naming Convention) commonly known as UNC which specifies a common syntax to describe the location of a network resource, such as a shared file, directory, or printer.
The UNC syntax for windows system is as below:
You can read about UNC in the wikipedia entry.
UNC was introduced after the introduction of MS-DOS so MS-DOS systems do not understand the UNC naming i.e. it is not backward compatible to MS-DOS. That said, we can create folders with special names in our local system using the UNC syntax. The single dot (.) is used to indicate the local system as per the UNC definition.
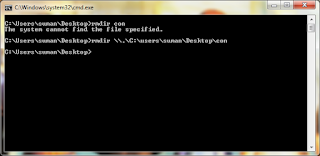
Now to create a folder with any of the reserved words, we will use mkdir command. For example, to create a CON folder in my friend's laptop's Desktop folder, I typed the following command in the command prompt.
This creates a con folder in our desktop. Now try to delete it using GUI or from command prompt by issuing rmdir con command. It will give you an error. So to delete the folder, you can use the same UNC syntax as below:
On issuing this command, your con folder should be gone. You can try the same with the other reserved file names. Also, check the following screenshots for clarity.

Some of you might think Whats the use of all this stuff?: I don't know if there's any serious use of this stuff but its kinda cool to know these kind of stuffs for tech-freaks. If there can be any good use of this trick, please share over here. I hope this stuff is useful. Happy New Year 2012 :)
Read more...
If you haven't tried yet, try creating the folder with the name con and you will find that the folder can not be renamed to con. This is not the only name that shows such unique behavior. Other such names that can not be the name of folders are CON, PRN, AUX, CLOCK$, NUL, COM0, COM1, COM2, COM3, COM4, COM5, COM6, COM7, COM8, COM9, LPT0, LPT1, LPT2, LPT3, LPT4, LPT5, LPT6, LPT7, LPT8, and LPT9(list taken from Wikipedia).
These words are the reserved words and date back to old MS-DOS days. These names were reserved for MS-DOS device files and hence to prevent any kind of ambiguity, these names are not allowed for normal files and folders.
But there's way. Now comes the role of Universal Naming Convention(or Uniform Naming Convention) commonly known as UNC which specifies a common syntax to describe the location of a network resource, such as a shared file, directory, or printer.
The UNC syntax for windows system is as below:
\\ComputerName\SharedFolder\Resource
You can read about UNC in the wikipedia entry.
UNC was introduced after the introduction of MS-DOS so MS-DOS systems do not understand the UNC naming i.e. it is not backward compatible to MS-DOS. That said, we can create folders with special names in our local system using the UNC syntax. The single dot (.) is used to indicate the local system as per the UNC definition.
Now to create a folder with any of the reserved words, we will use mkdir command. For example, to create a CON folder in my friend's laptop's Desktop folder, I typed the following command in the command prompt.
mkdir \\.\C:\Users\suman\Desktop\con
This creates a con folder in our desktop. Now try to delete it using GUI or from command prompt by issuing rmdir con command. It will give you an error. So to delete the folder, you can use the same UNC syntax as below:
rmdir \\.\C:\Users\suman\Desktop\con
On issuing this command, your con folder should be gone. You can try the same with the other reserved file names. Also, check the following screenshots for clarity.


Some of you might think Whats the use of all this stuff?: I don't know if there's any serious use of this stuff but its kinda cool to know these kind of stuffs for tech-freaks. If there can be any good use of this trick, please share over here. I hope this stuff is useful. Happy New Year 2012 :)
Read more...
Bookmark this post: | 
|
Friday 30 December 2011
Download Your Facebook Information [How To]
Well you might want to download your facebook information as an offline archive just like you would like to have backup of your other information. In this How To, I am sharing a helpful information on how you can backup your facebook information easily.
You can download following information from your facebook profile.
- Any photos or videos you've shared on Facebook
- Your Wall posts, messages and chat conversations
- Your friends' names and some of their email addresses
1) Login to your facebook account.
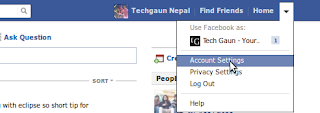
2) Click on Account option on the right top corner of your facebook page and then click on Account Settings from the dropdown menu.
3) Now click on the Download a copy link.

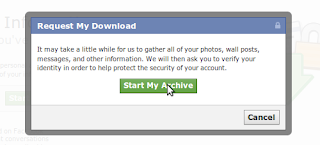
4) On the next page, click on the Start My Archive button.

5) A new pop-up will appear and again click on the Start My Archive button from the pop-up.
6) You will receive an email when your archive is ready for download. This may take some time. You can check your inbox later to view and download the archive containing your facebook information.
For more information about downloading information, check the Facebook Help page.
I hope it becomes useful for you. :)
Read more...
You can download following information from your facebook profile.
- Any photos or videos you've shared on Facebook
- Your Wall posts, messages and chat conversations
- Your friends' names and some of their email addresses
1) Login to your facebook account.
2) Click on Account option on the right top corner of your facebook page and then click on Account Settings from the dropdown menu.

3) Now click on the Download a copy link.

4) On the next page, click on the Start My Archive button.

5) A new pop-up will appear and again click on the Start My Archive button from the pop-up.

6) You will receive an email when your archive is ready for download. This may take some time. You can check your inbox later to view and download the archive containing your facebook information.
For more information about downloading information, check the Facebook Help page.
I hope it becomes useful for you. :)
Read more...
Bookmark this post: |
|
[FIX] Android XML Layout and Resource Design View Not Working In Eclipse
Hi sometimes XML views for your layouts and resources such as strings do not appear in the design view and you might be getting frustrated why this is happening. This post mentions a quick tip on how you can regain your original XML layout and/or resource design views.
The trick is simple. All you have to do is right click the layout or resource file in the "Package explorer" and then use the option "Open With" to open the file with the correct editor. In case of XML layouts, choose the Layout Editor option and in case of XML resources like strings, choose the Resource Editor option. Eclipse automatically saves your last choice so everything should work fine after doing these steps. I hope it comes useful sometimes. :)
Read more...
Bookmark this post: |
|
Thursday 29 December 2011
How To Get Timeline In Your Facebook Profile
Earlier, many people were wondering how can they get timeline for their facebook page when they were helping us with votes in the library so I thought why not make a blog post so that it would help people out there to get the timeline feature in their profile.
What is timeline?: Who would better explain than facebook itself regarding its feature... Read about timeline.
Now to get timeline, go to Introducing Timeline page and if you are not already using timeline, a bottom footer will appear with the Get Timeline button at the right side.
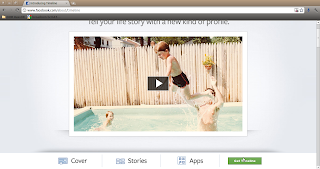
All you have to do is click on that link to get timeline for your facebook. Timeline will be activated and you will be redirected to your timeline. I hope this helps you. :)
Read more...
Bookmark this post: |
|
Wednesday 28 December 2011
Adding Regular User To Sudoers File In Linux
Hi everybody, this time I am writing about the different command line methods of adding regular user to the sudoers file in linux or in more obvious way, giving access to root privilege to certain regular users. The sudoers file(located at /etc/sudoers by default[in my distro i.e. ubuntu]) contains the information of groups and users who can execute commands with root privilege. I'll list 3 ways of adding users to the sudoers list so continue reading the post.
Method 1
The first way is to use the usermod command to append the user to the admin group. Since the admin group has the privilege of executing commands with sudo privilege, adding the user to the admin group is one easy way to add regular user to the sudoers file. The example command is as below(Replace user with the proper username which you want to add to sudoers list):
Method 2
This method is similar as above however the command is adduser this time and the command is even more simpler to remember. Just specify the respective user to be added to the admin group as below:
Method 3
The last method I'm writing about is the safe way of editing sudoers files. Linux advises to use visudo command to edit /etc/sudoers so that possible errors while writing in sudoers file can be avoided. Typing just visudo would open the /etc/sudoers file for editing, and in case, if you want to edit sudoer file in alternate location, type visudo -f sudoer_with_path. Anyway, to add new user to the default sudoers file, type sudo visudo and add the line as below(Replace user with the proper username to whom you want to give sudo privilege) at the end of file:
I hope these methods come useful for you.
Read more...
Method 1
The first way is to use the usermod command to append the user to the admin group. Since the admin group has the privilege of executing commands with sudo privilege, adding the user to the admin group is one easy way to add regular user to the sudoers file. The example command is as below(Replace user with the proper username which you want to add to sudoers list):
sudo usermod -a -G admin user
Method 2
This method is similar as above however the command is adduser this time and the command is even more simpler to remember. Just specify the respective user to be added to the admin group as below:
sudo adduser user admin
Method 3
The last method I'm writing about is the safe way of editing sudoers files. Linux advises to use visudo command to edit /etc/sudoers so that possible errors while writing in sudoers file can be avoided. Typing just visudo would open the /etc/sudoers file for editing, and in case, if you want to edit sudoer file in alternate location, type visudo -f sudoer_with_path. Anyway, to add new user to the default sudoers file, type sudo visudo and add the line as below(Replace user with the proper username to whom you want to give sudo privilege) at the end of file:
user ALL = (ALL) ALL
I hope these methods come useful for you.
Read more...
Bookmark this post: |
|
Saturday 24 December 2011
Hiding Information In Text Files Using Notepad [Windows]
Hi everybody, I had long ago read about hiding information inside text files using notepad and today I suddenly remembered while doing some other task. So I am sharing this little trick of hiding information inside the text file using notepad.
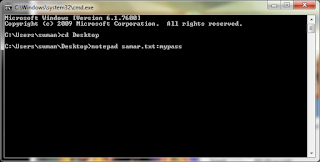
Open command prompt (Run-> Cmd) and then navigate to the directory (using cd command) where you want to save your text file. Now, type the following command:
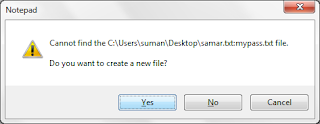
Replace filename part and password with yours as shown in the screenshot above and then you will be asked if you wish to create a new file or not(See the screenshot below) and then click on Yes to create the file.
Now enter your secret information in the file and save the file. Close the file and if you need to access the contents later, you will have to use the exact command you used while creating the file. If you or someone else edits your file without giving the password, your original hidden content will not be erased and you can still access the content with your original command.
I hope this trick is new for you. :)
Read more...
Open command prompt (Run-> Cmd) and then navigate to the directory (using cd command) where you want to save your text file. Now, type the following command:
notepad file.txt:mypassword

Replace filename part and password with yours as shown in the screenshot above and then you will be asked if you wish to create a new file or not(See the screenshot below) and then click on Yes to create the file.

Now enter your secret information in the file and save the file. Close the file and if you need to access the contents later, you will have to use the exact command you used while creating the file. If you or someone else edits your file without giving the password, your original hidden content will not be erased and you can still access the content with your original command.
I hope this trick is new for you. :)
Read more...
Bookmark this post: |
|
Thursday 22 December 2011
First Thing To Try When Encountered An Odd Error In Eclipse
Hi everybody, this is always worth trying when you encounter some unknown and odd error while developing applications with Eclipse IDE. You may encounter errors even though every line of your code is syntactically correct and still you can't find what exactly is the error. Sometimes you might spend hours trying to find error but actually there might be no error in your application.
To clean the current project in Eclipse, go to Project -> Clean and it will clean all the compiled stuffs and will give you a fresh start for the compilation. Keep in mind this little trick and you might find useful several times while you are working on Eclipse.
Read more...
To clean the current project in Eclipse, go to Project -> Clean and it will clean all the compiled stuffs and will give you a fresh start for the compilation. Keep in mind this little trick and you might find useful several times while you are working on Eclipse.
Read more...
Bookmark this post: |
|
Very Simple PHP Obfuscator Tool From Techgaun
Hi everybody, I've coded a very small snippet of code that will perform very basic PHP obfuscation so that programmers can protect their code from non-programmers. The obfuscation is by no means the advanced one and easily reversible. Only purpose is to prevent script kiddies and leechers from taking away your source code and distributing those as theirs.
Click here to access the PHP Obfuscator.
I hope it becomes useful sometimes. :)
Read more...
Click here to access the PHP Obfuscator.
I hope it becomes useful sometimes. :)
Read more...
Bookmark this post: |
|
Subscribe to:
Posts (Atom)