Showing posts with label linux. Show all posts
Showing posts with label linux. Show all posts
Sunday 8 June 2014
Postgresql Backup To Amazon S3 On OpenShift Origin
To move forward, you need to backup. Backing up your production data is critical and with Postgresql, you can backup WAL (Write Ahead Log) archives and this post gives you steps to accomplish for backing up postgresql WALs to Amazon S3 on your OpenShift Origin using WAL-E.
WAL-E is a great tool that simplifies backup of postgresql by performing continuous archiving of PostgreSQL WAL files and base backups. Enough blabbering, you can reach out technical docs on how WAL works. I'll just mention series of commands and steps necessary for sending WAL archives to AWS S3 bucket.
On the node containing application with postgresql cartridge, run the following commands:
Then, edit the postgresql configuration file so as to turn on wal archiving. You need to find the right container for your postgresql in /var/lib/openshift (Its quite trivial if you know OpenShift basics).
Finally, you need to ensure that you are taking base backups periodically which can be achieved by utilizing cron cartridge. Clone the repo, add the following file and push to the application.
Make sure you use the OPENSHIFT_POSTGRESQL_DIR env-var or some other env-var that does not have two forward slashes adjacently since WAL-E hates it.
This should help you keep your data backed up regularly and you can enjoy beers.
Read more...
WAL-E is a great tool that simplifies backup of postgresql by performing continuous archiving of PostgreSQL WAL files and base backups. Enough blabbering, you can reach out technical docs on how WAL works. I'll just mention series of commands and steps necessary for sending WAL archives to AWS S3 bucket.
On the node containing application with postgresql cartridge, run the following commands:
$ yum install python-pip lzop pv
$ rpm -Uvh ftp://ftp.pbone.net/mirror/ftp5.gwdg.de/pub/opensuse/repositories/home:/p_conrad:/branches/Fedora_19/x86_64/daemontools-0.76-3.1.x86_64.rpm
$ pip install wal-e
$ umask u=rwx,g=rx,o=
$ mkdir -p /etc/wal-e.d/env
$ echo "secret-key-content" > /etc/wal-e.d/env/AWS_SECRET_ACCESS_KEY
$ echo "access-key" > /etc/wal-e.d/env/AWS_ACCESS_KEY_ID
$ echo 's3://backup/production/pgsql' > \
  /etc/wal-e.d/env/WALE_S3_PREFIX
$ chmod -R 765 /etc/wal-e.d/
Then, edit the postgresql configuration file so as to turn on wal archiving. You need to find the right container for your postgresql in /var/lib/openshift (Its quite trivial if you know OpenShift basics).
$ vi YOUR_OO_CONTAINER/postgresql/data/postgresql.conf
wal_level = archive # hot_standby in 9.0 is also acceptable
archive_mode = on
archive_command = 'envdir /etc/wal-e.d/env wal-e wal-push %p'
archive_timeout = 60
archive_mode = on
archive_command = 'envdir /etc/wal-e.d/env wal-e wal-push %p'
archive_timeout = 60
Finally, you need to ensure that you are taking base backups periodically which can be achieved by utilizing cron cartridge. Clone the repo, add the following file and push to the application.
$ vi .openshift/cron/daily/postgres-backup
#!/bin/bash

if [ $OPENSHIFT_POSTGRESQL_DIR ]; then
        /usr/bin/envdir /etc/wal-e.d/env /bin/wal-e backup-push ${OPENSHIFT_POSTGRESQL_DIR}data
fi

$ git add .openshift/cron/daily/postgres-backup
$ git commit -m "Added pg cron script"
$ git push origin master
Make sure you use the OPENSHIFT_POSTGRESQL_DIR env-var or some other env-var that does not have two forward slashes adjacently since WAL-E hates it.
This should help you keep your data backed up regularly and you can enjoy beers.
Read more...
Bookmark this post: | 
|
Thursday 5 June 2014
Setting Up JVM Heap Size In JBoss OpenShift Origin
Openshift is an awesome technology and have fell in love with it recently. In this post, I will talk about how we can set JVM Heap Size for your application using Jboss cartridge.
If you look into the content of the standalone.conf located at $OPENSHIFT_JBOSSEAP_DIR/bin, you can see that JVM_HEAP_RATIO is set to 0.5 if it is not already set.
And, later this ratio is used to calculate the max_heap so as to inject the maximum heap size in jboss java process. You can see how gear memory size is used to calculate the value of heap size. This is the very reason why the default installation allocates half of total gear memory size.
OpenShift keeps its number of environment variables inside /var/lib/openshift/OPENSHIFT_GEAR_UUID/.env so what I did was SSH to my OO node and run the command below (you should replace your gear's UUID):
Alternatively, rhc set-env JVM_HEAP_RATIO=0.7 -a appName should also work but I have not tried it.
Read more...
If you look into the content of the standalone.conf located at $OPENSHIFT_JBOSSEAP_DIR/bin, you can see that JVM_HEAP_RATIO is set to 0.5 if it is not already set.
if [ -z "$JVM_HEAP_RATIO" ]; then
        JVM_HEAP_RATIO=0.5
And, later this ratio is used to calculate the max_heap so as to inject the maximum heap size in jboss java process. You can see how gear memory size is used to calculate the value of heap size. This is the very reason why the default installation allocates half of total gear memory size.
max_memory_mb=${OPENSHIFT_GEAR_MEMORY_MB}
max_heap=$( echo "$max_memory_mb * $JVM_HEAP_RATIO" | bc | awk '{print int($1+0.5)}')
OpenShift keeps its number of environment variables inside /var/lib/openshift/OPENSHIFT_GEAR_UUID/.env so what I did was SSH to my OO node and run the command below (you should replace your gear's UUID):
$ echo -n 0.7 > /var/lib/openshift/52e8d31bfa7c355caf000039/.env/JVM_HEAP_RATIO
Alternatively, rhc set-env JVM_HEAP_RATIO=0.7 -a appName should also work but I have not tried it.
Read more...
Bookmark this post: |
|
Sunday 10 November 2013
JPEG To PDF With Imagemagick
ImageMagick is an awesome toolkit with several powerful features for image creation and manipulation. You can use ImageMagick to translate, flip, mirror, rotate, scale, shear and transform images, adjust image colors, apply various special effects, or draw text, lines, polygons, ellipses and Bezier curves. Here, I will show how you can use ImageMagick suite to convert JPEG to PDF quickly.
First make sure imagemagick suite is installed in your system.
Ubuntu/Debian
CentOS/Fedora
Below are some of the examples of using convert which is a part of ImageMagick to convert Jpeg to PDF.
Single Image
Multiple Images
Resize and Convert
Negate and Convert
You can actually use different available switches to get your output as expected. I usually use PdfTk in conjunction with this technique to work in different scenarios and it really works great. I hope this helps :)
Read more...
First make sure imagemagick suite is installed in your system.
Ubuntu/Debian
$ sudo apt-get install imagemagick
CentOS/Fedora
$ sudo yum install imagemagick
Below are some of the examples of using convert which is a part of ImageMagick to convert Jpeg to PDF.
Single Image
$ convert image.jpg image.pdf
Multiple Images
$ convert 1.jpg 2.jpg 3.jpg output.pdf
Resize and Convert
$ convert -resize 80% image.jpg image.pdf
Negate and Convert
$ convert -negate image.jpg image.pdf
You can actually use different available switches to get your output as expected. I usually use PdfTk in conjunction with this technique to work in different scenarios and it really works great. I hope this helps :)
Read more...
Bookmark this post: |
|
Thursday 17 October 2013
How I am Trying To Keep My Eyes Safe On Computer
Lately I've been on computer a lot and with this, the usual problem with most computer users has started to bother me. Going through some of the blogs online for keeping eyes safe while using computer, I came through few suggestions and in this post, I'm writing how I'm trying to keep my eyes safe. Though not tremendously helpful for everybody, I thought I would share this and you could also use my technique.
The problem with computer addicts is not getting their eyes off the computer for much longer period and though I've been trying to remember to keep my eyes off the computer in regular interval, I usually never implement this.
My two principles based on my readings on different websites are:
But, you can not really follow the rules so easily and I had to find some other alternative to do so. This is how I am doing it now.
Create two cron jobs for each of the above mentioned methods such that notify-send is triggered in each 20 minutes and each 2 hours informing you to keep yourself safe from computers. So my /etc/crontab looked like this:
You need to replace techgaun with your username and need to give correct path to the ico file if you like to use icon like me. Otherwise, you could just omit the icon in notify-send command. I hope this proves useful for some of you :)
Read more...
The problem with computer addicts is not getting their eyes off the computer for much longer period and though I've been trying to remember to keep my eyes off the computer in regular interval, I usually never implement this.
My two principles based on my readings on different websites are:
- 20-20-20: In the 20 minutes interval, keep your eyes away for 20 seconds (& view other objects which are around 20 feet away)
- 2 hrs rule: In the 2 hours interval, stay away from computers for at least 2 minutes.
But, you can not really follow the rules so easily and I had to find some other alternative to do so. This is how I am doing it now.
Create two cron jobs for each of the above mentioned methods such that notify-send is triggered in each 20 minutes and each 2 hours informing you to keep yourself safe from computers. So my /etc/crontab looked like this:
*/20 * * * * techgaun export DISPLAY=:0.0 && /usr/bin/notify-send -i /home/techgaun/Samar/scripts/eye_inv.ico "20 - 20 - 20" "Time to take rest. Keep your eye safe :)"
01 */2 * * * techgaun export DISPLAY=:0.0 && /usr/bin/notify-send -i /home/techgaun/Samar/scripts/eye_inv.ico "2 hrs eye rest" "Time to take rest for 2 minutes. Keep your eye safe :)"
You need to replace techgaun with your username and need to give correct path to the ico file if you like to use icon like me. Otherwise, you could just omit the icon in notify-send command. I hope this proves useful for some of you :)
Read more...
Bookmark this post: |
|
Monday 16 September 2013
Two Ways To Print Lines From File Reversely
Ever tried to print lines in files in the reverse order? You will know two simple methods to print lines from file in the reverse order.
Imagine a file somefile.txt with content something like this:
You can achieve the same effect through other techniques as well but I'll stick to these simple ones :)
Read more...
Imagine a file somefile.txt with content something like this:
a
b
c
d
e
b
c
d
e
Method 1:
$ tac somefile.txt
e
d
c
b
a
e
d
c
b
a
Method 2:
$ sort -r somefile.txt
e
d
c
b
a
e
d
c
b
a
You can achieve the same effect through other techniques as well but I'll stick to these simple ones :)
Read more...
Bookmark this post: |
|
Wednesday 7 August 2013
Compile 32 Bit Binaries On 64 Bit Machine
Well I had this special need if you recall my previous blog post since my friend had 64 bit machine. Sometimes, there might be this necessity to compile 32 bit binaries on your 64 bit machine. This post describes how to do so.
First make sure the necessary x86 libraries are installed. We require 32-bit shared libraries for AMD64 to compile binaries in 32 bit format. The command below installs the i386 version of libc6-dev:
Now you can compile your code in 32 bit binary format using the -m32 flag where 32 represents the x86 processor (-m64 would mean x64 processor).
I hope this helps :)
Read more...
First make sure the necessary x86 libraries are installed. We require 32-bit shared libraries for AMD64 to compile binaries in 32 bit format. The command below installs the i386 version of libc6-dev:
$ sudo apt-get install libc6-dev-i386
Now you can compile your code in 32 bit binary format using the -m32 flag where 32 represents the x86 processor (-m64 would mean x64 processor).
$ gcc -m32 -o test test.c
I hope this helps :)
Read more...
Bookmark this post: |
|
Thursday 27 June 2013
Manual Sun Java Installation In Linux
Be it be multiple installations of java or be it be custom server, you might run into the necessity of manually installing java. This tutorial will provide step by step commands for installing java manually in linux.
Though the process was done on CentOS, it should work for most linux systems with or without slightest modifications. The process below installs Sun Java and configures Sun Java to be the default java to be used. Below are the steps I took to install and configure java in my system:
If you wish to reconfigure the default java, you can run alternatives as below & choose the appropriate option:
I hope this helps :)
Read more...
Though the process was done on CentOS, it should work for most linux systems with or without slightest modifications. The process below installs Sun Java and configures Sun Java to be the default java to be used. Below are the steps I took to install and configure java in my system:
$ cd /opt/java
$ wget http://download.oracle.com/otn-pub/java/jdk/6u45-b15/jdk-6u45-linux-i586.tar.gz
$ tar xvfz jdk-6u45-linux-i586.tar.gz
$ echo 'export JAVA_HOME=/opt/java/jdk1.6.0_45' > /etc/profile.d/sun-jdk.sh
$ echo 'export PATH=$JAVA_HOME/bin:$PATH' >> /etc/profile.d/sun-jdk.sh
$ alternatives --install /usr/bin/java java /opt/java/jdk1.6.0_45/bin/java 2
$ java -version
java version "1.6.0_45"
Java(TM) SE Runtime Environment (build 1.6.0_45-b06)
Java HotSpot(TM) 64-Bit Server VM (build 20.45-b01, mixed mode)
If you wish to reconfigure the default java, you can run alternatives as below & choose the appropriate option:
$ alternatives --config java
Read more...
Bookmark this post: |
|
Friday 21 June 2013
Share Local Directory With Remote Server During RDP Session
Well I have to constantly rdesktop to the remote servers at my workstation and sometimes I have to copy files and folders from my local machine. This post will provide you the steps on how to share files and folders with remote server during rdp session.
Normally, your RDP session would start with the following command:
But we wish to do something extra i.e. we need to share our directory with the remote server. The good news is that the rdesktop command supports device redirection using a -r flag which can be repeated.
Your command would look something like below:
You can then access your share as a drive or media. I hope this helps :)
Read more...
$ rdesktop -g90% your_server
But we wish to do something extra i.e. we need to share our directory with the remote server. The good news is that the rdesktop command supports device redirection using a -r flag which can be repeated.
Your command would look something like below:
$ rdesktop -g90% -r disk:share=/home/samar/scripts myserver
You can then access your share as a drive or media. I hope this helps :)
Read more...
Bookmark this post: |
|
Tuesday 2 April 2013
Step By Step Turbo C++ IDE In Ubuntu 12.04
Well we are doing our labs based on the traditional Turbo C++ IDE and I decided to write this blog post with the information on how I installed it on my Ubuntu box.
First thing first, download Turbo C from internet. For your ease, I've uploaded it HERE.
We will have to install dosbox to run the windows dos mode applications so lets install it:
Once you install dosbox, unzip the content to somewhere in your $HOME directory. In my example, I unzipped the content of the Turbo C zip file into ~/Tools/TurboC3/. Now launch the dosbox by typing dosbox in the terminal. A dosbox emulation window will appear which will look like your old DOS system.
In the window, type the following (make sure you type appropriate path for your installation):
And, then follow the on-screen information. Refer to the screenshots below:
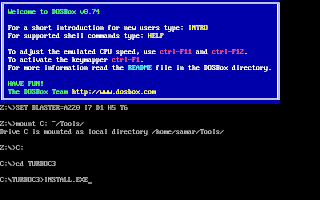


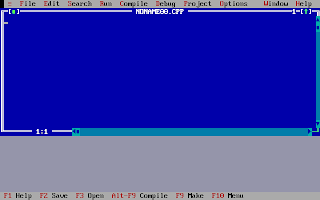
Once the installation finishes, you can then run the Turbo C by mounting the drive again and then navigation to C:\TC (cd C:\TC\BIN). If you need to use the Turbo C++ IDE frequently, my suggestion would be to add an autoexec entry in your dosbox configuration. The default configuration file resides in ~/.dosbox/dosbox-0.74.conf (My version of dosbox is 0.74 hence the file name, by default). Open up this file and in the section of [autoexec], add the lines below:
Adding this entry will run the above commands during the startup of dosbox thus giving you the Turbo C IDE interface directly on running dosbox.
I hope this helps :)
Read more...
First thing first, download Turbo C from internet. For your ease, I've uploaded it HERE.
We will have to install dosbox to run the windows dos mode applications so lets install it:
samar@samar-Techgaun:~$ sudo apt-get install dosbox
Once you install dosbox, unzip the content to somewhere in your $HOME directory. In my example, I unzipped the content of the Turbo C zip file into ~/Tools/TurboC3/. Now launch the dosbox by typing dosbox in the terminal. A dosbox emulation window will appear which will look like your old DOS system.
In the window, type the following (make sure you type appropriate path for your installation):
mount C: ~/Tools/
C:
cd TurboC3
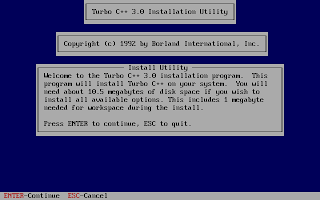
INSTALL.EXE
C:
cd TurboC3
INSTALL.EXE
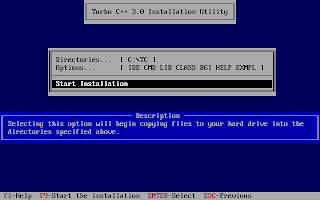
And, then follow the on-screen information. Refer to the screenshots below:


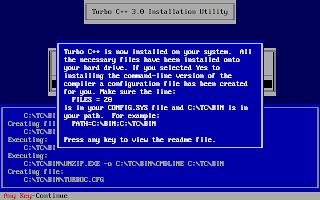
Once the installation finishes, you can then run the Turbo C by mounting the drive again and then navigation to C:\TC (cd C:\TC\BIN). If you need to use the Turbo C++ IDE frequently, my suggestion would be to add an autoexec entry in your dosbox configuration. The default configuration file resides in ~/.dosbox/dosbox-0.74.conf (My version of dosbox is 0.74 hence the file name, by default). Open up this file and in the section of [autoexec], add the lines below:
[autoexec]
mount C: ~/Tools/
C:
cd TC\BIN
TC.EXE
mount C: ~/Tools/
C:
cd TC\BIN
TC.EXE
Adding this entry will run the above commands during the startup of dosbox thus giving you the Turbo C IDE interface directly on running dosbox.
I hope this helps :)
Read more...
Bookmark this post: |
|
Saturday 9 March 2013
Check Battery Status From Terminal [How To]
Since I had no graphical interface for some reason, I needed some alternative way to check the battery status. If your system includes acpi command, you can just use this command but I had no luxury of such command and here's how you can do the same thing I did.
The /proc/ virtual file system has information of different states among which the ACPI information is one. The ACPI information provides us the details of device configurations and power status of the system. Below is one flavor of the command to check the battery status:
The first command provides the general status of the battery and the second command provides the detailed information about battery. The other way is to use the upower command that talks with the upowerd daemon. Upowerd daemon is a default daemon in ubuntu and few others for power statistics. Below is the command to see battery details:
If you wish to install acpi for future uses, you can do so by typing the command below:
Play around with different switches by looking over the help and man pages. You will find this tool quite useful :)
Read more...
samar@Techgaun:~$ cat /proc/acpi/battery/BAT0/state
present: yes
capacity state: ok
charging state: charged
present rate: unknown
remaining capacity: unknown
present voltage: 12276 mV
samar@Techgaun:~$ cat /proc/acpi/battery/BAT0/info
present: yes
design capacity: 4400 mAh
last full capacity: unknown
battery technology: rechargeable
design voltage: 10800 mV
design capacity warning: 250 mAh
design capacity low: 150 mAh
cycle count: 0
capacity granularity 1: 10 mAh
capacity granularity 2: 25 mAh
model number: Primary
serial number:
battery type: LION
OEM info: Hewlett-Packard
present: yes
capacity state: ok
charging state: charged
present rate: unknown
remaining capacity: unknown
present voltage: 12276 mV
samar@Techgaun:~$ cat /proc/acpi/battery/BAT0/info
present: yes
design capacity: 4400 mAh
last full capacity: unknown
battery technology: rechargeable
design voltage: 10800 mV
design capacity warning: 250 mAh
design capacity low: 150 mAh
cycle count: 0
capacity granularity 1: 10 mAh
capacity granularity 2: 25 mAh
model number: Primary
serial number:
battery type: LION
OEM info: Hewlett-Packard
The first command provides the general status of the battery and the second command provides the detailed information about battery. The other way is to use the upower command that talks with the upowerd daemon. Upowerd daemon is a default daemon in ubuntu and few others for power statistics. Below is the command to see battery details:
samar@Techgaun:~$ upower -i /org/freedesktop/UPower/devices/battery_BAT0
native-path: /sys/devices/LNXSYSTM:00/LNXSYBUS:00/PNP0C0A:00/power_supply/BAT0
vendor: Hewlett-Packard
model: Primary
power supply: yes
updated: Sat Mar 9 10:12:17 2013 (5 seconds ago)
has history: yes
has statistics: yes
battery
present: yes
rechargeable: yes
state: empty
energy: 0 Wh
energy-empty: 0 Wh
energy-full: 47.52 Wh
energy-full-design: 47.52 Wh
energy-rate: 0 W
voltage: 12.28 V
percentage: 0%
capacity: 100%
technology: lithium-ion
If you wish to install acpi for future uses, you can do so by typing the command below:
samar@Techgaun:~$ sudo apt-get install acpi
Play around with different switches by looking over the help and man pages. You will find this tool quite useful :)
Read more...
Bookmark this post: |
|
Tuesday 12 February 2013
Chaining The Proxies With ProxyChains
In this tutorial, we will learn to redirect our TCP traffics through the chain of proxies using a well known tool named ProxyChains.
ProxyChains is a tool for tunneling TCP and DNS traffics through chain of several proxy servers which supports HTTP, SOCKS4, and SOCKS5 proxy servers. Hence, this tool leverages several usages such as anonymity, bypassing filters, running any program through proxy servers, etc.
You can DOWNLOAD proxychains from SourceForge. In ubuntu, you can directly install it from repos:
Once you have installed the proxychains, you need to configure this tool. The global configuration file is located at /etc/proxychains.conf so if you wish to have your own configuration file, you could either create the proxychains.conf file in the current working directory or at $HOME/.proxychains/proxychains.conf.
In my example, I'll edit the global configuration file by issuing the command:
First, we will have to select the kind of chaining option we want to use. We can use one of the dynamic_chain, strict_chain, and random_chain chaining options. In most cases, it is good to just use the dynamic_chain so we uncomment the line containing dynamic_chain and comment all other chaining options.
Then we need to grab some proxies and then insert at the end of our configuration file which would look like:
You could add as much as proxy servers in the list. Btw, the asterisks in the above example do not mean wildcards, they are just there to symbolize some proxy server. There are free sites on the Internet which provide big database of different kinds of proxies. Even several proxy scrapers are available all over the internet and you could even write one on your own. So getting list of good proxies is not the difficult job. Once you finish the configuration, you can run any command through proxychains. The syntax is as simple as below:
For example, below is the example nmap scan run through the proxychains:
P.S. If you are interested in some GUI for using proxychains, you can use ProxyChainsGUI. Lastly, the default package from Ubuntu repository seems to be missing the proxyresolv command so I would recommend to compile the source code locally.
Read more...
ProxyChains is a tool for tunneling TCP and DNS traffics through chain of several proxy servers which supports HTTP, SOCKS4, and SOCKS5 proxy servers. Hence, this tool leverages several usages such as anonymity, bypassing filters, running any program through proxy servers, etc.
You can DOWNLOAD proxychains from SourceForge. In ubuntu, you can directly install it from repos:
samar@samar-Techgaun:~$ sudo apt-get install proxychains
Once you have installed the proxychains, you need to configure this tool. The global configuration file is located at /etc/proxychains.conf so if you wish to have your own configuration file, you could either create the proxychains.conf file in the current working directory or at $HOME/.proxychains/proxychains.conf.
In my example, I'll edit the global configuration file by issuing the command:
samar@samar-Techgaun:~$ sudo nano /etc/proxychains.conf
First, we will have to select the kind of chaining option we want to use. We can use one of the dynamic_chain, strict_chain, and random_chain chaining options. In most cases, it is good to just use the dynamic_chain so we uncomment the line containing dynamic_chain and comment all other chaining options.
Then we need to grab some proxies and then insert at the end of our configuration file which would look like:
socks4 127.0.0.1 9050
socks5 192.168.2.90 3128
socks5 1**.1**.*.* 8080
socks5 192.168.2.90 3128
socks5 1**.1**.*.* 8080
You could add as much as proxy servers in the list. Btw, the asterisks in the above example do not mean wildcards, they are just there to symbolize some proxy server. There are free sites on the Internet which provide big database of different kinds of proxies. Even several proxy scrapers are available all over the internet and you could even write one on your own. So getting list of good proxies is not the difficult job. Once you finish the configuration, you can run any command through proxychains. The syntax is as simple as below:
samar@samar-Techgaun:~$ proxychains <any_command>
For example, below is the example nmap scan run through the proxychains:
samar@samar-Techgaun:~$ proxychains nmap -p 1-1000 -O victim.tld
P.S. If you are interested in some GUI for using proxychains, you can use ProxyChainsGUI. Lastly, the default package from Ubuntu repository seems to be missing the proxyresolv command so I would recommend to compile the source code locally.
Read more...
Bookmark this post: |
|
Wednesday 30 January 2013
Search Text Over Multiple PDF Files In Linux
You can use the old grep command or the small script using the pdftotext command to search text over multiple pdf files but we are talking about a simple utility that lets us to search text in PDF files.
The pdfgrep tool lets you perform grep style search over multiple pdf files easily from the terminal. It depends upon the poppler package and under ubuntu, you can just type the command below to install pdfgrep.
Once pdfgrep is installed, you can perform any kind of search like you would do while using the grep command. Enjoy grepping the PDF files :)
Read more...
The pdfgrep tool lets you perform grep style search over multiple pdf files easily from the terminal. It depends upon the poppler package and under ubuntu, you can just type the command below to install pdfgrep.
samar@\Techgaun:~$ sudo apt-get install pdfgrep
Once pdfgrep is installed, you can perform any kind of search like you would do while using the grep command. Enjoy grepping the PDF files :)
Read more...
Bookmark this post: |
|
Tuesday 29 January 2013
Swasthani.com Swasthani Ripper
Yesterday I came to know that I can listen Swasthani online at this site, www.swasthani.com and I decided to write a swasthani audio downloader. Since it would be useful for everyone, here is the script.
From the site itself, Sri Swasthani Brata Katha is a very popular ritual observed in Nepal in the Poush month (January – February) during winter. Goddess Sri Swasthani, known to grant wishes of her devotees, is worshipped for the whole month of Poush. The Swasthani Brat Katha (story) is recited everyday. The month long telling of the tales are dedicated to the Goddess and the stories that are mainly narrated are those of Swasthani Devi, Lord Shiva and other Gods.
Save the above file as swasthani, then chmod for executable permission and run it. If you have problem copying above code, you can check the Swasthani Downloader at GitHub. Enjoy listening Swasthani, geeks :)
Read more...
From the site itself, Sri Swasthani Brata Katha is a very popular ritual observed in Nepal in the Poush month (January – February) during winter. Goddess Sri Swasthani, known to grant wishes of her devotees, is worshipped for the whole month of Poush. The Swasthani Brat Katha (story) is recited everyday. The month long telling of the tales are dedicated to the Goddess and the stories that are mainly narrated are those of Swasthani Devi, Lord Shiva and other Gods.
#!/bin/bash
###############################################
# Swasthani.com Swasthani Ripper       #
# Samar @ http://www.techgaun.com       #
###############################################
if [[ ! -f /tmp/swasthani.txt ]]
then
 wget http://www.swasthani.com/ -O - | egrep '<li class="leaf( first| last)?"><a href="/swasthani/' | grep -o '<a .*href=.*>' | sed -e 's/<a /\n<a /g' | sed -e 's/<a .*href=['"'"'"]//' -e 's/["'"'"'].*$//' -e '/^$/ d' > /tmp/swasthani.txt
fi

while read -r line
do
 wget "http://www.swasthani.com$line" -O - | egrep 'data="soundFile=http://www.swasthani.com/system/files/' | cut -d\" -f6 | cut -d= -f2 | wget -nc -i -
done </tmp/swasthani.txt
Save the above file as swasthani, then chmod for executable permission and run it. If you have problem copying above code, you can check the Swasthani Downloader at GitHub. Enjoy listening Swasthani, geeks :)
Read more...
Bookmark this post: |
|
How To Check Which Groups You Belong To
In this post, you will get to know about a simple command that lets you know what groups the particular user belongs to. Users and groups are the one of the several concepts employed in the Linux systems for access control.
From the man page, the groups command does is:
Print group memberships for each USERNAME or, if no USERNAME is specified, for the current process (which may differ if the groups database has changed).
So if you are interested in finding what group a particular user is in, run the command as below. Replace samar with your USERNAME and you are good to go:
I hope this proves useful :)
Read more...
From the man page, the groups command does is:
Print group memberships for each USERNAME or, if no USERNAME is specified, for the current process (which may differ if the groups database has changed).
So if you are interested in finding what group a particular user is in, run the command as below. Replace samar with your USERNAME and you are good to go:
samar@Techgaun:~$ groups samar
samar : samar adm cdrom sudo vboxusers ....
samar : samar adm cdrom sudo vboxusers ....
I hope this proves useful :)
Read more...
Bookmark this post: |
|
Thursday 10 January 2013
Create Backup Of List Of Apps Installed In Ubuntu
When my laptop's HDD was near to death, I had created backup of the list of all applications and packages I'd installed in my Ubuntu so that I would be able to install them easily in my new system in new HDD. I had forgotten about it but today suddenly remembered and am sharing this simple technique.
Fire up the terminal and type the following:
Now the list of packages will be saved in the installed_apps file and you can use it for future reference. I hope this is useful ;)
Read more...
samar@Techgaun:~$ sudo dpkg --get-selections > installed_apps
Now the list of packages will be saved in the installed_apps file and you can use it for future reference. I hope this is useful ;)
Read more...
Bookmark this post: |
|
Monday 17 December 2012
Evince Rocks! Foxit Sucks
Been using foxit PDF reader for a while in Windows 7 while I was working on some windows-based project and I was totally pissed off with foxit.
Not being a fan of Adobe's PDF reader, I decided to try foxit PDF reader since some of the online reviews were stating Foxit to be a great PDF reader. Basically, I was looking for a very simple, fast, and lightweight PDF reader that suits me. Foxit has everything a good PDF reader should have. It works pretty well with any PDF documents I need to read. It is supposedly lightweight, fast, secure, and it has millions of users. But, it was neither fast nor lightweight in its default configuration, in my experience.
But its still lacking some feature, that I do not know. I just can not feel the software. I am not satisfied with the level of user experience this software imparts. What do you guys have to say about this??
Then I decided to use the famous PDF reader from linux world, the Evince. And, what can I say?
If you have not tried evince for windows, download it from Gnome's Evince page and try right away on Windows. It should work on Windows XP, Vista, and 7.
Read more...
Not being a fan of Adobe's PDF reader, I decided to try foxit PDF reader since some of the online reviews were stating Foxit to be a great PDF reader. Basically, I was looking for a very simple, fast, and lightweight PDF reader that suits me. Foxit has everything a good PDF reader should have. It works pretty well with any PDF documents I need to read. It is supposedly lightweight, fast, secure, and it has millions of users. But, it was neither fast nor lightweight in its default configuration, in my experience.
But its still lacking some feature, that I do not know. I just can not feel the software. I am not satisfied with the level of user experience this software imparts. What do you guys have to say about this??
Then I decided to use the famous PDF reader from linux world, the Evince. And, what can I say?
Evince ROCKS!!!
If you have not tried evince for windows, download it from Gnome's Evince page and try right away on Windows. It should work on Windows XP, Vista, and 7.
Download Evince
Read more...
Bookmark this post: |
|
Tuesday 27 November 2012
Basic Guide To Crontab
Well it has been a busy week and now I am back with this basic guide to running cron jobs in linux.
Cron is a time-based job scheduling program which comes shipped with most linux distributions and enables users to execute commands or set of scripts automatically at the specified time. Cron is particularly important for system administration and maintenance though it can be used for any general purpose such as scheduling your porn downloads. My post is based on the Vixie Cron, a popular implementation of Cron by Paul Vixie which is by default the cron program in Ubuntu. Other implementations of the cron are anacron, fcron, and dcron.
The cron daemon runs automatically during the startup and consults the crontabs (shorthand for cron tables) for jobs to executed. Crontabs are nothing but files containing the commands to be run at the specified time, however there is a particular (& simple to remember) syntax for cronjobs to be run. You could directly edit these cron tables files but that's not the recommended way. You should always use the crontab editor to add/update jobs to the crontabs.
Cron searches its spool area (located at /var/spool/cron/crontabs) for crontab files which are named after the user accounts from /etc/passwd. As a matter of precaution, you should not directly manipulate the files in there. Additionally, cron reads the /etc/crontab file and all the files in /etc/cron.d. Also, there are other folders: /etc/cron.daily, /etc/cron.hourly, /etc/cron.monthly, and /etc/cron.weekly. And, the name of folders are obvious so if you put the scripts in one of these folders, your script will run either daily or hourly or monthly or weekly.
Since you got several files associated with cron, you have bunch of options on running the cron jobs in your system. First lets start with the crontab tool which is used to install, deinstall or list the tables used to drive the cron daemon. If the /etc/cron.allow file exists, then you must be listed (one user per line) therein in order to be allowed to use this command. If the /etc/cron.allow file does not exist but the /etc/cron.deny file does exist, then you must not be listed in the /etc/cron.deny file in order to use this command.
The crontab command provides following options:
crontab can be configured to use any of the editors.
To list the user's crontab, use the following command:
To delete existing cron table, type:
To install new cron table, type:
If you are wishing to add commands that require root privilege for execution, make sure you prepend sudo in the above command to add such commands to crontabs. The cron table expects each line of cron job in the following format:
These columns take the values in the range below:
Apart from these values, the cron entries accept other special characters. In each of these five columns:
Now we know the format of how should each line of cron entry should look like, lets see some examples.
The information below is taken directly from man 5 crontab and can serve as a good reference for special strings in place of the 5 columns:
Now that you are feeling better with cronjobs, we will see how we can add cronjobs in the /etc/crontab file. The different thing about this crontab file is that there is an extra column for user field so that the particular cron entry is executed as the specified user.
The format for cron entry is similar to what we've seen already, with an extra column for user.
You can use any text editor such as nano or vi to edit the /etc/crontab file.
Finally, once you update crons, make sure to restart the cron daemon to ensure your new cron entries get read by the daemon.
I hope this primer for crontab helps you in your job scheduling job :D
Read more...
Cron is a time-based job scheduling program which comes shipped with most linux distributions and enables users to execute commands or set of scripts automatically at the specified time. Cron is particularly important for system administration and maintenance though it can be used for any general purpose such as scheduling your porn downloads. My post is based on the Vixie Cron, a popular implementation of Cron by Paul Vixie which is by default the cron program in Ubuntu. Other implementations of the cron are anacron, fcron, and dcron.
The cron daemon runs automatically during the startup and consults the crontabs (shorthand for cron tables) for jobs to executed. Crontabs are nothing but files containing the commands to be run at the specified time, however there is a particular (& simple to remember) syntax for cronjobs to be run. You could directly edit these cron tables files but that's not the recommended way. You should always use the crontab editor to add/update jobs to the crontabs.
Cron searches its spool area (located at /var/spool/cron/crontabs) for crontab files which are named after the user accounts from /etc/passwd. As a matter of precaution, you should not directly manipulate the files in there. Additionally, cron reads the /etc/crontab file and all the files in /etc/cron.d. Also, there are other folders: /etc/cron.daily, /etc/cron.hourly, /etc/cron.monthly, and /etc/cron.weekly. And, the name of folders are obvious so if you put the scripts in one of these folders, your script will run either daily or hourly or monthly or weekly.
Since you got several files associated with cron, you have bunch of options on running the cron jobs in your system. First lets start with the crontab tool which is used to install, deinstall or list the tables used to drive the cron daemon. If the /etc/cron.allow file exists, then you must be listed (one user per line) therein in order to be allowed to use this command. If the /etc/cron.allow file does not exist but the /etc/cron.deny file does exist, then you must not be listed in the /etc/cron.deny file in order to use this command.
The crontab command provides following options:
        -e edit user's crontab
 -l list user's crontab
 -r delete user's crontab
 -i prompt before deleting user's crontab
crontab can be configured to use any of the editors.
To list the user's crontab, use the following command:
$ crontab -l
To delete existing cron table, type:
$ crontab -ir
To install new cron table, type:
$ crontab -e
If you are wishing to add commands that require root privilege for execution, make sure you prepend sudo in the above command to add such commands to crontabs. The cron table expects each line of cron job in the following format:
m h dom mon dow command
i.e.
minute hour day_of_month month day_of_week command_to_run
i.e.
minute hour day_of_month month day_of_week command_to_run
These columns take the values in the range below:
  Minute (0 - 59)
  Hour (0 - 23)
  Day of month (1 - 31)
  Month (1 - 12)
  Day of the week (0 - 6, 0 representing sunday, 6 saturday)
Apart from these values, the cron entries accept other special characters. In each of these five columns:
- An asterisk (*) stands for "every".
- Slashes (/) are used to describe increments of ranges eg. */15 in minutes column would execute the specified command regularly and repeatedly after 15 minute.
- Commas (,) are used to separate items of a list. eg. using 1,2,3 in the 5th field (day of week) would mean Mondays, Tuesday, and Wednesday.
- Hyphens (-) are used to define ranges. For example, 2-5 in the 5th field would indicate Tuesday to Friday.
Now we know the format of how should each line of cron entry should look like, lets see some examples.
Run backup at 5 a.m every Monday
0 5 * * 1 /bin/mybackup
Run backup at 12:01 a.m monday-thursday
1 0 * * 1-4 /bin/mybackup
Run backup at 12:01 a.m on monday and thursday
1 0 * * 1,4 /bin/mybackup
Run backup every minute
* * * * * /bin/mybackup
Run backup every 15 minutes repeatedly
*/15 * * * * /bin/mybackup
The information below is taken directly from man 5 crontab and can serve as a good reference for special strings in place of the 5 columns:
              @reboot        Run once, at startup.
              @yearly        Run once a year, "0 0 1 1 *".
              @annually      (same as @yearly)
              @monthly       Run once a month, "0 0 1 * *".
              @weekly        Run once a week, "0 0 * * 0".
              @daily         Run once a day, "0 0 * * *".
              @midnight      (same as @daily)
              @hourly        Run once an hour, "0 * * * *".
Now that you are feeling better with cronjobs, we will see how we can add cronjobs in the /etc/crontab file. The different thing about this crontab file is that there is an extra column for user field so that the particular cron entry is executed as the specified user.
The format for cron entry is similar to what we've seen already, with an extra column for user.
m h dom mon dow user command
You can use any text editor such as nano or vi to edit the /etc/crontab file.
Finally, once you update crons, make sure to restart the cron daemon to ensure your new cron entries get read by the daemon.
$ sudo service cron restart
I hope this primer for crontab helps you in your job scheduling job :D
Read more...
Bookmark this post: |
|
Friday 23 November 2012
Video Transcoding With HandBrake In Linux
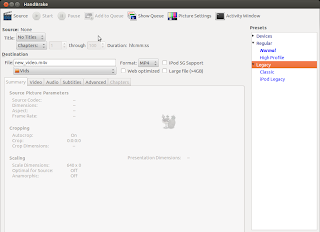
HandBrake is a GPL-licensed, multiplatform, multithreaded video transcoder available for major platforms: linux, mac, and windows. HandBrake converts video from nearly any format to a handful of modern ones.

Handbrake can save output in two containers, MP4 and MKV and I've been using it as a MKV transcoder for a while and I'm quite satisfied with it. Even though the official wiki says its not a ripper, I can see it to be quite useful DVD ripper.
Handbrake is available in CLI (HandBrakeCLI) and GUI (ghb) mode. Hence this offers the flexibility to choose the appropriate version according to your linux personality. As of now, we can install HandBrake from PPA and the latest version is v. 0.9.8 released back in July this year.
HandBrake can be installed from PPA. Issue the following commands in your terminal
Or if you wish to install the GUI version, type:
I recommend using the CLI version since you can transcode/convert videos much more efficiently if you use the CLI version. But if you are not comfortable with the command line interfaces, the GUI version of HandBrake is also quite good.
Only problem I have felt is the naming convention of the commands for both the GUI and CLI versions of the tool. In order to run two versions of this tool, you need to type HandBrakeCLI for CLI version and ghb for the GUI version. The problem here is with the naming convention for the binaries. I mean, the names handbrake-cli and handbrake-gtk would be more straightforward than these badly chosen names. Otherwise, the tool does pretty good job of video conversion and can be good alternative if you are not comfortable with ffmpeg. Note that ffmpeg is also capable of video conversions of different formats and is a great tool. :)
Read more...
Handbrake can save output in two containers, MP4 and MKV and I've been using it as a MKV transcoder for a while and I'm quite satisfied with it. Even though the official wiki says its not a ripper, I can see it to be quite useful DVD ripper.
Handbrake is available in CLI (HandBrakeCLI) and GUI (ghb) mode. Hence this offers the flexibility to choose the appropriate version according to your linux personality. As of now, we can install HandBrake from PPA and the latest version is v. 0.9.8 released back in July this year.
HandBrake can be installed from PPA. Issue the following commands in your terminal
$ sudo add-apt-repository ppa:stebbins/handbrake-releases
$ sudo apt-get update
$ sudo apt-get install handbrake-cli
$ sudo apt-get update
$ sudo apt-get install handbrake-cli
Or if you wish to install the GUI version, type:
$ sudo apt-get install handbrake-gtk
I recommend using the CLI version since you can transcode/convert videos much more efficiently if you use the CLI version. But if you are not comfortable with the command line interfaces, the GUI version of HandBrake is also quite good.

Only problem I have felt is the naming convention of the commands for both the GUI and CLI versions of the tool. In order to run two versions of this tool, you need to type HandBrakeCLI for CLI version and ghb for the GUI version. The problem here is with the naming convention for the binaries. I mean, the names handbrake-cli and handbrake-gtk would be more straightforward than these badly chosen names. Otherwise, the tool does pretty good job of video conversion and can be good alternative if you are not comfortable with ffmpeg. Note that ffmpeg is also capable of video conversions of different formats and is a great tool. :)
Read more...
Bookmark this post: |
|
Tuesday 13 November 2012
Linux Mint 14 "Nadia" RC Released
After 6 months of incremental development on top of stable and reliable technologies such as MATE, Cinnamon and MDM, Linux Mint 14 codenamed "Nadia" RC is available for download.

For the first time since Linux Mint 11, the development team was able to capitalize on upstream technology which works and fits its goals. After 6 months of incremental development, Linux Mint 14 features an impressive list of improvements, increased stability and a refined desktop experience. This new release comes with updated software and brings refinements and new features to make your desktop even more comfortable to use. Linux Mint 14 "Nadia" is based upon the Ubuntu 12.10 "Quantal Quetzal".
The download links (torrents and direct both) are available at this blog post.
Useful Links
Download Nadia
Nadia release notes
Whats New in Nadia
Read more...
Bookmark this post: |
|
Saturday 3 November 2012
Make Your Linux Read Papers For You
Fed up of reading text files and PDF papers? Is you eye power degrading day by day and can't hold even few minutes on screen? Don't worry, you can easily make your linux system speak and read all those papers for you.
There are several text to speech tools available for linux but in this post, I will be using festival, a Text-to-speech (TTS) tool written in C++. Also, Ubuntu and its derivation are most likely to include by default espeak, a multi-lingual software speech synthesizer.
For ubuntu and debian based system, type the following to install festival:
Moreover, you can also install a pidgin plugin that uses festival:
For now, you just need to install festival. Once you have installed festival, you can make it read text files for you. If you go through the online manual of festival, it says:
"Festival works in two fundamental modes, command mode and text-to-speech mode (tts-mode). In command mode, information (in files or through standard input) is treated as commands and is interpreted by a Scheme interpreter. In tts-mode, information (in files or through standard input) is treated as text to be rendered as speech. The default mode is command mode, though this may change in later versions."
To read a text file, you can use the command below:
The festival will start in text-to-speech (tts) mode and will read your text files for you. But now, we want to read PDF files and if you try to read PDF files directly (festival --tts paper.pdf), festival is most likely to speak the cryptic terms since it actually reads the content of PDF including its header (You know PDF is different than simple text file). So we will use a pdftotext command to convert our pdf file and then pipe the output to the festival so that festival reads the PDF files for us. You can use the syntax as below to read PDF files.
If you want to skip all those table of contents and prefaces or if you are in the middle of PDF, you can use the switches of pdftotext to change the starting and ending pages. For example, if I wish to read page 10 - 14 of a PDF, I would do:
Enjoy learning. I hope this post helps you ;)
Read more...
There are several text to speech tools available for linux but in this post, I will be using festival, a Text-to-speech (TTS) tool written in C++. Also, Ubuntu and its derivation are most likely to include by default espeak, a multi-lingual software speech synthesizer.
For ubuntu and debian based system, type the following to install festival:
samar@samar-Techgaun:~$ sudo apt-get install festival
Moreover, you can also install a pidgin plugin that uses festival:
samar@samar-Techgaun:~$ sudo apt-get install pidgin-festival
For now, you just need to install festival. Once you have installed festival, you can make it read text files for you. If you go through the online manual of festival, it says:
"Festival works in two fundamental modes, command mode and text-to-speech mode (tts-mode). In command mode, information (in files or through standard input) is treated as commands and is interpreted by a Scheme interpreter. In tts-mode, information (in files or through standard input) is treated as text to be rendered as speech. The default mode is command mode, though this may change in later versions."
To read a text file, you can use the command below:
samar@samar-Techgaun:~$ festival --tts mypaper.txt
The festival will start in text-to-speech (tts) mode and will read your text files for you. But now, we want to read PDF files and if you try to read PDF files directly (festival --tts paper.pdf), festival is most likely to speak the cryptic terms since it actually reads the content of PDF including its header (You know PDF is different than simple text file). So we will use a pdftotext command to convert our pdf file and then pipe the output to the festival so that festival reads the PDF files for us. You can use the syntax as below to read PDF files.
samar@samar-Techgaun:~$ pdftotext paper.pdf - | festival --tts
If you want to skip all those table of contents and prefaces or if you are in the middle of PDF, you can use the switches of pdftotext to change the starting and ending pages. For example, if I wish to read page 10 - 14 of a PDF, I would do:
samar@samar-Techgaun:~$ pdftotext -f 10 -l 14 paper.pdf - | festival --tts
Enjoy learning. I hope this post helps you ;)
Read more...
Bookmark this post: |
|
Subscribe to:
Posts (Atom)