Thursday 13 August 2015
Skype on Ubuntu 15.04 64 bit and AMD graphics card
This post solves particular use case with skype not working on Ubuntu 15.04 with AMD as the graphics card.
I was having problem with skype not opening and I quickly figured out that there was some issue with finding shared object file.
So, first make sure you have fglrx installed. You might see errors such as below:
The fix is simple. You must be able to search for the file that's being complained about
Based on the output, just do something like below:-
And, there you go. Skype launches without complaining anything. If you receive complains about similar shared object files, make sure to install appropriate packages and then specify via LD_PRELOAD. To make permanent and be able to open via just click on Skype icon, you can create a symbolic link:
Read more...
So, first make sure you have fglrx installed. You might see errors such as below:
skype: error while loading shared libraries: libGL.so.1: cannot open shared object file: No such file or directory
The fix is simple. You must be able to search for the file that's being complained about
$ find /usr/ -name "libGL.so.1"
Based on the output, just do something like below:-
$ LD_PRELOAD=/usr/lib32/fglrx/libGL.so.1 skype
And, there you go. Skype launches without complaining anything. If you receive complains about similar shared object files, make sure to install appropriate packages and then specify via LD_PRELOAD. To make permanent and be able to open via just click on Skype icon, you can create a symbolic link:
ln -sf /usr/lib32/fglrx/libGL.so.1 /usr/lib/libGL.so.1
Read more...
Bookmark this post: | 
|
Sunday 8 February 2015
Uppercase and Lowercase Conversion - Bash Style
After a long long time, I am back with this short post to convert case of strings in bash. While you might have been using tr (Like I did for a while) for this purpose, bash 4 has a built-in way for the case conversion.
Withour further ado, here is a session
I hope this helps ;)
Read more...
$ x="samar"

$ echo "${x^}"
Samar

$ echo "${x^^}"
SAMAR

$ y="${x^^}"

$ echo $y
SAMAR

$ echo "${y,}"
sAMAR

$ echo "${y,,}"
samar
I hope this helps ;)
Read more...
Bookmark this post: |
|
Wednesday 23 July 2014
Hacking KU Admission Web Application
This post is a write-up of my attempt to keep local scene safe and secure and make institutions, programmers and digital users aware about security.
Today, at 1:00 PM, I got a call from a very talented NJ Subedi who told me that some guy told him that the guy could change all his scores and would be able to get him admitted to Kathmandu University even without appearing on the exam. WTH! I told myself. I was working on one of my projects so at first, I did not think of trying to attack the admission app. But, I could not resist my curiosity and soon began some basic recon.
My findings:-
Server: Ubuntu 12.04
OpenSSH 5.9p1
Apache httpd 2.2.22
MariaDB (possibly 5.5.37)
I started smelling bad things when I found that MariaDB port 3306 was open to the world and anybody could access the database server given the credentials.
I knew of an authentication bypass bug in MySQL/MariaDB. But, it was for older versions of database server so after a quick test, I ruled out this exploit.
SSH port was also open to the world and SSH bruteforcing is still common. I don't know if a weak password has been chosen for one of the accounts in the system but I ruled out this possibility believing that there had to be something else: some kind of coding flaw or deployment issue.
Then, I started looking at the source code of common.js file. I could immediately sense that the directory browsing has been enabled so I could list files in a directory without an index file. Looking at the pattern of javascript backup file, I could access backup copies of PHP files as well which revealed critical database credentials. BOOOOM!!! The MariaDB service is open to the world and I now have database credentials of the apply.ku.edu.np/cbt web application. It turned out easier than expected
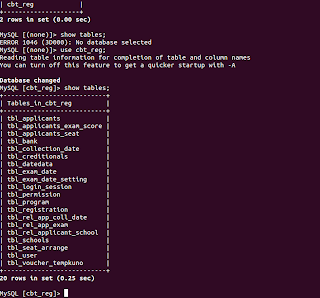
I then switched to the terminal and got access to the MariaDB server. Within half an hour, I was already in the database. As a proof, I've attached 'show tables' output. No further queries were executed.
Remedies:-
Timeline:-
1:10 PM - started looking into the issue
1:35 PM - got access to the system
2:00 PM - notified concerned people
3:30 PM - bugs resolved
4:00 PM - Vulnerability disclosed
That was quickly fixed. Wish all the applicants good luck.
Updates:- Later, I found a blind SQL injection flaw and a possible vulnerability that would allow to send reset e-mail to all the applicants (I did not test the later one but can still see the possibility of existence of this flaw.)
The blind SQL injection flaw was in ajaxCallFile.php which checks for valid e-mail during password reset process. Its non-trivial but still possible to use this flaw to attack the web application. Below are few PoC URLs:
http://apply.ku.edu.np/admission/ajaxCallFile.php?&emailID=%27%20or%201=%271%27;%20--+&entryMode=checkEmail (A seemingly invalid e-mail address but SQL contextual emailID generates a valid result
http://apply.ku.edu.np/admission/ajaxCallFile.php?&emailID=%27%20or%201=%271%27%20+AND+1=1;%20--+&entryMode=checkEmail (I'm using AND 1 = 1 which is always true here)
http://apply.ku.edu.np/admission/ajaxCallFile.php?&emailID=%27%20or%201=%271%27%20+AND+1=2;%20--+&entryMode=checkEmail (I'm using AND 1=2 this time)
http://apply.ku.edu.np/admission/ajaxCallFile.php?&emailID=%27%20or%201=%271%27%20+AND+5=substr%28@@VERSION,1,1%29;%20--+&entryMode=checkEmail (Here, I find the major version of database is 5.x)
http://apply.ku.edu.np/admission/ajaxCallFile.php?&emailID=%27%20or%201=%271%27%20+AND+%27snipped_for_security%27=substr%28user%28%29,1,3%29;%20--+&entryMode=checkEmail (Here, I can see that first three characters of current db user are 'snipped_for_security')
It was also quickly fixed. Thanks for working hard on keeping applicants safe.
Read more...
Today, at 1:00 PM, I got a call from a very talented NJ Subedi who told me that some guy told him that the guy could change all his scores and would be able to get him admitted to Kathmandu University even without appearing on the exam. WTH! I told myself. I was working on one of my projects so at first, I did not think of trying to attack the admission app. But, I could not resist my curiosity and soon began some basic recon.
My findings:-
Server: Ubuntu 12.04
OpenSSH 5.9p1
Apache httpd 2.2.22
MariaDB (possibly 5.5.37)
I started smelling bad things when I found that MariaDB port 3306 was open to the world and anybody could access the database server given the credentials.
I knew of an authentication bypass bug in MySQL/MariaDB. But, it was for older versions of database server so after a quick test, I ruled out this exploit.
SSH port was also open to the world and SSH bruteforcing is still common. I don't know if a weak password has been chosen for one of the accounts in the system but I ruled out this possibility believing that there had to be something else: some kind of coding flaw or deployment issue.
Then, I started looking at the source code of common.js file. I could immediately sense that the directory browsing has been enabled so I could list files in a directory without an index file. Looking at the pattern of javascript backup file, I could access backup copies of PHP files as well which revealed critical database credentials. BOOOOM!!! The MariaDB service is open to the world and I now have database credentials of the apply.ku.edu.np/cbt web application. It turned out easier than expected
I then switched to the terminal and got access to the MariaDB server. Within half an hour, I was already in the database. As a proof, I've attached 'show tables' output. No further queries were executed.

Remedies:-
- Remove all backup copies of PHP files
- Filter port 3306 and 22 for limited trusted IPs only (Though I didn't bruteforce MariaDB or SSHD, it can also be an issue).
- Check if any users have been added to linux system and mariadb mysql.user list and revoke necessary accesses
- Change mariadb users and passwords
- Disable remote access to MariaDB
Timeline:-
1:10 PM - started looking into the issue
1:35 PM - got access to the system
2:00 PM - notified concerned people
3:30 PM - bugs resolved
4:00 PM - Vulnerability disclosed
That was quickly fixed. Wish all the applicants good luck.
Updates:- Later, I found a blind SQL injection flaw and a possible vulnerability that would allow to send reset e-mail to all the applicants (I did not test the later one but can still see the possibility of existence of this flaw.)
The blind SQL injection flaw was in ajaxCallFile.php which checks for valid e-mail during password reset process. Its non-trivial but still possible to use this flaw to attack the web application. Below are few PoC URLs:
http://apply.ku.edu.np/admission/ajaxCallFile.php?&emailID=%27%20or%201=%271%27;%20--+&entryMode=checkEmail (A seemingly invalid e-mail address but SQL contextual emailID generates a valid result
http://apply.ku.edu.np/admission/ajaxCallFile.php?&emailID=%27%20or%201=%271%27%20+AND+1=1;%20--+&entryMode=checkEmail (I'm using AND 1 = 1 which is always true here)
http://apply.ku.edu.np/admission/ajaxCallFile.php?&emailID=%27%20or%201=%271%27%20+AND+1=2;%20--+&entryMode=checkEmail (I'm using AND 1=2 this time)
http://apply.ku.edu.np/admission/ajaxCallFile.php?&emailID=%27%20or%201=%271%27%20+AND+5=substr%28@@VERSION,1,1%29;%20--+&entryMode=checkEmail (Here, I find the major version of database is 5.x)
http://apply.ku.edu.np/admission/ajaxCallFile.php?&emailID=%27%20or%201=%271%27%20+AND+%27snipped_for_security%27=substr%28user%28%29,1,3%29;%20--+&entryMode=checkEmail (Here, I can see that first three characters of current db user are 'snipped_for_security')
It was also quickly fixed. Thanks for working hard on keeping applicants safe.
Read more...
Bookmark this post: |
|
Sunday 8 June 2014
Postgresql Backup To Amazon S3 On OpenShift Origin
To move forward, you need to backup. Backing up your production data is critical and with Postgresql, you can backup WAL (Write Ahead Log) archives and this post gives you steps to accomplish for backing up postgresql WALs to Amazon S3 on your OpenShift Origin using WAL-E.
WAL-E is a great tool that simplifies backup of postgresql by performing continuous archiving of PostgreSQL WAL files and base backups. Enough blabbering, you can reach out technical docs on how WAL works. I'll just mention series of commands and steps necessary for sending WAL archives to AWS S3 bucket.
On the node containing application with postgresql cartridge, run the following commands:
Then, edit the postgresql configuration file so as to turn on wal archiving. You need to find the right container for your postgresql in /var/lib/openshift (Its quite trivial if you know OpenShift basics).
Finally, you need to ensure that you are taking base backups periodically which can be achieved by utilizing cron cartridge. Clone the repo, add the following file and push to the application.
Make sure you use the OPENSHIFT_POSTGRESQL_DIR env-var or some other env-var that does not have two forward slashes adjacently since WAL-E hates it.
This should help you keep your data backed up regularly and you can enjoy beers.
Read more...
WAL-E is a great tool that simplifies backup of postgresql by performing continuous archiving of PostgreSQL WAL files and base backups. Enough blabbering, you can reach out technical docs on how WAL works. I'll just mention series of commands and steps necessary for sending WAL archives to AWS S3 bucket.
On the node containing application with postgresql cartridge, run the following commands:
$ yum install python-pip lzop pv
$ rpm -Uvh ftp://ftp.pbone.net/mirror/ftp5.gwdg.de/pub/opensuse/repositories/home:/p_conrad:/branches/Fedora_19/x86_64/daemontools-0.76-3.1.x86_64.rpm
$ pip install wal-e
$ umask u=rwx,g=rx,o=
$ mkdir -p /etc/wal-e.d/env
$ echo "secret-key-content" > /etc/wal-e.d/env/AWS_SECRET_ACCESS_KEY
$ echo "access-key" > /etc/wal-e.d/env/AWS_ACCESS_KEY_ID
$ echo 's3://backup/production/pgsql' > \
  /etc/wal-e.d/env/WALE_S3_PREFIX
$ chmod -R 765 /etc/wal-e.d/
Then, edit the postgresql configuration file so as to turn on wal archiving. You need to find the right container for your postgresql in /var/lib/openshift (Its quite trivial if you know OpenShift basics).
$ vi YOUR_OO_CONTAINER/postgresql/data/postgresql.conf
wal_level = archive # hot_standby in 9.0 is also acceptable
archive_mode = on
archive_command = 'envdir /etc/wal-e.d/env wal-e wal-push %p'
archive_timeout = 60
archive_mode = on
archive_command = 'envdir /etc/wal-e.d/env wal-e wal-push %p'
archive_timeout = 60
Finally, you need to ensure that you are taking base backups periodically which can be achieved by utilizing cron cartridge. Clone the repo, add the following file and push to the application.
$ vi .openshift/cron/daily/postgres-backup
#!/bin/bash

if [ $OPENSHIFT_POSTGRESQL_DIR ]; then
        /usr/bin/envdir /etc/wal-e.d/env /bin/wal-e backup-push ${OPENSHIFT_POSTGRESQL_DIR}data
fi

$ git add .openshift/cron/daily/postgres-backup
$ git commit -m "Added pg cron script"
$ git push origin master
Make sure you use the OPENSHIFT_POSTGRESQL_DIR env-var or some other env-var that does not have two forward slashes adjacently since WAL-E hates it.
This should help you keep your data backed up regularly and you can enjoy beers.
Read more...
Bookmark this post: |
|
Thursday 5 June 2014
Setting Up JVM Heap Size In JBoss OpenShift Origin
Openshift is an awesome technology and have fell in love with it recently. In this post, I will talk about how we can set JVM Heap Size for your application using Jboss cartridge.
If you look into the content of the standalone.conf located at $OPENSHIFT_JBOSSEAP_DIR/bin, you can see that JVM_HEAP_RATIO is set to 0.5 if it is not already set.
And, later this ratio is used to calculate the max_heap so as to inject the maximum heap size in jboss java process. You can see how gear memory size is used to calculate the value of heap size. This is the very reason why the default installation allocates half of total gear memory size.
OpenShift keeps its number of environment variables inside /var/lib/openshift/OPENSHIFT_GEAR_UUID/.env so what I did was SSH to my OO node and run the command below (you should replace your gear's UUID):
Alternatively, rhc set-env JVM_HEAP_RATIO=0.7 -a appName should also work but I have not tried it.
Read more...
If you look into the content of the standalone.conf located at $OPENSHIFT_JBOSSEAP_DIR/bin, you can see that JVM_HEAP_RATIO is set to 0.5 if it is not already set.
if [ -z "$JVM_HEAP_RATIO" ]; then
        JVM_HEAP_RATIO=0.5
And, later this ratio is used to calculate the max_heap so as to inject the maximum heap size in jboss java process. You can see how gear memory size is used to calculate the value of heap size. This is the very reason why the default installation allocates half of total gear memory size.
max_memory_mb=${OPENSHIFT_GEAR_MEMORY_MB}
max_heap=$( echo "$max_memory_mb * $JVM_HEAP_RATIO" | bc | awk '{print int($1+0.5)}')
OpenShift keeps its number of environment variables inside /var/lib/openshift/OPENSHIFT_GEAR_UUID/.env so what I did was SSH to my OO node and run the command below (you should replace your gear's UUID):
$ echo -n 0.7 > /var/lib/openshift/52e8d31bfa7c355caf000039/.env/JVM_HEAP_RATIO
Alternatively, rhc set-env JVM_HEAP_RATIO=0.7 -a appName should also work but I have not tried it.
Read more...
Bookmark this post: |
|
Friday 11 April 2014
Patching Your OpenShift Origin Against Heartbleed vulnerability
Recently the heartbleed bug was exposed which existed in all the services that used OpenSSL 1.0.1 through 1.0.1f (inclusive) for years already. This weakness allows stealing the information protected, under normal conditions, by the SSL/TLS encryption used to secure the Internet by reading the memory of the system without need of any kind of access.
I've been administering OpenShift applications recently and this post outlines the measures I took to secure the OpenShift applications from this critical vulnerability.
In order to check if you are vulnerable or not, you can either check OpenSSL version:
Alternatively, you can use one of the online tools or the offline python tool to check if you are vulnerable or not.
Note that in case of OpenShift origin, you will have to update the OpenSSL package in brokers and nodes such that all the OpenShift apps are secure.
Once completed, verify the installation of patched version:
We'll have to restart the proxy systems (node-proxy) for the nodes for the effect of the patch. In fact, we will have to restart all the services that use the vulnerable OpenSSL versions.
I hope this helps :)
Read more...
I've been administering OpenShift applications recently and this post outlines the measures I took to secure the OpenShift applications from this critical vulnerability.
In order to check if you are vulnerable or not, you can either check OpenSSL version:
# openssl version -a
OpenSSL 1.0.1e-fips 11 Feb 2013
built on: Wed Jan 8 07:20:55 UTC 2014
platform: linux-x86_64
OpenSSL 1.0.1e-fips 11 Feb 2013
built on: Wed Jan 8 07:20:55 UTC 2014
platform: linux-x86_64
Alternatively, you can use one of the online tools or the offline python tool to check if you are vulnerable or not.
Note that in case of OpenShift origin, you will have to update the OpenSSL package in brokers and nodes such that all the OpenShift apps are secure.
# yum install -y openssl
Once completed, verify the installation of patched version:
# openssl version -a
OpenSSL 1.0.1e-fips 11 Feb 2013
built on: Tue Apr 8 00:29:11 UTC 2014
platform: linux-x86_64
# rpm -q --changelog openssl | grep CVE-2014-0160
- pull in upstream patch for CVE-2014-0160
OpenSSL 1.0.1e-fips 11 Feb 2013
built on: Tue Apr 8 00:29:11 UTC 2014
platform: linux-x86_64
# rpm -q --changelog openssl | grep CVE-2014-0160
- pull in upstream patch for CVE-2014-0160
We'll have to restart the proxy systems (node-proxy) for the nodes for the effect of the patch. In fact, we will have to restart all the services that use the vulnerable OpenSSL versions.
# systemctl restart openshift-node-web-proxy.service
# /bin/systemctl reload httpd.service
# /bin/systemctl reload httpd.service
I hope this helps :)
Read more...
Bookmark this post: |
|
Saturday 7 December 2013
MyISAM to InnoDB Engine Conversion
We are doing lots of MyISAM to InnoDB migrations in our production environment and since the engine conversion needs to be done for each table, its good to generate a script to do so when you have huge number of databases each having several tables. Here is the quick script to generate script for MyISAM to InnoDB engine conversion.
Once the SQL script is generated, all you need to do is run the sql file to your database server.
Note that while InnoDB is generally the better engine than MyISAM and MySQL has InnoDB as default engine since 5.5, MyISAM has its own benefits and you should make performance analysis in preferably a test environment while converting the engine type.
Read more...
mysql -u <user> -p -e "SELECT concat('ALTER TABLE \`',TABLE_SCHEMA,'\`.\`',TABLE_NAME,'\` ENGINE=InnoDB;') FROM Information_schema.TABLES WHERE TABLE_SCHEMA in ('database1', 'database2', 'databaseN') AND ENGINE = 'MyISAM' AND TABLE_TYPE='BASE TABLE'" | tail -n+2 > alter.sql
Once the SQL script is generated, all you need to do is run the sql file to your database server.
$ mysql -u <user> -p < alter.sql
Note that while InnoDB is generally the better engine than MyISAM and MySQL has InnoDB as default engine since 5.5, MyISAM has its own benefits and you should make performance analysis in preferably a test environment while converting the engine type.
Read more...
Bookmark this post: |
|
Monday 18 November 2013
Install HTTrack On CentOS
Since I could not find the rpm in the repo, here is the quick How To to install HTTrack website copier on CentOS.
This should do all. If you wish not to install zlib compression support, you can skip the first step and run the configure as ./configure --without-zlib. I hope this helps :)
Read more...
$ yum install zlib-devel
$ wget http://download.httrack.com/cserv.php3?File=httrack.tar.gz -O httrack.tar.gz
$ tar xvfz httrack.tar.gz
$ cd httrack-3.47.27
$ ./configure
$ make && sudo make install
$ wget http://download.httrack.com/cserv.php3?File=httrack.tar.gz -O httrack.tar.gz
$ tar xvfz httrack.tar.gz
$ cd httrack-3.47.27
$ ./configure
$ make && sudo make install
This should do all. If you wish not to install zlib compression support, you can skip the first step and run the configure as ./configure --without-zlib. I hope this helps :)
Read more...
Bookmark this post: |
|
Sunday 10 November 2013
JPEG To PDF With Imagemagick
ImageMagick is an awesome toolkit with several powerful features for image creation and manipulation. You can use ImageMagick to translate, flip, mirror, rotate, scale, shear and transform images, adjust image colors, apply various special effects, or draw text, lines, polygons, ellipses and Bezier curves. Here, I will show how you can use ImageMagick suite to convert JPEG to PDF quickly.
First make sure imagemagick suite is installed in your system.
Ubuntu/Debian
CentOS/Fedora
Below are some of the examples of using convert which is a part of ImageMagick to convert Jpeg to PDF.
Single Image
Multiple Images
Resize and Convert
Negate and Convert
You can actually use different available switches to get your output as expected. I usually use PdfTk in conjunction with this technique to work in different scenarios and it really works great. I hope this helps :)
Read more...
First make sure imagemagick suite is installed in your system.
Ubuntu/Debian
$ sudo apt-get install imagemagick
CentOS/Fedora
$ sudo yum install imagemagick
Below are some of the examples of using convert which is a part of ImageMagick to convert Jpeg to PDF.
Single Image
$ convert image.jpg image.pdf
Multiple Images
$ convert 1.jpg 2.jpg 3.jpg output.pdf
Resize and Convert
$ convert -resize 80% image.jpg image.pdf
Negate and Convert
$ convert -negate image.jpg image.pdf
You can actually use different available switches to get your output as expected. I usually use PdfTk in conjunction with this technique to work in different scenarios and it really works great. I hope this helps :)
Read more...
Bookmark this post: |
|
Saturday 9 November 2013
Fix Your Ubuntu
Recently Ubuntu has been known for turning into an advertising company and has been accused of not protecting user's privacy so just came across this site that fixes your ubuntu by applying some patches to turn off some of the invasive features of Ubuntu.
FixUbuntu.com
Read more...
FixUbuntu.com
Read more...
Bookmark this post: |
|
Wednesday 6 November 2013
Recursion and Memoization - A Fibonacci Example
In this post, I will try to describe why memoization can be a great optmization technique in the recursive function implementations with an example of fibonacci sequence.
Straight from Wikipedia, memoization is an optimization technique used primarily to speed up computer programs by having function calls avoid repeating the calculation of results for previously processed inputs.
Basically, we maintain a lookup table and store the computer values for particular cases which lets us query and use the corresponding value for particular case present in the lookup tables. This reduces function call overheads. Now in order to understand why this is a great optimization technique in recursion, lets first draw a recursion tree for finding nth term in fibonacci sequence.
We can clearly see the calls to fib() with same arguments several times. For example, fib(1) is called 5 times and fib(2) 3 times. Thus, we are repeating same calculations multiple times and imagine how this would look like for large value of n. If we would have maintained the value of fib(n) in the lookup table when computed the value for the first time.
The python code without memoization looks like below and notice the runtime:
And, now with the memoization, you will notice significant improvement in runtime.
If you run and compare above two codes, you will find that the addition of memoization significantly improves the performance of recursive functions. Recursion are generally known to be terribly slow however memoization can make the difference insignificant. Some languages now provide memoization as the language feature natively or via third party APIs such as groovy memoize.
Read more...
Straight from Wikipedia, memoization is an optimization technique used primarily to speed up computer programs by having function calls avoid repeating the calculation of results for previously processed inputs.
Basically, we maintain a lookup table and store the computer values for particular cases which lets us query and use the corresponding value for particular case present in the lookup tables. This reduces function call overheads. Now in order to understand why this is a great optimization technique in recursion, lets first draw a recursion tree for finding nth term in fibonacci sequence.
                           fib(5)
                             /\
                            /  \
                           /    \
                          /      \
                     fib(4)       fib(3)
                      /\               /\
                     /  \             /  \
                    /    \           /    \
                   /      \         /      \
               fib(3)    fib(2)     fib(2) fib(1) -> 1
                  /\         /\          /\
                 /  \       /  \        /  \
                /    \     /    \      /    \
               /      \   /      \    /      \
          fib(2) fib(1) fib(1) fib(0) fib(1) fib(0) -> 0
          /\        |     |      |        |    |
         /  \       1     1      0        1    0
    fib(1) fib(0)
       |      |
       1      0
We can clearly see the calls to fib() with same arguments several times. For example, fib(1) is called 5 times and fib(2) 3 times. Thus, we are repeating same calculations multiple times and imagine how this would look like for large value of n. If we would have maintained the value of fib(n) in the lookup table when computed the value for the first time.
The python code without memoization looks like below and notice the runtime:
#!/usr/bin/python

def fib(n):
        if n == 0:
                return 0
        if n == 1:
                return 1
        val = fib(n-1) + fib(n-2)
        return val

print fib(50)
And, now with the memoization, you will notice significant improvement in runtime.
#!/usr/bin/python

known = {0:0, 1:1}

def fib(n):
        if n in known:
                return known[n]
        known[n] = fib(n-1) + fib(n-2)
        return known[n]

print fib(50)
If you run and compare above two codes, you will find that the addition of memoization significantly improves the performance of recursive functions. Recursion are generally known to be terribly slow however memoization can make the difference insignificant. Some languages now provide memoization as the language feature natively or via third party APIs such as groovy memoize.
Read more...
Bookmark this post: |
|
Friday 18 October 2013
Pattern Based Database GRANT In MySQL
At our workplace, we need to manage database access for different teams and rather than adding another grant on the addition of new database, I've been following a pattern based database access grants in MySQL.
We let different teams work on replicas of same database and hence append the terms such as _dev and _qa as the database prefix. And, we define GRANTS based on these patterns. An example would be something like below:
I hope this proves useful for some of you guys :)
Read more...
We let different teams work on replicas of same database and hence append the terms such as _dev and _qa as the database prefix. And, we define GRANTS based on these patterns. An example would be something like below:
GRANT ALL ON `%\_dev`.* TO 'user'@'%' IDENTIFIED BY 'password' WITH GRANT OPTION;
I hope this proves useful for some of you guys :)
Read more...
Bookmark this post: |
|
Thursday 17 October 2013
How I am Trying To Keep My Eyes Safe On Computer
Lately I've been on computer a lot and with this, the usual problem with most computer users has started to bother me. Going through some of the blogs online for keeping eyes safe while using computer, I came through few suggestions and in this post, I'm writing how I'm trying to keep my eyes safe. Though not tremendously helpful for everybody, I thought I would share this and you could also use my technique.
The problem with computer addicts is not getting their eyes off the computer for much longer period and though I've been trying to remember to keep my eyes off the computer in regular interval, I usually never implement this.
My two principles based on my readings on different websites are:
But, you can not really follow the rules so easily and I had to find some other alternative to do so. This is how I am doing it now.
Create two cron jobs for each of the above mentioned methods such that notify-send is triggered in each 20 minutes and each 2 hours informing you to keep yourself safe from computers. So my /etc/crontab looked like this:
You need to replace techgaun with your username and need to give correct path to the ico file if you like to use icon like me. Otherwise, you could just omit the icon in notify-send command. I hope this proves useful for some of you :)
Read more...
The problem with computer addicts is not getting their eyes off the computer for much longer period and though I've been trying to remember to keep my eyes off the computer in regular interval, I usually never implement this.
My two principles based on my readings on different websites are:
- 20-20-20: In the 20 minutes interval, keep your eyes away for 20 seconds (& view other objects which are around 20 feet away)
- 2 hrs rule: In the 2 hours interval, stay away from computers for at least 2 minutes.
But, you can not really follow the rules so easily and I had to find some other alternative to do so. This is how I am doing it now.
Create two cron jobs for each of the above mentioned methods such that notify-send is triggered in each 20 minutes and each 2 hours informing you to keep yourself safe from computers. So my /etc/crontab looked like this:
*/20 * * * * techgaun export DISPLAY=:0.0 && /usr/bin/notify-send -i /home/techgaun/Samar/scripts/eye_inv.ico "20 - 20 - 20" "Time to take rest. Keep your eye safe :)"
01 */2 * * * techgaun export DISPLAY=:0.0 && /usr/bin/notify-send -i /home/techgaun/Samar/scripts/eye_inv.ico "2 hrs eye rest" "Time to take rest for 2 minutes. Keep your eye safe :)"
You need to replace techgaun with your username and need to give correct path to the ico file if you like to use icon like me. Otherwise, you could just omit the icon in notify-send command. I hope this proves useful for some of you :)
Read more...
Bookmark this post: |
|
Monday 16 September 2013
Two Ways To Print Lines From File Reversely
Ever tried to print lines in files in the reverse order? You will know two simple methods to print lines from file in the reverse order.
Imagine a file somefile.txt with content something like this:
You can achieve the same effect through other techniques as well but I'll stick to these simple ones :)
Read more...
Imagine a file somefile.txt with content something like this:
a
b
c
d
e
b
c
d
e
Method 1:
$ tac somefile.txt
e
d
c
b
a
e
d
c
b
a
Method 2:
$ sort -r somefile.txt
e
d
c
b
a
e
d
c
b
a
You can achieve the same effect through other techniques as well but I'll stick to these simple ones :)
Read more...
Bookmark this post: |
|
Wednesday 7 August 2013
Compile 32 Bit Binaries On 64 Bit Machine
Well I had this special need if you recall my previous blog post since my friend had 64 bit machine. Sometimes, there might be this necessity to compile 32 bit binaries on your 64 bit machine. This post describes how to do so.
First make sure the necessary x86 libraries are installed. We require 32-bit shared libraries for AMD64 to compile binaries in 32 bit format. The command below installs the i386 version of libc6-dev:
Now you can compile your code in 32 bit binary format using the -m32 flag where 32 represents the x86 processor (-m64 would mean x64 processor).
I hope this helps :)
Read more...
First make sure the necessary x86 libraries are installed. We require 32-bit shared libraries for AMD64 to compile binaries in 32 bit format. The command below installs the i386 version of libc6-dev:
$ sudo apt-get install libc6-dev-i386
Now you can compile your code in 32 bit binary format using the -m32 flag where 32 represents the x86 processor (-m64 would mean x64 processor).
$ gcc -m32 -o test test.c
I hope this helps :)
Read more...
Bookmark this post: |
|
Pointers Without Pointer Variables
Since a pointer variable is nothing but a variable holding 4 bytes memory address (at least on 32-bit addressing), I had a thought that non-pointer variables which can hold 4-bytes of data can be used in place of pointer variables. This post shows how this can be achieved.
The code example below uses an unsigned integer variable in order to store memory addresses to point the integer array.
The same concept can be used to use non-pointer variable for pointing other datatypes. After all, its about correct type-casting and since 4 bytes datatype can hold memory addresses, pointer is not always necessary. It must be noted that the increment would be different for different datatypes. Since integer requires 4 bytes, ptr is incremented in this example. If we had character array, then ptr would have to be increased by 1 since char type requires 1 byte.
However, pointers are there to make our life easy. It was just for fun :)
Read more...
The code example below uses an unsigned integer variable in order to store memory addresses to point the integer array.
#includeint main(int argc, char **argv) { int num[] = {1, 2, 3, 4, 5}; unsigned int ptr; int i; ptr = (unsigned int) num; for (i = 0; i < 5; i++) { printf("%p - %d\n\n", (void *) ptr, *(int *)(ptr)); ptr = ptr + 4; } return 0; }
The same concept can be used to use non-pointer variable for pointing other datatypes. After all, its about correct type-casting and since 4 bytes datatype can hold memory addresses, pointer is not always necessary. It must be noted that the increment would be different for different datatypes. Since integer requires 4 bytes, ptr is incremented in this example. If we had character array, then ptr would have to be increased by 1 since char type requires 1 byte.
However, pointers are there to make our life easy. It was just for fun :)
Read more...
Bookmark this post: |
|
Friday 28 June 2013
Rename MySQL root User [How To]
MySQL ships with the default user 'root' who has all kind of access to the MySQL database. We often wish to rename this user to something else because of maybe security issues or any other reason. While renaming 'root' to something else is not going to alleviate all sorts of security problems that may arise, it is good idea to rename 'root' to some other name.
Login to the MySQL console and then type the following SQL statements:
It is often good idea to drop anonymous users and the test database because of security reasons. I bet you are never going to use that test database so why keep it? Run the SQL statements as below to do so:
Also, make sure you use strong passwords. You can use mysqladmin to change passwords.
The later two commands are to ensure that no log of any of your MySQL queries or admin level commands have been stored in the history.
I hope this helps :)
Read more...
Login to the MySQL console and then type the following SQL statements:
mysql> use mysql;
mysql> update user set user="some_other_user" where user="root";
mysql> flush privileges;
mysql> update user set user="some_other_user" where user="root";
mysql> flush privileges;
It is often good idea to drop anonymous users and the test database because of security reasons. I bet you are never going to use that test database so why keep it? Run the SQL statements as below to do so:
mysql> drop user "";
mysql> drop database test;
mysql> drop database test;
Also, make sure you use strong passwords. You can use mysqladmin to change passwords.
$ mysqladmin -u my_new_user -p password 's0m3_r4nd0m_$|r0ng_p455'
$ history -c
$ rm ~/.mysql_history
The later two commands are to ensure that no log of any of your MySQL queries or admin level commands have been stored in the history.
I hope this helps :)
Read more...
Bookmark this post: |
|
Thursday 27 June 2013
Manual Sun Java Installation In Linux
Be it be multiple installations of java or be it be custom server, you might run into the necessity of manually installing java. This tutorial will provide step by step commands for installing java manually in linux.
Though the process was done on CentOS, it should work for most linux systems with or without slightest modifications. The process below installs Sun Java and configures Sun Java to be the default java to be used. Below are the steps I took to install and configure java in my system:
If you wish to reconfigure the default java, you can run alternatives as below & choose the appropriate option:
I hope this helps :)
Read more...
Though the process was done on CentOS, it should work for most linux systems with or without slightest modifications. The process below installs Sun Java and configures Sun Java to be the default java to be used. Below are the steps I took to install and configure java in my system:
$ cd /opt/java
$ wget http://download.oracle.com/otn-pub/java/jdk/6u45-b15/jdk-6u45-linux-i586.tar.gz
$ tar xvfz jdk-6u45-linux-i586.tar.gz
$ echo 'export JAVA_HOME=/opt/java/jdk1.6.0_45' > /etc/profile.d/sun-jdk.sh
$ echo 'export PATH=$JAVA_HOME/bin:$PATH' >> /etc/profile.d/sun-jdk.sh
$ alternatives --install /usr/bin/java java /opt/java/jdk1.6.0_45/bin/java 2
$ java -version
java version "1.6.0_45"
Java(TM) SE Runtime Environment (build 1.6.0_45-b06)
Java HotSpot(TM) 64-Bit Server VM (build 20.45-b01, mixed mode)
If you wish to reconfigure the default java, you can run alternatives as below & choose the appropriate option:
$ alternatives --config java
Read more...
Bookmark this post: |
|
Friday 21 June 2013
Share Local Directory With Remote Server During RDP Session
Well I have to constantly rdesktop to the remote servers at my workstation and sometimes I have to copy files and folders from my local machine. This post will provide you the steps on how to share files and folders with remote server during rdp session.
Normally, your RDP session would start with the following command:
But we wish to do something extra i.e. we need to share our directory with the remote server. The good news is that the rdesktop command supports device redirection using a -r flag which can be repeated.
Your command would look something like below:
You can then access your share as a drive or media. I hope this helps :)
Read more...
$ rdesktop -g90% your_server
But we wish to do something extra i.e. we need to share our directory with the remote server. The good news is that the rdesktop command supports device redirection using a -r flag which can be repeated.
Your command would look something like below:
$ rdesktop -g90% -r disk:share=/home/samar/scripts myserver
You can then access your share as a drive or media. I hope this helps :)
Read more...
Bookmark this post: |
|
Wednesday 19 June 2013
Customizing Jenkins Layout
We use jenkins as our continuous integration server at our workplace and without any doubt, its the best CI tool I've used. We had been thinking of customizing jenkins layout to fit our company and thanks to the plugins developed by people who make jenkins not just another random tool on the internet, but the software WITH awesome community.
There are particularly two plugins that seemed to fit our scenario. The first one is Simple Theme Plugin and the second one is Page Markup Plugin.
The later one does allow to add markups to the page but didn't best fit for our scenario. So we decided to use the Simple Theme Plugin. Installing the plugin is straightforward in jenkins. Once the Simple Theme Plugin is installed, a new content box will appear in your Manage Jenkins -> Configure System which will look something like below:

This plugin requires you to specify your own custom .css and .js file. The good thing about jenkins is you can place your own content at the JENKINS_INSTALL_DIR/userContent/ directory and then access it via http://yourbuildserver.tld/jenkins_path/userConent/yourfile.ext. I was working on the windows system where my jenkins install was at C:\.jenkins\ and hence I placed my CSS and image files inside the userContent directory of jenkins install folder. This should not be very difficult on any other systems if you are familiar with jenkins and your OS.
You can grab the jenkins css files from the webapp root directory (I was using tomcat so I grabbed it from inside there) and then edit the css as per your necessity. In my case, I had to change the header style only so my CSS looked something like below:
This is all you have to do. Btw, don't fall for the readme.txt inside userContent directory which says: "Files in this directory will be served under your http://server/jenkins/userContent/". Make sure you specify the URL according to your server configuration not according to this specification thus appending "/jenkins" in your URL.
Read more...
The later one does allow to add markups to the page but didn't best fit for our scenario. So we decided to use the Simple Theme Plugin. Installing the plugin is straightforward in jenkins. Once the Simple Theme Plugin is installed, a new content box will appear in your Manage Jenkins -> Configure System which will look something like below:

This plugin requires you to specify your own custom .css and .js file. The good thing about jenkins is you can place your own content at the JENKINS_INSTALL_DIR/userContent/ directory and then access it via http://yourbuildserver.tld/jenkins_path/userConent/yourfile.ext. I was working on the windows system where my jenkins install was at C:\.jenkins\ and hence I placed my CSS and image files inside the userContent directory of jenkins install folder. This should not be very difficult on any other systems if you are familiar with jenkins and your OS.
You can grab the jenkins css files from the webapp root directory (I was using tomcat so I grabbed it from inside there) and then edit the css as per your necessity. In my case, I had to change the header style only so my CSS looked something like below:
#top-panel {
  background-size:100% 100%;
  height: 43px;
  }

#top-panel td#login-field span a {
    background: none; }

#top-panel a {
    background: url("title.png") 0 0 no-repeat;
    display: block;
    width: 107px;
    height: 27px;
    margin: 10px 0 -5px 0px; }
#top-panel td > a img {
      display: none; }
This is all you have to do. Btw, don't fall for the readme.txt inside userContent directory which says: "Files in this directory will be served under your http://server/jenkins/userContent/". Make sure you specify the URL according to your server configuration not according to this specification thus appending "/jenkins" in your URL.
Read more...
Bookmark this post: |
|
Subscribe to:
Posts (Atom)