Showing posts with label ubuntu 12.04. Show all posts
Showing posts with label ubuntu 12.04. Show all posts
Thursday 17 October 2013
How I am Trying To Keep My Eyes Safe On Computer
Lately I've been on computer a lot and with this, the usual problem with most computer users has started to bother me. Going through some of the blogs online for keeping eyes safe while using computer, I came through few suggestions and in this post, I'm writing how I'm trying to keep my eyes safe. Though not tremendously helpful for everybody, I thought I would share this and you could also use my technique.
The problem with computer addicts is not getting their eyes off the computer for much longer period and though I've been trying to remember to keep my eyes off the computer in regular interval, I usually never implement this.
My two principles based on my readings on different websites are:
But, you can not really follow the rules so easily and I had to find some other alternative to do so. This is how I am doing it now.
Create two cron jobs for each of the above mentioned methods such that notify-send is triggered in each 20 minutes and each 2 hours informing you to keep yourself safe from computers. So my /etc/crontab looked like this:
You need to replace techgaun with your username and need to give correct path to the ico file if you like to use icon like me. Otherwise, you could just omit the icon in notify-send command. I hope this proves useful for some of you :)
Read more...
The problem with computer addicts is not getting their eyes off the computer for much longer period and though I've been trying to remember to keep my eyes off the computer in regular interval, I usually never implement this.
My two principles based on my readings on different websites are:
- 20-20-20: In the 20 minutes interval, keep your eyes away for 20 seconds (& view other objects which are around 20 feet away)
- 2 hrs rule: In the 2 hours interval, stay away from computers for at least 2 minutes.
But, you can not really follow the rules so easily and I had to find some other alternative to do so. This is how I am doing it now.
Create two cron jobs for each of the above mentioned methods such that notify-send is triggered in each 20 minutes and each 2 hours informing you to keep yourself safe from computers. So my /etc/crontab looked like this:
*/20 * * * * techgaun export DISPLAY=:0.0 && /usr/bin/notify-send -i /home/techgaun/Samar/scripts/eye_inv.ico "20 - 20 - 20" "Time to take rest. Keep your eye safe :)"
01 */2 * * * techgaun export DISPLAY=:0.0 && /usr/bin/notify-send -i /home/techgaun/Samar/scripts/eye_inv.ico "2 hrs eye rest" "Time to take rest for 2 minutes. Keep your eye safe :)"
You need to replace techgaun with your username and need to give correct path to the ico file if you like to use icon like me. Otherwise, you could just omit the icon in notify-send command. I hope this proves useful for some of you :)
Read more...
Bookmark this post: | 
|
Tuesday 2 April 2013
Step By Step Turbo C++ IDE In Ubuntu 12.04
Well we are doing our labs based on the traditional Turbo C++ IDE and I decided to write this blog post with the information on how I installed it on my Ubuntu box.
First thing first, download Turbo C from internet. For your ease, I've uploaded it HERE.
We will have to install dosbox to run the windows dos mode applications so lets install it:
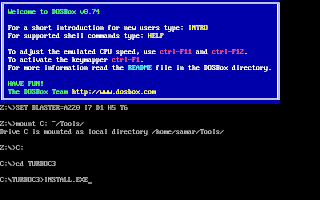
Once you install dosbox, unzip the content to somewhere in your $HOME directory. In my example, I unzipped the content of the Turbo C zip file into ~/Tools/TurboC3/. Now launch the dosbox by typing dosbox in the terminal. A dosbox emulation window will appear which will look like your old DOS system.
In the window, type the following (make sure you type appropriate path for your installation):
And, then follow the on-screen information. Refer to the screenshots below:


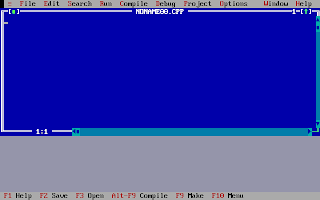
Once the installation finishes, you can then run the Turbo C by mounting the drive again and then navigation to C:\TC (cd C:\TC\BIN). If you need to use the Turbo C++ IDE frequently, my suggestion would be to add an autoexec entry in your dosbox configuration. The default configuration file resides in ~/.dosbox/dosbox-0.74.conf (My version of dosbox is 0.74 hence the file name, by default). Open up this file and in the section of [autoexec], add the lines below:
Adding this entry will run the above commands during the startup of dosbox thus giving you the Turbo C IDE interface directly on running dosbox.
I hope this helps :)
Read more...
First thing first, download Turbo C from internet. For your ease, I've uploaded it HERE.
We will have to install dosbox to run the windows dos mode applications so lets install it:
samar@samar-Techgaun:~$ sudo apt-get install dosbox
Once you install dosbox, unzip the content to somewhere in your $HOME directory. In my example, I unzipped the content of the Turbo C zip file into ~/Tools/TurboC3/. Now launch the dosbox by typing dosbox in the terminal. A dosbox emulation window will appear which will look like your old DOS system.
In the window, type the following (make sure you type appropriate path for your installation):
mount C: ~/Tools/
C:
cd TurboC3
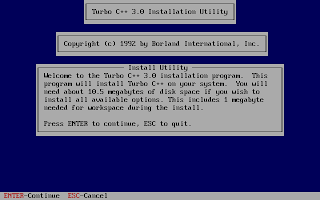
INSTALL.EXE
C:
cd TurboC3
INSTALL.EXE
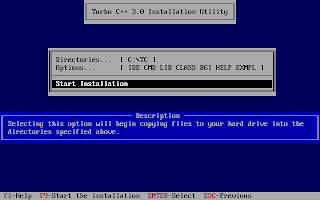
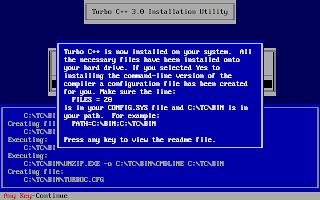
And, then follow the on-screen information. Refer to the screenshots below:


Once the installation finishes, you can then run the Turbo C by mounting the drive again and then navigation to C:\TC (cd C:\TC\BIN). If you need to use the Turbo C++ IDE frequently, my suggestion would be to add an autoexec entry in your dosbox configuration. The default configuration file resides in ~/.dosbox/dosbox-0.74.conf (My version of dosbox is 0.74 hence the file name, by default). Open up this file and in the section of [autoexec], add the lines below:
[autoexec]
mount C: ~/Tools/
C:
cd TC\BIN
TC.EXE
mount C: ~/Tools/
C:
cd TC\BIN
TC.EXE
Adding this entry will run the above commands during the startup of dosbox thus giving you the Turbo C IDE interface directly on running dosbox.
I hope this helps :)
Read more...
Bookmark this post: |
|
Saturday 9 March 2013
Check Battery Status From Terminal [How To]
Since I had no graphical interface for some reason, I needed some alternative way to check the battery status. If your system includes acpi command, you can just use this command but I had no luxury of such command and here's how you can do the same thing I did.
The /proc/ virtual file system has information of different states among which the ACPI information is one. The ACPI information provides us the details of device configurations and power status of the system. Below is one flavor of the command to check the battery status:
The first command provides the general status of the battery and the second command provides the detailed information about battery. The other way is to use the upower command that talks with the upowerd daemon. Upowerd daemon is a default daemon in ubuntu and few others for power statistics. Below is the command to see battery details:
If you wish to install acpi for future uses, you can do so by typing the command below:
Play around with different switches by looking over the help and man pages. You will find this tool quite useful :)
Read more...
samar@Techgaun:~$ cat /proc/acpi/battery/BAT0/state
present: yes
capacity state: ok
charging state: charged
present rate: unknown
remaining capacity: unknown
present voltage: 12276 mV
samar@Techgaun:~$ cat /proc/acpi/battery/BAT0/info
present: yes
design capacity: 4400 mAh
last full capacity: unknown
battery technology: rechargeable
design voltage: 10800 mV
design capacity warning: 250 mAh
design capacity low: 150 mAh
cycle count: 0
capacity granularity 1: 10 mAh
capacity granularity 2: 25 mAh
model number: Primary
serial number:
battery type: LION
OEM info: Hewlett-Packard
present: yes
capacity state: ok
charging state: charged
present rate: unknown
remaining capacity: unknown
present voltage: 12276 mV
samar@Techgaun:~$ cat /proc/acpi/battery/BAT0/info
present: yes
design capacity: 4400 mAh
last full capacity: unknown
battery technology: rechargeable
design voltage: 10800 mV
design capacity warning: 250 mAh
design capacity low: 150 mAh
cycle count: 0
capacity granularity 1: 10 mAh
capacity granularity 2: 25 mAh
model number: Primary
serial number:
battery type: LION
OEM info: Hewlett-Packard
The first command provides the general status of the battery and the second command provides the detailed information about battery. The other way is to use the upower command that talks with the upowerd daemon. Upowerd daemon is a default daemon in ubuntu and few others for power statistics. Below is the command to see battery details:
samar@Techgaun:~$ upower -i /org/freedesktop/UPower/devices/battery_BAT0
native-path: /sys/devices/LNXSYSTM:00/LNXSYBUS:00/PNP0C0A:00/power_supply/BAT0
vendor: Hewlett-Packard
model: Primary
power supply: yes
updated: Sat Mar 9 10:12:17 2013 (5 seconds ago)
has history: yes
has statistics: yes
battery
present: yes
rechargeable: yes
state: empty
energy: 0 Wh
energy-empty: 0 Wh
energy-full: 47.52 Wh
energy-full-design: 47.52 Wh
energy-rate: 0 W
voltage: 12.28 V
percentage: 0%
capacity: 100%
technology: lithium-ion
If you wish to install acpi for future uses, you can do so by typing the command below:
samar@Techgaun:~$ sudo apt-get install acpi
Play around with different switches by looking over the help and man pages. You will find this tool quite useful :)
Read more...
Bookmark this post: |
|
Friday 23 November 2012
Video Transcoding With HandBrake In Linux
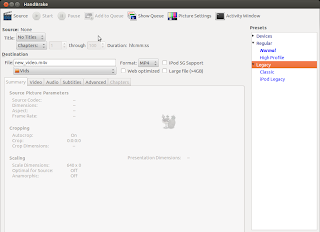
HandBrake is a GPL-licensed, multiplatform, multithreaded video transcoder available for major platforms: linux, mac, and windows. HandBrake converts video from nearly any format to a handful of modern ones.

Handbrake can save output in two containers, MP4 and MKV and I've been using it as a MKV transcoder for a while and I'm quite satisfied with it. Even though the official wiki says its not a ripper, I can see it to be quite useful DVD ripper.
Handbrake is available in CLI (HandBrakeCLI) and GUI (ghb) mode. Hence this offers the flexibility to choose the appropriate version according to your linux personality. As of now, we can install HandBrake from PPA and the latest version is v. 0.9.8 released back in July this year.
HandBrake can be installed from PPA. Issue the following commands in your terminal
Or if you wish to install the GUI version, type:
I recommend using the CLI version since you can transcode/convert videos much more efficiently if you use the CLI version. But if you are not comfortable with the command line interfaces, the GUI version of HandBrake is also quite good.
Only problem I have felt is the naming convention of the commands for both the GUI and CLI versions of the tool. In order to run two versions of this tool, you need to type HandBrakeCLI for CLI version and ghb for the GUI version. The problem here is with the naming convention for the binaries. I mean, the names handbrake-cli and handbrake-gtk would be more straightforward than these badly chosen names. Otherwise, the tool does pretty good job of video conversion and can be good alternative if you are not comfortable with ffmpeg. Note that ffmpeg is also capable of video conversions of different formats and is a great tool. :)
Read more...
Handbrake can save output in two containers, MP4 and MKV and I've been using it as a MKV transcoder for a while and I'm quite satisfied with it. Even though the official wiki says its not a ripper, I can see it to be quite useful DVD ripper.
Handbrake is available in CLI (HandBrakeCLI) and GUI (ghb) mode. Hence this offers the flexibility to choose the appropriate version according to your linux personality. As of now, we can install HandBrake from PPA and the latest version is v. 0.9.8 released back in July this year.
HandBrake can be installed from PPA. Issue the following commands in your terminal
$ sudo add-apt-repository ppa:stebbins/handbrake-releases
$ sudo apt-get update
$ sudo apt-get install handbrake-cli
$ sudo apt-get update
$ sudo apt-get install handbrake-cli
Or if you wish to install the GUI version, type:
$ sudo apt-get install handbrake-gtk
I recommend using the CLI version since you can transcode/convert videos much more efficiently if you use the CLI version. But if you are not comfortable with the command line interfaces, the GUI version of HandBrake is also quite good.

Only problem I have felt is the naming convention of the commands for both the GUI and CLI versions of the tool. In order to run two versions of this tool, you need to type HandBrakeCLI for CLI version and ghb for the GUI version. The problem here is with the naming convention for the binaries. I mean, the names handbrake-cli and handbrake-gtk would be more straightforward than these badly chosen names. Otherwise, the tool does pretty good job of video conversion and can be good alternative if you are not comfortable with ffmpeg. Note that ffmpeg is also capable of video conversions of different formats and is a great tool. :)
Read more...
Bookmark this post: |
|
Saturday 3 November 2012
Make Your Linux Read Papers For You
Fed up of reading text files and PDF papers? Is you eye power degrading day by day and can't hold even few minutes on screen? Don't worry, you can easily make your linux system speak and read all those papers for you.
There are several text to speech tools available for linux but in this post, I will be using festival, a Text-to-speech (TTS) tool written in C++. Also, Ubuntu and its derivation are most likely to include by default espeak, a multi-lingual software speech synthesizer.
For ubuntu and debian based system, type the following to install festival:
Moreover, you can also install a pidgin plugin that uses festival:
For now, you just need to install festival. Once you have installed festival, you can make it read text files for you. If you go through the online manual of festival, it says:
"Festival works in two fundamental modes, command mode and text-to-speech mode (tts-mode). In command mode, information (in files or through standard input) is treated as commands and is interpreted by a Scheme interpreter. In tts-mode, information (in files or through standard input) is treated as text to be rendered as speech. The default mode is command mode, though this may change in later versions."
To read a text file, you can use the command below:
The festival will start in text-to-speech (tts) mode and will read your text files for you. But now, we want to read PDF files and if you try to read PDF files directly (festival --tts paper.pdf), festival is most likely to speak the cryptic terms since it actually reads the content of PDF including its header (You know PDF is different than simple text file). So we will use a pdftotext command to convert our pdf file and then pipe the output to the festival so that festival reads the PDF files for us. You can use the syntax as below to read PDF files.
If you want to skip all those table of contents and prefaces or if you are in the middle of PDF, you can use the switches of pdftotext to change the starting and ending pages. For example, if I wish to read page 10 - 14 of a PDF, I would do:
Enjoy learning. I hope this post helps you ;)
Read more...
There are several text to speech tools available for linux but in this post, I will be using festival, a Text-to-speech (TTS) tool written in C++. Also, Ubuntu and its derivation are most likely to include by default espeak, a multi-lingual software speech synthesizer.
For ubuntu and debian based system, type the following to install festival:
samar@samar-Techgaun:~$ sudo apt-get install festival
Moreover, you can also install a pidgin plugin that uses festival:
samar@samar-Techgaun:~$ sudo apt-get install pidgin-festival
For now, you just need to install festival. Once you have installed festival, you can make it read text files for you. If you go through the online manual of festival, it says:
"Festival works in two fundamental modes, command mode and text-to-speech mode (tts-mode). In command mode, information (in files or through standard input) is treated as commands and is interpreted by a Scheme interpreter. In tts-mode, information (in files or through standard input) is treated as text to be rendered as speech. The default mode is command mode, though this may change in later versions."
To read a text file, you can use the command below:
samar@samar-Techgaun:~$ festival --tts mypaper.txt
The festival will start in text-to-speech (tts) mode and will read your text files for you. But now, we want to read PDF files and if you try to read PDF files directly (festival --tts paper.pdf), festival is most likely to speak the cryptic terms since it actually reads the content of PDF including its header (You know PDF is different than simple text file). So we will use a pdftotext command to convert our pdf file and then pipe the output to the festival so that festival reads the PDF files for us. You can use the syntax as below to read PDF files.
samar@samar-Techgaun:~$ pdftotext paper.pdf - | festival --tts
If you want to skip all those table of contents and prefaces or if you are in the middle of PDF, you can use the switches of pdftotext to change the starting and ending pages. For example, if I wish to read page 10 - 14 of a PDF, I would do:
samar@samar-Techgaun:~$ pdftotext -f 10 -l 14 paper.pdf - | festival --tts
Enjoy learning. I hope this post helps you ;)
Read more...
Bookmark this post: |
|
Saturday 27 October 2012
Accelerate Your Softwares Update Speed Using Apt-fast
Long ago, I had posted about apt-fast script which used axel to create multiple HTTP connections and increase the download speed of software updates and packages. In this post, you will get the details for installing apt-fast from PPA.
apt-fast is a shellscript wrapper for apt-get and aptitude that can drastically improve apt download times by downloading packages in parallel, with multiple connections per package.
As a pre-requisite, we will first install axel, a simple yet very useful command line download accelerator. Alternatively, you can also use aria accelerator with apt-fast.
Then you will have to add a PPA for apt-fast, update the database, and install apt-fast.
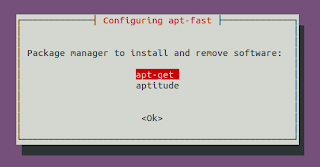
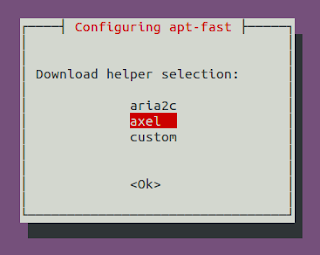
You need to configure few options afterwards as below:
For manual installation and grabbing the source code, check the GitHub.
Once you install apt-fast, you can install softwares and perform updates from the repos using the command below:
I hope this becomes useful :)
Read more...
As a pre-requisite, we will first install axel, a simple yet very useful command line download accelerator. Alternatively, you can also use aria accelerator with apt-fast.
samar@samar-Techgaun:~$ sudo apt-get install axel
Then you will have to add a PPA for apt-fast, update the database, and install apt-fast.
samar@samar-Techgaun:~$ sudo add-apt-repository ppa:apt-fast/stable
samar@samar-Techgaun:~$ sudo apt-get update
samar@samar-Techgaun:~$ sudo apt-get install apt-fast
You need to configure few options afterwards as below:


For manual installation and grabbing the source code, check the GitHub.
Once you install apt-fast, you can install softwares and perform updates from the repos using the command below:
samar@samar-Techgaun:~$ sudo apt-fast install package_name
I hope this becomes useful :)
Read more...
Bookmark this post: |
|
Linux Cat Command Examples
The cat command displays the content of file on the standard output. If multiple files are specified, the contents of all files will be concatenated and then displayed on the standard output. Likewise, if no file is specified, it will assume standard input (keyboard input) as the input to the command. The Ctrl + d is the shortcut used to save the contents in the appropriate output placeholder specified and exit the cat command.
Print content of file in standard output
samar@samar-Techgaun:~$ cat workers.txt
List of workers, designations & salary (in K):
Kshitiz Director 30
Bikky Manager  20


Abhis Sweeper  10
Rajesh Guard  12
Print line numbers
samar@samar-Techgaun:~$ cat -n workers.txt
     1 List of workers, designations & salary (in K):
     2 Kshitiz Director 30
     3 Bikky Manager  20
     4
     5
     6 Abhis Sweeper  10
     7 Rajesh Guard  12
Print line numbers for non-empty lines only
samar@samar-Techgaun:~$ cat -b workers.txt
     1 List of workers, designations & salary (in K):
     2 Kshitiz Director 30
     3 Bikky Manager  20


     4 Abhis Sweeper  10
     5 Rajesh Guard  12
Create a new file
samar@samar-Techgaun:~$ cat > newfile.txt
We can create text files
using cat command
once u finish writing,
press ctrl+d to save file
^d
Display content of multiple files
samar@samar-Techgaun:~$ cat workers.txt newfile.txt
List of workers, designations & salary (in K):
Kshitiz Director 30
Bikky Manager  20


Abhis Sweeper  10
Rajesh Guard  12
We can create text files
using cat command
once u finish writing,
press ctrl+d to save file
Combine multiple files to new file
samar@samar-Techgaun:~$ cat workers.txt newfile.txt > concat.txt
samar@samar-Techgaun:~$ cat concat.txt
List of workers, designations & salary (in K):
Kshitiz Director 30
Bikky Manager  20


Abhis Sweeper  10
Rajesh Guard  12
We can create text files
using cat command
once u finish writing,
press ctrl+d to save file
Append data to existing file
samar@samar-Techgaun:~$ cat >> newfile.txt
New line added
^d
samar@samar-Techgaun:~$ cat newfile.txt
We can create text files
using cat command
once u finish writing,
press ctrl+d to save file
New line added
Alternatively, you can use the syntax below if you wish to create new file combining the content of already existing file and standard input.
samar@samar-Techgaun:~$ cat newfile.txt - > myfile
thanks for everything
^d
samar@samar-Techgaun:~$ cat myfile
We can create text files
using cat command
once u finish writing,
press ctrl+d to save file
New line added
thanks for everything
Another possibility is to combine two text files with data from standard input (keyboard) in-between the contents of these two text files.
samar@samar-Techgaun:~$ cat workers.txt - newfile.txt > myfile

----------------------------------

^d
samar@samar-Techgaun:~$ cat myfile
List of workers, designations & salary (in K):
Kshitiz Director 30
Bikky Manager  20


Abhis Sweeper  10
Rajesh Guard  12

----------------------------------

We can create text files
using cat command
once u finish writing,
press ctrl+d to save file
New line added
Display $ sign at the end of each line
samar@samar-Techgaun:~$ cat -E workers.txt
List of workers, designations & salary (in K):$
Kshitiz Director 30$
Bikky Manager  20$
$
$
Abhis Sweeper  10$
Rajesh Guard  12$
Display ^I sign instead of TABs
samar@samar-Techgaun:~$ cat -T workers.txt
List of workers, designations & salary (in K):
Kshitiz^IDirector^I30
Bikky^IManager^I^I20


Abhis^ISweeper^I^I10
Rajesh^IGuard^I^I12
Display files with non-printing characters
samar@samar-Techgaun:~$ cat -v /bin/nc
In the example above, the non-printing characters are replaced with ^ and M- notation except for line breaks and TABs. This can be used to display the contents of binary files which would otherwise have shown gibberish text all over the console.
Show contents with tabs, line breaks and non-printing characters
samar@samar-Techgaun:~$ cat -A /bin/nc
The tab will be substituted by ^I, line breaks with $ and non-printing characters with ^ and M- notation. Actually, the -A switch is equivalent to -vET switch.
Supress/squeeze repeated empty lines
samar@samar-Techgaun:~$ cat -s workers.txt
List of workers, designations & salary (in K):
Kshitiz Director 30
Bikky Manager  20

Abhis Sweeper  10
Rajesh Guard  12
Using -s switch, we can squeeze repeatedly occurring blank lines and replace all the adjacent empty lines with a single empty line in the output. This might be useful to reformat a file with several empty lines in-between (eg. cat -s workers.txt > formatted_workers.txt).
Display last line first
samar@samar-Techgaun:~$ tac workers.txt
Rajesh Guard  12
Abhis Sweeper  10

Bikky Manager  20
Kshitiz Director 30
List of workers, designations & salary (in K):
It is the tac, not the cat that is doing the magic but just thought that this is the right place to make a note about this little known command.
Edit: Added here-doc examples. Thanks rho dai for pointing me this.
Parameter substitution using here-document strings
samar@samar-Techgaun:~$ cat > test << TEST
samar@samar-Techgaun:~$ I am $USER. My home is $HOME
samar@samar-Techgaun:~$ I came here from $OLDPWD
samar@samar-Techgaun:~$ TEST
samar@samar-Techgaun:~$ cat test
I am samar. My home is /home/samar
I came here from /home/samar/Downloads
Command expansion example
samar@samar-Techgaun:~$ cat > test << TEST
samar@samar-Techgaun:~$ $(ls /)
samar@samar-Techgaun:~$ TEST
samar@samar-Techgaun:~$ cat test
bin
boot
cdrom
dev
etc
home
initrd.img
initrd.img.old
lib
lost+found
media
mnt
opt
proc
root
run
sbin
selinux
srv
sys
tmp
usr
var
vmlinuz
vmlinuz.old
Parameter substitution turned off
samar@samar-Techgaun:~$ cat > test << 'TEST'
samar@samar-Techgaun:~$ I am $USER. My home is $HOME
samar@samar-Techgaun:~$ I came here from $OLDPWD
samar@samar-Techgaun:~$ TEST
samar@samar-Techgaun:~$ cat test
I am $USER. My home is $HOME
I came here from $OLDPWD
Note the difference between the last example and previous two examples. Enclosing the limit string TEST with quotes prevents the substitutions and expansions.
I hope these examples are useful. :)
Read more...
Bookmark this post: |
|
Monday 22 October 2012
Ubuntu Tweak Development Will Continue
Three days ago, Ubuntu Tweak developer Tualatrix had posted a blog post mentioning that the Ubuntu Tweak will no longer be developed but he has now changed his mind and has decided to continue the development because of support he received.
The developer writes
You made me know that Ubuntu Tweak is still valuable, and as the first software project I made 5 years ago, it is just like my baby, I don’t really want to give up the development.
and thanks all the good people who left the message for him and forked the app in github.
The blog post also mentions
Back to 5 years ago, I developed it just because of my practice on Linux programming, I felt freedom when I make things on Linux (Although I didn’t have developing experience on Windows and Mac then). But now I don’t feel any freedom about developing this software any more. The initial motivation is changed, and I’m still looking for new motivation.
Overall, he is not too satisfied with his current overload for working on this personal project while still managing time for his job and personal life.
Anyway, Ubuntu Tweak 0.8.1 is out and you can download from PPA.
PPA DEB link
Release Notes
Read more...
Bookmark this post: |
|
Subscribe to:
Posts (Atom)