Friday 9 December 2011
Converting .CUE/.BIN Files To .ISO Format
Bchunk is a CD image format conversion tool that is capable of converting CD images from bin/cue to iso/cdr formats. Converting a .bin/.cue file to .iso can be done by using the bchunk command line tool.
The bin/cue format is used by some non-Unix cd-writing software, but is not supported on most other cd-writing programs. image.bin is the raw cd image file. image.cue is the track index file containing track types and offsets. basename is used for the beginning part of the created track files.
The produced .iso track contains an ISO file system, which can be mounted through a loop device on Linux systems, or written on a CD-R using cdrecord. The .cdr tracks are in the native CD audio format. They can be either written on a CD-R using cdrecord -audio, or converted to WAV (or any other sound format for that matter) using sox.
An example of this is:
Following are the available switches in the command, explore them if you need them.
OPTIONS
-v Makes binchunker print some more unnecessary messages, which should not be of interest for anyone.
-w Makes binchunker write audio tracks in WAV format.
-s Makes binchunker swap byte order in the samples of audio tracks.
-p Makes binchunker go into PSX mode and truncate MODE2/2352 tracks to 2336 bytes at offset 0 instead of normal 2048 bytes at offset 24.
-r Makes binchunker output MODE2/2352 tracks in raw format, from offset 0 for 2352 bytes. Good for MPEG/VCD.
To install this tool on ubuntu, open the terminal and type:
I hope it helps. :)
Read more...
The bin/cue format is used by some non-Unix cd-writing software, but is not supported on most other cd-writing programs. image.bin is the raw cd image file. image.cue is the track index file containing track types and offsets. basename is used for the beginning part of the created track files.
The produced .iso track contains an ISO file system, which can be mounted through a loop device on Linux systems, or written on a CD-R using cdrecord. The .cdr tracks are in the native CD audio format. They can be either written on a CD-R using cdrecord -audio, or converted to WAV (or any other sound format for that matter) using sox.
An example of this is:
bchunk image.bin image.cue image.iso
Following are the available switches in the command, explore them if you need them.
OPTIONS
-v Makes binchunker print some more unnecessary messages, which should not be of interest for anyone.
-w Makes binchunker write audio tracks in WAV format.
-s Makes binchunker swap byte order in the samples of audio tracks.
-p Makes binchunker go into PSX mode and truncate MODE2/2352 tracks to 2336 bytes at offset 0 instead of normal 2048 bytes at offset 24.
-r Makes binchunker output MODE2/2352 tracks in raw format, from offset 0 for 2352 bytes. Good for MPEG/VCD.
To install this tool on ubuntu, open the terminal and type:
sudo apt-get install bchunk
I hope it helps. :)
Read more...
Bookmark this post: | 
|
Monday 5 December 2011
Solution For No Ethernet(LAN) In Ubuntu [That Worked For Me]
Not a tutorial but a quick note, I don't know if this works for you or not but this worked for me. Earlier, my system was not showing the ethernet interface and I tried lots of stuffs to find the solution. Just a thought came across my mind and then I turned off my laptop and removed the battery and then inserted the battery after a while. On booting to the system, I found the ethernet to be working. Maybe this might help you sometimes so putting up this small note.
Read more...
Read more...
Bookmark this post: |
|
Wednesday 30 November 2011
Free Emsisoft Anti-Malware Activation and Recharge Card Giveaway
I am giving two giveaways for the visitors of my website and will announce the result in December 10, 2011. Please read the full posts with further details on the giveaways.
Giveaway 1: I'll be providing a one year license key for Emsisoft Anti-Malware which is one of the highest ranked anti-malware tools as of now.

Features:
The first giveaway is available for all the users from all around the world.
Giveaway 2: This giveaway is only for Nepali visitors. I'll give the recharge pins equivalent to Rs. 500 to the winner of the giveaway program.

How To Participate
To participate in the giveaway, you'll have to leave the comment in the comment section below and then like our facebook page.
I'll announce the winners of the giveaway on the 10th of December and will update this page and will make a new post as well. Check the blog on that date and I'll make contact you in your e-mail adddress.
Read more...
Giveaway 1: I'll be providing a one year license key for Emsisoft Anti-Malware which is one of the highest ranked anti-malware tools as of now.
Features:
- Comprehensive PC protection against viruses, trojans, spyware, adware, worms, bots, keyloggers and rootkits.
- 2 combined scanners for cleaning: Anti-Virus + Anti-Malware
- 3 guards against new infections: file guard, behavior blocker and surf protection
The first giveaway is available for all the users from all around the world.
Giveaway 2: This giveaway is only for Nepali visitors. I'll give the recharge pins equivalent to Rs. 500 to the winner of the giveaway program.
How To Participate
To participate in the giveaway, you'll have to leave the comment in the comment section below and then like our facebook page.
I'll announce the winners of the giveaway on the 10th of December and will update this page and will make a new post as well. Check the blog on that date and I'll make contact you in your e-mail adddress.
Read more...
Bookmark this post: |
|
Saturday 26 November 2011
Creating Your Profile Banner On Facebook
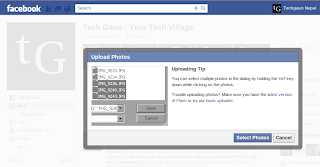
Making a profile banner in Facebook is a way lot eye-catching idea to display your important news or just your profile page's banner itself. Facebook lets you display 5 photos on top of your wall from which you can create a sequence. For this you can use app like profile banner but self customization is more preferable.You simply have to create a banner with sixe 485px * 68px and divide them into 5 equal photos.


Read more...
1.After uploading your 5 photos to your album,
skip publishing for a while.
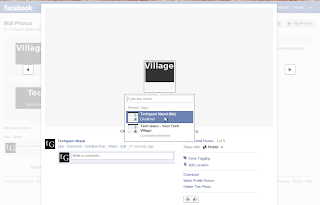
2.Sequence of photo totally depends upon the sequencce of tagging.That is why tag the photo to yourself in opposite order(tag last to the one you want 1st).
Now your banner is completely ready with your information.
But you cannot prevent your friends tagging you some other photo which will disrupt the sequence so you can hide it by clicking on the "x" just on the right corner on the banner as shown in picture.
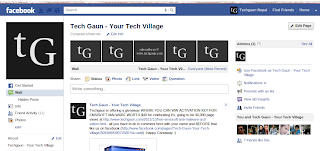
But this thing cannot be done for the facebook fan pages because we cannot maintain the sequence of display.A quite clever method could be :
Making the individual photo of size 97*68 informative itself so that sequence doesn't matter at all.
Read more...
Bookmark this post: |
|
Wednesday 23 November 2011
Setting A Sticky Post In Blogger [Keep a Post Always In Top]
I wanted to set my giveaway post always at the top of post even if I posted new posts so this is just little trick that might be useful for many people out there. Since blogger arranges the blog posts in the reverse chronological order (descending order of date and time), we apply a little trick to set our post always at the top just like the sticky post.
The trick is to set the date and time of the post to some date that is far away in the future. For example, you could keep the date of your post to 2020 A.D. thus that post will always be at top since blogger shows the post in the reverse chronological order. Now to do this, while you are composing your post or editing your post, click on Post Options to expand it and then in the Post date and time, select the Scheduled at and then enter some future date. Now just publish your post and this particular post will always be in the top of your blog homepage. I hope it helps you. :)
Read more...
Bookmark this post: |
|
Installation of eBarnamala [Content Management For LTSP]
This post is a reference for the future e-library volunteers who perform the installation of the LTSP server. One of the useful softwares within our e-library deployment is the software known as eBarnamala developed by Nepali developer for nepali schools. While the software itself is very useful for students, most of the volunteers have been complaining about the errors while trying to setup this software. However, the installation of eBarnamala can be simply done by following few simple steps. And this is what I'm writing in this post.
First, due to the different versions(the one with which .py was compiled to .pyc and the python interpreter currently installed in the working system), you might face some bad magic number error. FYI, in the UNIX-like system, filetypes are recognized by the first few bytes of the file which is known as magic bytes. Python also puts the same kind of bytes to ensure they are .pyc files and python interpreter checks for the same number while loading .pyc.
To fix our error, lets delete all the .pyc files in eBarnamala folder. The directory might be different but the commands are the same(except the path). The command for this purpose is as below:
Now lets recompile all the *.py files in the eBarnamala folder. Write the following lines of code and save it as somefile.py and later run as "python somefile.py" without quotes.
Now lets write a small shell script and save it in the /bin/ folder as eBarnamala(This is absolutely necessary since you'll face errors regarding the loading of images if you do "python /opt/eBarnamala/eBarnamala.py").
Now you need to copy the fonts from the eBarnamala directory to /usr/share/fonts/truetype.
So you are done. Just create some menu entry or desktop shortcut so that the general users and students can access the software easily. I hope it helps the future e-library volunteers.
Read more...
First, due to the different versions(the one with which .py was compiled to .pyc and the python interpreter currently installed in the working system), you might face some bad magic number error. FYI, in the UNIX-like system, filetypes are recognized by the first few bytes of the file which is known as magic bytes. Python also puts the same kind of bytes to ensure they are .pyc files and python interpreter checks for the same number while loading .pyc.
To fix our error, lets delete all the .pyc files in eBarnamala folder. The directory might be different but the commands are the same(except the path). The command for this purpose is as below:
find /opt/eBarnamala/ -name *.pyc -exec rm -f {} \;
Now lets recompile all the *.py files in the eBarnamala folder. Write the following lines of code and save it as somefile.py and later run as "python somefile.py" without quotes.
import compileall
compileall.compile_dir('/opt/eBarnamala/', force=True)
compileall.compile_dir('/opt/eBarnamala/', force=True)
Now lets write a small shell script and save it in the /bin/ folder as eBarnamala(This is absolutely necessary since you'll face errors regarding the loading of images if you do "python /opt/eBarnamala/eBarnamala.py").
cd /opt/eBarnamala/ && python eBarnamala.py
Now you need to copy the fonts from the eBarnamala directory to /usr/share/fonts/truetype.
So you are done. Just create some menu entry or desktop shortcut so that the general users and students can access the software easily. I hope it helps the future e-library volunteers.
Read more...
Bookmark this post: |
|
40K Visitors + Giveaway From Techgaun
Cheers from techgaun for our 40,000+ pageviews, to all of you people for your visit, your comments and suggestion and for bookmarking us. with all your kind support, we have made this far.
WE ENCOURAGE YOU TO LEARN AND YOU ENCOURAGE US TO WRITE
To celebrate our 40K+ pageviews, we are having a giveaway. Please read this post for the instructions on how you can participate in the giveaway. Please support us.
Read more...
WE ENCOURAGE YOU TO LEARN AND YOU ENCOURAGE US TO WRITE
To celebrate our 40K+ pageviews, we are having a giveaway. Please read this post for the instructions on how you can participate in the giveaway. Please support us.
Read more...
Bookmark this post: |
|
Tuesday 22 November 2011
How To Check Your Password Strength
With the increase in number of hackers and hack attacks, choosing strong and hard to guess passwords is one of the ways to keep yourself secure. While there are other numerous parameters to take care of to keep yourself secure, one of the primitives is choosing the strong password. In this post, I'll let you know how you can determine the strength of the password you choose to use.
Strength of the password can be tested by studying the character combinations used in the password and there are some tools to assist you in this process.
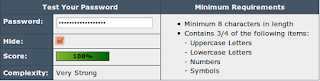
The first tool is the password strength checker. This online tool gives a very comrehensive detail of the strenght of the password.
Another tool to test the strength of the password is to calculate the bruteforce attack time to retrieve the password from hash. One such tool is a excel template available HERE which gives the estimate of how fast a password is hacked by these widely available tools running on today's desktops. Another online tool for the similar purpose is howsecureismypassword.net which provides bruteforce time and informs if your password is the common one or not.
I hope you find this information useful. :)
Read more...
Strength of the password can be tested by studying the character combinations used in the password and there are some tools to assist you in this process.
The first tool is the password strength checker. This online tool gives a very comrehensive detail of the strenght of the password.

Another tool to test the strength of the password is to calculate the bruteforce attack time to retrieve the password from hash. One such tool is a excel template available HERE which gives the estimate of how fast a password is hacked by these widely available tools running on today's desktops. Another online tool for the similar purpose is howsecureismypassword.net which provides bruteforce time and informs if your password is the common one or not.
I hope you find this information useful. :)
Read more...
Bookmark this post: |
|
Subscribe to:
Posts (Atom)