Tuesday 16 October 2012
Practical ls Command Examples For Fun & Profit
The power of linux lies in the shell through which we can perform complex job in no time. While the directory listing command 'ls' seems to be very simple command, the linux shell provides the power to use switches and pipes to do anything from terminal. Check out this list with practically useful examples using ls.
Any more example that fires up in your mind? Feel free to share over here ;)
Read more...
Display all files including hidden files/folders
ls -a
Display one file/folder per line
ls -1
Count number of files & folders
ls -1 | wc -l
Human readable file sizes (eg. Mb or Gb)
ls -lh
Alphabetically sort the listing
ls -X
Only list the folders in current directory
ls -d */
ls -p | grep /
ls -p | grep /
Display folders in current directory consisting certain patterns
ls -l D* | grep :$
ls -l *a* | grep :$
ls -l *a* | grep :$
List files by descending order of modification time
ls -lt
ls -l --sort=time #alternative long version
ls -l --sort=time #alternative long version
List files by descending order of creation time
ls -lct
List files in reverse order
ls -ltr
ls -l --sort=time --reverse #alternative long version
ls -l --sort=time --reverse #alternative long version
List files in descending order of file size
ls -lSh
ls -lh --sort=size
ls -lSh1 *.avi #find largest AVI file
rm `ls -S1 | head -1` #delete largest file in current folder
ls -lh --sort=size
ls -lSh1 *.avi #find largest AVI file
rm `ls -S1 | head -1` #delete largest file in current folder
List files in ascending order of file size
ls -lShr
ls -lh --sort=size --reverse #alternative long version
ls -lh --sort=size --reverse #alternative long version
Display directories in recursive manner
ls -R
Display the files/folders created today
ls -l --time-style=+%F | grep `date +%F`
Display the files/folders created this year
ls -l --time-style=+%y | grep `date +%y`
Any more example that fires up in your mind? Feel free to share over here ;)
Read more...
Bookmark this post: | 
|
Monday 15 October 2012
Useful Nautilus Shortcuts
Nautilus is a default file manager for GNOME Desktop and is used as the default file manager in several linux distros such as Ubuntu. I love nautilus because its simple, friendly, and clean, supports local as well as remote file systems over different protocols. Moreover, there are several useful shortcuts that make life easier while using nautilus.
Below is the list of the most helpful shortcuts for navigation and file management in the nautilus:
Ctrl + r: Refresh the current view
Ctrl + h: Toggle show/hide mode for hidden files
F9: Show/Hide the side pane
Ctrl + l: Activate location/url bar (You can then provide path to local or remote filesystems or quickly copy the absolute paths)
Alt + Up Arrow: Move up one directory level
Alt + Down Arrow: Move down one directory level (the directory to be entered should be selected for this to work)
Alt + Left Arrow: Go back to the previous folder in view
Alt + Right Arrow: Go forward
Ctrl + Shift + n: Create a new empty directory
Ctrl + (+ / -): Zoom in (+) or zoom out (-)
Ctrl + 0: Zoom to normal state
Alt + Enter: View selected file/folder properties
F2: Rename selected file/folder
Ctrl + Shift + Drag file/folder: Create symbolic link to file/folder
Ctrl + f: Search for files/folders
Ctrl + s: Select files based upon templates (eg. select all pdf files using *.pdf)
Ctrl + 1: Toggle view as icons
Ctrl + 2: Toggle view as lists
Ctrl + 3: Toggle compact view
Ctrl + w: Close current nautilus window
Ctrl + Shift + w: Current all open nautilus windows
Ctrl + T: Open new tab
Alt + HOME: Navigate to HOME folder
F6: Toggle between side pane and central pane
Know more shortcuts? Share as the comments :)
Read more...
Bookmark this post: |
|
Saturday 13 October 2012
How To Exclude Directory While Compressing With Tar
Quite a handy and useful tip here. Several times, you want to compress files and folders but there might be cases when you want to compress your data excluding some of the directories. Tar command makes the process easier by providing us a exclusion switch.
I was actually backing up data I had downloaded in the remote server and wanted a copy of backup tar file in my system as well. But all those images that resided in the folders deep inside were not necessary for me. So all I did was something like below:
The above command effectively excludes all the sub directories from testdirectory having the string image (eg. image, images, images_old in my case) and creates the backup.tar file. Moreover, the --exclude switch also co-operates the regular expressions so you can specify the regex to filter the directories. As an example, the command below excludes the directories a, b, c, d, and e while creating the tarball.
You can exploit this switch for ease several times in your daily works. I hope this helps :)
Read more...
I was actually backing up data I had downloaded in the remote server and wanted a copy of backup tar file in my system as well. But all those images that resided in the folders deep inside were not necessary for me. So all I did was something like below:
adm@RServ:~$ tar cvf backup.tar test --exclude=image*
The above command effectively excludes all the sub directories from testdirectory having the string image (eg. image, images, images_old in my case) and creates the backup.tar file. Moreover, the --exclude switch also co-operates the regular expressions so you can specify the regex to filter the directories. As an example, the command below excludes the directories a, b, c, d, and e while creating the tarball.
adm@RServ:~$ tar cvf backup.tar test --exclude=[a-e]
You can exploit this switch for ease several times in your daily works. I hope this helps :)
Read more...
Bookmark this post: |
|
Empty Trash From Command Line In Ubuntu
CLI is such a sexy piece so why bother using GUI, even for cleaning up your trash. In this post, you will see how you can empty trash in Ubuntu from command line.
The trash you see in GUI is nothing but just the view for the files deleted by users which are temporarily moved to the special location of user's home directory. For any user, the trash location is ~/.local/share/Trash/. That is, whatever a user deletes gets saved in this location.
I hope this becomes useful :)
Read more...
The trash you see in GUI is nothing but just the view for the files deleted by users which are temporarily moved to the special location of user's home directory. For any user, the trash location is ~/.local/share/Trash/. That is, whatever a user deletes gets saved in this location.
samar@samar-Techgaun:~$ rm -rf ~/.local/share/Trash/
I hope this becomes useful :)
Read more...
Bookmark this post: |
|
Enable Fingerprint Authentication In Ubuntu
So you got fingerprint reader in your device but have not been able to use it under ubuntu? Follow this How To to enable fingerprint authentication in ubuntu using the Fingerprint GUI from fingerprints reader integration team.
First make sure your fingerprint hardware is supported. You can check for the vendor and device ID by entering the following command:
This link provides the list of the supported fingerprint readers.
Installation is easy. Fire up the terminal and enter the following commands:
You will have to restart the system or log out the session and login back to use and configure the fingerprint GUI.
Press Alt + F2 and type fingerprint-gui. From this GUI, you can configure and enroll your fingerprints.

Read more...
First make sure your fingerprint hardware is supported. You can check for the vendor and device ID by entering the following command:
samar@TG:~$ lsusb | grep -i finger | awk -F " " '{print $6}'
138a:0005
138a:0005
Installation is easy. Fire up the terminal and enter the following commands:
sudo add-apt-repository ppa:fingerprint/fingerprint-gui
sudo apt-get update
sudo apt-get install libbsapi policykit-1-fingerprint-gui fingerprint-gui
sudo apt-get update
sudo apt-get install libbsapi policykit-1-fingerprint-gui fingerprint-gui
You will have to restart the system or log out the session and login back to use and configure the fingerprint GUI.
Press Alt + F2 and type fingerprint-gui. From this GUI, you can configure and enroll your fingerprints.

Read more...
Bookmark this post: |
|
Add Google Search Support In Gnome-Terminal
Gnome-terminal is my favorite thing in my system and recently I came to know that I could add google search support in gnome-terminal which is totally awesome. Ubuntu Tweak already includes the google search support but if you want google search in your terminal without the whole ubuntu tweak, you can follow this guide.
All you need to do is add the PPA and you can easily install the gnome-terminal with google search support. Fire up the terminal and enter the following commands:

Credits: Ubuntu Tweak
Read more...
All you need to do is add the PPA and you can easily install the gnome-terminal with google search support. Fire up the terminal and enter the following commands:
sudo add-apt-repository ppa:tualatrix/personal
sudo apt-get update
sudo apt-get install gnome-terminal
sudo apt-get update
sudo apt-get install gnome-terminal

Credits: Ubuntu Tweak
Read more...
Bookmark this post: |
|
Friday 12 October 2012
Pinkie Pie Wins $60K In Pwnium2
The teenage hacker who goes by the handle "Pinkie Pie" once again successfully exploited the google chrome browser in the Pwnium 2 event held in HITB2012 conference in Kuala Luampur.
With the goal to reward the exceptional vulnerability researchers, Google Chromium team had started Pwnium earlier this year and this is the second installment of Pwnium.
Google software engineer Chris Evans writes in a blog post:
" We’re happy to confirm that we received a valid exploit from returning pwner, Pinkie Pie. This pwn relies on a WebKit Scalable Vector Graphics (SVG) compromise to exploit the renderer process and a second bug in the IPC layer to escape the Chrome sandbox. Since this exploit depends entirely on bugs within Chrome to achieve code execution, it qualifies for our highest award level as a “full Chrome exploit,” a $60,000 prize and free Chromebook. "
Chromium team has already released the patched and updated google chrome in less than 10 hours after the exploit was confirmed. The Stable channel has been updated to 22.0.1229.94 for Windows, Mac, and Linux which contains the fix for the security exploit discovered by Pinkie Pie
Read more...
Bookmark this post: |
|
Wednesday 3 October 2012
Keccak Wins The SHA-3 Competition
After five years of competition, National Institute of Standards and Technology (NIST) has announced the winner of SHA-3 competition. The Keccak has been selected as the standard for SHA-3 algorithm among the 64 entries made for SHA-3 cryptographic algorithm announced by NIST back in November 2, 2007.
After three rounds of competitions, the finalists were five hash algorithms. On December 9, 2010, NIST announced five third-round candidates – BLAKE, Grøstl, JH, Keccak and Skein, to enter the final round of the competition. And, the winner is Keccak.
Keccak was designed by a team of cryptographers from Belgium and Italy, they are:
The NIST team praised the Keccak algorithm for its many admirable qualities, including its elegant design and its ability to run well on many different computing devices. The clarity of Keccak’s construction lends itself to easy analysis, and Keccak has higher performance in hardware implementations than SHA-2 or any of the other finalists.
“Keccak has the added advantage of not being vulnerable in the same ways SHA-2 might be,” says NIST computer security expert Tim Polk. “An attack that could work on SHA-2 most likely would not work on Keccak because the two algorithms are designed so differently.”
Though SHA-2 is still considered to be still secure enough for general usage, SHA-3 is thought to provide a new security tool for system and protocol designers, and that may create opportunities for security in networks that did not exist before.
If you are interested in quick summary about the pseudocode of Keccak, you can read the summary of Keccak.
Read more...
After three rounds of competitions, the finalists were five hash algorithms. On December 9, 2010, NIST announced five third-round candidates – BLAKE, Grøstl, JH, Keccak and Skein, to enter the final round of the competition. And, the winner is Keccak.
Keccak was designed by a team of cryptographers from Belgium and Italy, they are:
- Guido Bertoni (Italy) of STMicroelectronics,
- Joan Daemen (Belgium) of STMicroelectronics,
- Michaël Peeters (Belgium) of NXP Semiconductors,
- Gilles Van Assche (Belgium) of STMicroelectronics.
The NIST team praised the Keccak algorithm for its many admirable qualities, including its elegant design and its ability to run well on many different computing devices. The clarity of Keccak’s construction lends itself to easy analysis, and Keccak has higher performance in hardware implementations than SHA-2 or any of the other finalists.
“Keccak has the added advantage of not being vulnerable in the same ways SHA-2 might be,” says NIST computer security expert Tim Polk. “An attack that could work on SHA-2 most likely would not work on Keccak because the two algorithms are designed so differently.”
Though SHA-2 is still considered to be still secure enough for general usage, SHA-3 is thought to provide a new security tool for system and protocol designers, and that may create opportunities for security in networks that did not exist before.
If you are interested in quick summary about the pseudocode of Keccak, you can read the summary of Keccak.
Read more...
Bookmark this post: |
|
Tuesday 2 October 2012
Binary, Hex, Octal and Decimal Conversion Under Linux
Base conversions are easy with linux CLI. No need of fancy GUI-based calculator to perform base conversions when there is our favorite linux terminal.
We will be using bc, a calculator language that supports arbitrary precision numbers with interactive execution of statements. We will exploit the pipelining feature of shell and will let the bc process our query to convert the numbers from one base to other.
As seen in all the examples above, the conversion to decimal numbers does not require you to specify the obase as obase defaults to decimal. The same thing applies for ibase i.e. ibase defaults to decimal base by default as seen in the examples below.
Now lets try some conversion with decimal numbers as the input base.
Below are few more examples of base conversions to clarify the use of the command.
I hope this is helpful ;-)
Read more...
We will be using bc, a calculator language that supports arbitrary precision numbers with interactive execution of statements. We will exploit the pipelining feature of shell and will let the bc process our query to convert the numbers from one base to other.
From binary to decimal
The syntax is obvious and we will follow the similar syntax for all the conversions. In this first example, we are converting the binary number 1101101 from input base binary to decimal(obase defaults to decimal unless specified).
samar@samar-Techgaun:~$ echo "ibase=2;1101101" | bc
109
109
From octal to decimal
samar@samar-Techgaun:~$ echo "ibase=8;1101101" | bc
295489
295489
From Hexadecimal to decimal
samar@samar-Techgaun:~$ echo "ibase=16;A1F3DF" | bc
10613727
10613727
From N-base to decimal
All you need to do is provide the appropriate ibase value (eg. ibase=4 for 4-base to decimal conversion).
samar@samar-Techgaun:~$ echo "ibase=16;A1F3DF" | bc
10613727
10613727
As seen in all the examples above, the conversion to decimal numbers does not require you to specify the obase as obase defaults to decimal. The same thing applies for ibase i.e. ibase defaults to decimal base by default as seen in the examples below.
Now lets try some conversion with decimal numbers as the input base.
From decimal to binary
samar@samar-Techgaun:~$ echo "obase=2;109" | bc
1101101
1101101
From decimal to octal
samar@samar-Techgaun:~$ echo "obase=8;295489" | bc
1101101
1101101
From decimal to hexadecimal
samar@samar-Techgaun:~$ echo "obase=16;10613727" | bc
A1F3DF
A1F3DF
From decimal to N-base
All you need to do is provide the appropriate obase value (eg. obase=4 for decimal to 4-base conversion).
samar@samar-Techgaun:~$ echo "obase=4;121" | bc
1321
1321
Below are few more examples of base conversions to clarify the use of the command.
From binary to octal
samar@samar-Techgaun:~$ echo "ibase=2;obase=8;1111" | bc
17
17
From hexadecimal to binary
samar@samar-Techgaun:~$ echo "ibase=16;obase=2;AFBE" | bc
1010111110111110
1010111110111110
I hope this is helpful ;-)
Read more...
Bookmark this post: |
|
Friday 28 September 2012
Mozilla Announces First Beta Release Of Persona
Persona is finally ready for use. Today, Mozilla is going to announce the first public beta release of Persona, a login management system that eliminates per-site passwords in websites while being safe, secure and easy to use.
Mozilla Persona is a completely decentralized and secure authentication system for the web based on the open BrowserID protocol. To get started with Mozilla Persona, you'll have to signup here. FYI, Persona was first introduced as BrowserID.
Persona is now ready to use for authentication and will be available from today to the public as the first beta release. It works in all major smartphone, tablet, and desktop browsers and the user experience has been thoroughly reviewed and polished.
Available in more than 25 languages, Persona does not need any API keys and it will always remain free. Persona is an open source project and you can easily use persona with your site. Persona is safe, secure, and built on top of public key cryptography. Instead of a password, the user's browser generates a cryptographic "identity assertion" that expires after a few minutes and is only valid on a single site. Because there are no site-specific passwords, websites using Persona don't have to worry about securely storing or potentially losing a password database.
The sites such as OpenPhoto and Times Crossword are already using Mozilla Persona in their websites.
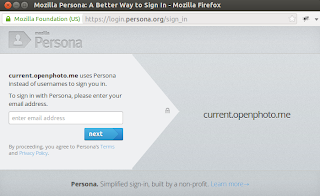
Persona is built upon BrowserID protocol. Once popular browser vendors implement BrowserID, they will no longer need to rely on Mozilla to log in. You can easily integrate Persona in few minutes. Persona is already getting integrated in different applications.
Lets see how successful will be Mozilla Persona, its success depends upon the adoption by websites and applications and then the subsequent use by the users.
Want to read more?
Announcing the Beta release of Persona
Mozilla Persona Documentation
New API for Persona
Read more...
Bookmark this post: |
|
Ubuntu 12.10 Beta 2 Released
The ubuntu developers have just released the Beta 2 of Ubuntu 12.10 Quantal Quetzal which gives the preview of the next version of ubuntu. The final ubuntu 12.10 release is scheduled for 18th October this year.
The Beta 2 release is intended to give the preview of how the final release of Quantal Quetzal will be like. The previous beta 1 release was released on 6th September.

As always, Ubuntu has chosen the Quetzal as codename for Ubuntu 12.10. According to Wikipedia, Quetzals are strikingly colored birds in the trogon family. They are found in forests and woodlands, especially in humid highlands, with the five species from the genus Pharomachrus being exclusively Neotropical, while the single Euptilotis species is almost entirely restricted to western Mexico.
Like we heard earlier, Ubuntu 12.10 releases are no longer available as Live CD.
Download Quantal Quetzal 12.10 Beta 2 Release
Read more...
Bookmark this post: |
|
Thursday 27 September 2012
GNOME 3.6 Released
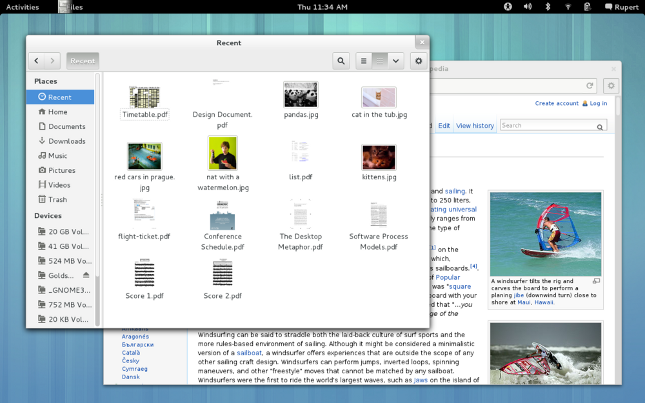
The GNOME project has released its third update v. 3.6 to its 3.X series. This latest version of GNOME 3 includes a number of new features and enhancements, as well as many bug fixes and minor improvements. Together, they represent a significant upgrade to the GNOME 3 user experience.
Andreas Nilsson, President of the GNOME Foundation, said: “The GNOME Foundation is proud to present this latest GNOME release, and I would like to congratulate the GNOME community on its achievement.” He described the release as “an important milestone in our mission to bring a free and open computing environment to everyone.”
 Highlights for this release include:
GNOME 3.6 Released: Evolution in the making
GNOME 3.6 Release Notes
Getting GNOME
Read more...
Andreas Nilsson, President of the GNOME Foundation, said: “The GNOME Foundation is proud to present this latest GNOME release, and I would like to congratulate the GNOME community on its achievement.” He described the release as “an important milestone in our mission to bring a free and open computing environment to everyone.”
- Big improvements to notifications, including a redesigned Message Tray, smarter notifications, and other tweaks and refinements.
- An enhanced Activities Overview with an improved layout.
- A greatly enhanced Files application, with functional file search, a new Recent location, redesigned interface and lots of bug fixes and handy new features.
- Integrated Input Sources, which makes inputting different character sets (eg. Japanese or Chinese) fast and easy.
- Accessibility on demand, meaning that universal access features like the Orca screen reader can be enabled with the push of a button.
- A new Lock Screen. This provides an attractive view when the device is locked, plus handy functionality like media controls and notifications.
GNOME 3.6 Released: Evolution in the making
GNOME 3.6 Release Notes
Getting GNOME
Read more...
Bookmark this post: |
|
Saturday 15 September 2012
Things To Do On The Ocassion Of Software Freedom Day
If you are FOSS enthusiast then you are possibly seeking for some ideas to celebrate Software Freedom Day in different way. I have come up with some ideas I could think of doing on the ocassion of software freedom day today.
Software Freedom Day (SFD) is annually celebrated on the third saturday of September with the aim of increasing awareness of Free Software and its virtues, and encouraging its use. SFD was first observed in 28th of August back in 2004 and since 2006, it is observed on the 3rd saturday of september. Software Freedom International acts as the central legal body for organizing software freedom day and each local team is responsible for organizing the local chapters of Software Freedom Day.
Software Freedom Day is not just about attending an event that is organized locally in your area. Rather, you can do anything that hits your mind to celebrate software freedom day. Below are some of the ideas in my mind.
Any other idea that hits your mind? Share as the comment :)
And at last, happy software freedom day to all the freedom lovers :)
Read more...
Software Freedom Day (SFD) is annually celebrated on the third saturday of September with the aim of increasing awareness of Free Software and its virtues, and encouraging its use. SFD was first observed in 28th of August back in 2004 and since 2006, it is observed on the 3rd saturday of september. Software Freedom International acts as the central legal body for organizing software freedom day and each local team is responsible for organizing the local chapters of Software Freedom Day.
Software Freedom Day is not just about attending an event that is organized locally in your area. Rather, you can do anything that hits your mind to celebrate software freedom day. Below are some of the ideas in my mind.
- Attend local SFD events You can attend the local SFD events being organized today. You can find the local events through SFD 2012 events map. Locate the nearby event and attend it. Maybe you will find someone to discuss with :)
- Listen to the SFD and other FOSS songs Download the SFD song or FSF song on your favorite music gadget and listen to them the whole day. You can also listen the musics at MUSOpen.org.
- Listen to the free audio and video speeches from FSF and GNU You can listen to several audio and video speeches related to the free software foundation and GNU movements which are available at audio-video.gnu.org. Quite a good way to pass the time while getting to know about FSF, GNU and related events.
- Watch some open source movies and documentaries You can download and watch the open-source or free-content films for time pass. You can also watch the movies and documentaries. Some of them are Revolution OS, Freedom Fry, The Codebreakers, Code Rush, Still This 1, Still This 2, The Code, Arduino documentary and few others you can find on net. If you got any suggestions, do drop them as comments.
- Run an install fest anywhere possible You could run the installation fest and help your friends and relatives install different linux distros. It can be anywhere. I mean anywhere. You can do it in your own home, in your school, and in your office. After all, its fun to motivate your friends and relatives to use open source softwares if they are not already using them. Literate the people who are around you. Believe me its fun.
- Try finding bug on some open source softwares Grab some open source softwares; it can be desktop app or web app. Try finding bugs or errors in them and report them. You have just helped to improve one of the open source softwares and your contribution will be counted for sure :). If you are geek enough, try finding some critical bugs and vulnerabilities. It can be kind of tough and challenging task but its always fun to do so.
- Do some blogging about software freedom and free and open source softwares If you got your own blog or website, make some entries related to software freedom. You could include the event you just visited or you could discuss about the free and open source softwares available in the market. If you don't have blog already, start today. Its a good day itself to start blogging on open source softwares.
- Write some code snippets and useful little softwares If you are a good programmer, why not write and distribute the small software projects by today itself. You could do small stuffs like command line file transfer app, nepali calendar or anything you can think of. Try to develop some local software that will be useful for you and your community.
- Join any beginner IRC channel and help the beginners Search for some IRC channels in freenode or other networks and try helping the beginners. You can preferably choose the IRC channels related to linux, programming, hacking, and open source softwares and then dedicate some hours of your day to help other people.
- Donate some amount to your favorite open source softwares Got some bucks to spare? Why not donate some amount to your favorite open source software. This can be very motivating to the developers of open source softwares.
Any other idea that hits your mind? Share as the comment :)
And at last, happy software freedom day to all the freedom lovers :)
Read more...
Bookmark this post: |
|
Friday 14 September 2012
How To Find The Location Of Command In Linux
Sometimes you need to find the pathnames or locations of commands you use frequently. In this post, I am going to discuss two useful commands that are useful for locating Linux commands.
The first command to locate the Linux commands is which. This command returns the pathnames of the files or links. However, it does not follow the symbolic links.
You can also find the pathnames of multiple commands at once using which command.
The other command is type command which is useful to determine if a command is an alias, a built-in command or an independent command.
You can play more with the type command. I hope this helps :)
Read more...
The first command to locate the Linux commands is which. This command returns the pathnames of the files or links. However, it does not follow the symbolic links.
samar@Techgaun:~$ which bash
/bin/bash
/bin/bash
You can also find the pathnames of multiple commands at once using which command.
samar@Techgaun:~$ which -a bash cat ls iftop
/bin/bash
/bin/cat
/bin/ls
/usr/sbin/iftop
/bin/bash
/bin/cat
/bin/ls
/usr/sbin/iftop
The other command is type command which is useful to determine if a command is an alias, a built-in command or an independent command.
samar@Techgaun:~$ type gedit
gedit is /usr/bin/gedit
samar@Techgaun:~$ type grep
grep is aliased to `grep --color=auto'
samar@Techgaun:~$ type -t iftop
file
gedit is /usr/bin/gedit
samar@Techgaun:~$ type grep
grep is aliased to `grep --color=auto'
samar@Techgaun:~$ type -t iftop
file
You can play more with the type command. I hope this helps :)
Read more...
Bookmark this post: |
|
Wednesday 12 September 2012
Disable Guest Account Login In Ubuntu 12.04
Security is an important issue and I do not want anyone to access my machine, not even as the guest. Like almost every operating systems, I could see guest logon option in Ubuntu 12.04 which was turned on by default. This post provides the steps to enable or disable the guest account login in Ubuntu 12.04.
Fire up your terminal and type the following command:
Now add a new line at the end containing the string as below:
Now reboot your system or type the following in your terminal:
The guest account will no longer be active. If you want to enable the guest login again, just remove the line you added or change the value to true. I hope this helps :)
Read more...
Fire up your terminal and type the following command:
samar@samar-Techgaun:~$ sudo nano /etc/lightdm/lightdm.conf
Now add a new line at the end containing the string as below:
allow-guest=false
Now reboot your system or type the following in your terminal:
samar@samar-Techgaun:~$ sudo /etc/init.d/lightdm restart
The guest account will no longer be active. If you want to enable the guest login again, just remove the line you added or change the value to true. I hope this helps :)
Read more...
Bookmark this post: |
|
How To Fix Bootmgr Missing In UNetBootin
Sometimes while working with the LiveUSBs using UNetBootin, you might face the issue that says the Bootmgr is missing and it also says, Press Ctrl + ALT + DELETE TO Restart. This post will help you to fix this particular issue.
First off, format your USB as a FAT32 since it happens commonly because your USB drive is formatted as NTFS and UNetBootin seems to have issues with NTFS filesystems. If formatting to FAT32 also does not work, then try formatting as FAT filesystem.
If you still get boot errors from USB, it is possible that the partition is not marked as active. Assuming you're on windows, you can use the diskpart tool to make the partition active. See the process below:
The above command will display the disks and their sizes as well. Choose the appropriate disk as below:
Replace the value 1 in above command to select the correct USB drive. Then again list the partitions but usually you can select the partition for USBs as below and then activate it:
The active command will mark the currently selected partition as active. Now reboot and enjoy booting from LiveUSB.
Read more...
First off, format your USB as a FAT32 since it happens commonly because your USB drive is formatted as NTFS and UNetBootin seems to have issues with NTFS filesystems. If formatting to FAT32 also does not work, then try formatting as FAT filesystem.
If you still get boot errors from USB, it is possible that the partition is not marked as active. Assuming you're on windows, you can use the diskpart tool to make the partition active. See the process below:
list disk
The above command will display the disks and their sizes as well. Choose the appropriate disk as below:
select disk 1
Replace the value 1 in above command to select the correct USB drive. Then again list the partitions but usually you can select the partition for USBs as below and then activate it:
select partition 1
active
active
The active command will mark the currently selected partition as active. Now reboot and enjoy booting from LiveUSB.
Read more...
Bookmark this post: |
|
Tuesday 11 September 2012
How To Enable Native PDF Viewer In Firefox 15
Firefox 14 added a native HTML5 and javascript based PDF reader to read PDF files within the browser but it is disabled by default in Firefox 15 since it is not totally ready. If you don't mind few minor glitches, you can experience the native PDF viewer in Firefox 15 through about:config
Browser developers are integrating many functionalities in the browsers themselves. PDF viewer is no exception and Mozilla is still working for fully functional PDF viewer based on HTML5 and javascript which is called as pdf.js. Pdf.js is still in Beta phase and Mozilla has not declared it as 100% usable so it is disabled by default in firefox 15.
Type about:config in the URL bar (and ignore warning if it appears). Then search for pdfjs. A particular preference pdfjs.disabled will be listed on the search result whose value is by default set to true.
You will just need to double click on this preference row and it will be set to false. This will enable the native PDF viewer in Firefox 15.

You'll possibly have to restart your browser to see the effect in action.
I have been using the native PDF viewer and haven't faced any glitches or problem still. I hope this is helpful :)
Read more...
Bookmark this post: |
|
Ubuntu Desktop Edition No More In LiveCD
The ubuntu team has announced that they have dropped the LiveCD option for Ubuntu and now onwards Ubuntu will be available as a single 800MB image that can be used from USB or DVD.
The mailing list reads "For the client, this release now has a consolidated Ubuntu image. There is no longer a traditional CD sized image, DVD or alternate image, but rather a single 800MB Ubuntu image that can be used from USB or DVD. This change does not affect Ubuntu Server, which remains a traditional CD sized image.
That is, starting from Ubuntu 12.10 "Quantal Quetzal", we will have a single 800 MB disk image that can only be used with USB or DVD. The decision does not seem to affect Ubuntu's user base since DVDs and USBs are getting cheaper and LiveUSBs are being popular these days.
Read more...
Bookmark this post: |
|
Monday 3 September 2012
Preventing Accidental Overwriting Of Files In Bash Shell
How many times has this happened to you? It used to happen once in a while with me. A Linux user learns to use the redirection operators such as '>' and '>>' but accidental overwriting starts to become common in commands you use and shell scripts you write.
The accidental overwriting of files that happens unintentionally is known as clobbering and it commonly happens while using the '>' redirection operator.
In the above example, the mycmd clobbers any existing data in the myfile file if that file exists already. Worse things may happen sometime. Imagine accidentally typing
instead of possibly using other redirection operators (like >> or <). Thankfully, you could recover /etc/passwd from either /etc/passwd- or /var/backups/passwd.bak if you hadn't rm'd these files.
To prevent such accidental overwriting, we can set the noclobber environment variable. Below is a session of enabling this variable:
As seen above, you have to turn on the noclobber variable using the set -o noclobber command in your shell. However, you might want to intentionally overwrite contents of certain files even when the noclobber is turned on.
Notice the >| in place of your normal > redirection operator. Using this operator, you can however overwrite the existing files even if the noclobber is turned on.
If you want to turn off the noclobber variable, type the following:
You can also permanently turn on the noclobber by the following command:
Moreover, such accidental overwriting can be prevented by enabling the interactive mode which is available in most of the linux commands. For example, you can write the alias for many commands that are likely to cause accidental overwriting. See some examples of aliases below:
You could even keep these aliases in your ~/.bashrc file permanently. Enabling such interactive modes by default in the commands that are more likely to cause accidental overwriting can prevent clobbering in many cases.
I hope this proves useful to you :)
Read more...
The accidental overwriting of files that happens unintentionally is known as clobbering and it commonly happens while using the '>' redirection operator.
samar@Techgaun:~$ mycmd > myfile
In the above example, the mycmd clobbers any existing data in the myfile file if that file exists already. Worse things may happen sometime. Imagine accidentally typing
samar@Techgaun:~$ mycmd > /etc/passwd
instead of possibly using other redirection operators (like >> or <). Thankfully, you could recover /etc/passwd from either /etc/passwd- or /var/backups/passwd.bak if you hadn't rm'd these files.
To prevent such accidental overwriting, we can set the noclobber environment variable. Below is a session of enabling this variable:
samar@Techgaun:~/Desktop/test$ echo "www.techgaun.com" > myfile
samar@Techgaun:~/Desktop/test$ echo "Overwriting techgaun.com" > myfile
samar@Techgaun:~/Desktop/test$ set -o noclobber
samar@Techgaun:~/Desktop/test$ echo "Retrying to overwrite" > myfile
-bash: myfile: cannot overwrite existing file
samar@Techgaun:~/Desktop/test$ echo "Overwriting techgaun.com" > myfile
samar@Techgaun:~/Desktop/test$ set -o noclobber
samar@Techgaun:~/Desktop/test$ echo "Retrying to overwrite" > myfile
-bash: myfile: cannot overwrite existing file
As seen above, you have to turn on the noclobber variable using the set -o noclobber command in your shell. However, you might want to intentionally overwrite contents of certain files even when the noclobber is turned on.
samar@Techgaun:~$ mycmd >| myfile
Notice the >| in place of your normal > redirection operator. Using this operator, you can however overwrite the existing files even if the noclobber is turned on.
If you want to turn off the noclobber variable, type the following:
samar@Techgaun:~$ set +o noclobber
You can also permanently turn on the noclobber by the following command:
samar@Techgaun:~$ echo "set -o noclobber" >> ~/.bashrc
Moreover, such accidental overwriting can be prevented by enabling the interactive mode which is available in most of the linux commands. For example, you can write the alias for many commands that are likely to cause accidental overwriting. See some examples of aliases below:
samar@Techgaun:~$ alias rm=rm -i
samar@Techgaun:~$ alias mv=mv -i
samar@Techgaun:~$ alias mv=mv -i
You could even keep these aliases in your ~/.bashrc file permanently. Enabling such interactive modes by default in the commands that are more likely to cause accidental overwriting can prevent clobbering in many cases.
I hope this proves useful to you :)
Read more...
Bookmark this post: |
|
Sunday 2 September 2012
How To Search Manual Pages In Linux
Linux system consists of hundreds of binaries, several syscalls, and other stuffs that do have manual page. What if you want to locate or find the commands by searching through the manual pages? In this post, I am going to talk about one such useful command to search through the manual page names and short descriptions.
The command I am talking about is the apropos command. The best way to learn any linux command is to read its corresponding manual and go through the help (-h or --help) so lets poke through the help of apropos itself.
Particularly, the -e switch is quite useful to filter out your search. See the example below:
Each command has its associated short description and the apropos command searches the short description section of appropriate manual page for the provided keyword. You can also specify the search keywords in the form of regular expression for more flexibility. I hope this command counts as useful one :)
Read more...
The command I am talking about is the apropos command. The best way to learn any linux command is to read its corresponding manual and go through the help (-h or --help) so lets poke through the help of apropos itself.
samar@Techgaun:~$ apropos -h
Usage: apropos [OPTION...] KEYWORD...

  -d, --debug                emit debugging messages
  -v, --verbose              print verbose warning messages
  -e, --exact                search each keyword for exact match
  -r, --regex                interpret each keyword as a regex
  -w, --wildcard             the keyword(s) contain wildcards
  -a, --and                  require all keywords to match
  -l, --long                 do not trim output to terminal width
  -C, --config-file=FILE     use this user configuration file
  -L, --locale=LOCALE        define the locale for this search
  -m, --systems=SYSTEM       use manual pages from other systems
  -M, --manpath=PATH         set search path for manual pages to PATH
  -s, --section=SECTION      search only this section
  -?, --help                 give this help list
      --usage                give a short usage message
  -V, --version              print program version

Mandatory or optional arguments to long options are also mandatory or optional
for any corresponding short options.

The --regex option is enabled by default.

Report bugs to cjwatson@debian.org.
Particularly, the -e switch is quite useful to filter out your search. See the example below:
samar@Techgaun:~$ apropos -e tar
bf_tar (1)           - shell script to write a tar file of a bogofilter direc...
bf_tar-bdb (1)       - shell script to write a tar file of a bogofilter direc...
git-tar-tree (1)     - Create a tar archive of the files in the named tree ob...
lz (1)               - gunzips and shows a listing of a gzip'd tar'd archive
mxtar (1)            - Wrapper for using GNU tar directly from a floppy disk
ptar (1)             - a tar-like program written in perl
tar (1)              - The GNU version of the tar archiving utility
tar (5)              - format of tape archive files
tgz (1)              - makes a gzip'd tar archive
uz (1)               - gunzips and extracts a gzip'd tar'd archive
Each command has its associated short description and the apropos command searches the short description section of appropriate manual page for the provided keyword. You can also specify the search keywords in the form of regular expression for more flexibility. I hope this command counts as useful one :)
Read more...
Bookmark this post: |
|
Subscribe to:
Posts (Atom)