Monday 17 December 2012
Evince Rocks! Foxit Sucks
Been using foxit PDF reader for a while in Windows 7 while I was working on some windows-based project and I was totally pissed off with foxit.
Not being a fan of Adobe's PDF reader, I decided to try foxit PDF reader since some of the online reviews were stating Foxit to be a great PDF reader. Basically, I was looking for a very simple, fast, and lightweight PDF reader that suits me. Foxit has everything a good PDF reader should have. It works pretty well with any PDF documents I need to read. It is supposedly lightweight, fast, secure, and it has millions of users. But, it was neither fast nor lightweight in its default configuration, in my experience.
But its still lacking some feature, that I do not know. I just can not feel the software. I am not satisfied with the level of user experience this software imparts. What do you guys have to say about this??
Then I decided to use the famous PDF reader from linux world, the Evince. And, what can I say?
If you have not tried evince for windows, download it from Gnome's Evince page and try right away on Windows. It should work on Windows XP, Vista, and 7.
Read more...
Not being a fan of Adobe's PDF reader, I decided to try foxit PDF reader since some of the online reviews were stating Foxit to be a great PDF reader. Basically, I was looking for a very simple, fast, and lightweight PDF reader that suits me. Foxit has everything a good PDF reader should have. It works pretty well with any PDF documents I need to read. It is supposedly lightweight, fast, secure, and it has millions of users. But, it was neither fast nor lightweight in its default configuration, in my experience.
But its still lacking some feature, that I do not know. I just can not feel the software. I am not satisfied with the level of user experience this software imparts. What do you guys have to say about this??
Then I decided to use the famous PDF reader from linux world, the Evince. And, what can I say?
Evince ROCKS!!!
If you have not tried evince for windows, download it from Gnome's Evince page and try right away on Windows. It should work on Windows XP, Vista, and 7.
Download Evince
Read more...
Bookmark this post: | 
|
Wednesday 12 December 2012
GitHub Snippet Sharing Gist Gets Revamped
GitHub team has today announced the new Gist, their online snippet sharing tool. Gist is a simple way to share snippets and pastes with others offering syntax support for several languages, configuration file formats and document formats.
The great thing about Gist is that all gists are git repositories, so they are automatically versioned, forkable and usable as a git repository. Whether it's a simple snippet or a full app, Gist is a great way to get your point across.
The new Gist is re-written completely from scratch using better libraries and following appropriate style guide.
Read rest of the story at GitHub
Read more...
Bookmark this post: |
|
Tuesday 11 December 2012
Inj3ct0r Team Hacked ExploitHub, Stole Private Exploits Worth $242333
Inj3ct0r team, which provides the ultimate database of exploits and vulnerabilities and serves as a great resource for vulnerability researchers and security professionals, has hacked ExploitHub.com, the site similar to inj3ct0r and stolen several private exploits worth $242333.
In the post from inj3ct0r team, they have provided the details for motivation of hack and the process of hack. At the time of writing this, ExploitHub.com seems to be down.
The post gives the process to accomplish the hack as below: I am very much surprised when he learned of Magento eCommerce Software and search /install/ 1) We scan server and site 2) We reinstall Magento CMS https://www.exploithub.com/install/ <= We reinstall Magento CMS 3) Upload shell and phpinfo https://www.exploithub.com/phpinfo.php 4) Back all files and database. 5) Upload piece of the database https://www.exploithub.com/export/ 6) Increased privileges
Read more...
Bookmark this post: |
|
Saturday 8 December 2012
DNS Rebinding Attack Using Rebind
Rebind is a tool that implements the multiple A record DNS rebinding attack. Although this tool was originally written to target home routers, it can be used to target any public (non RFC1918) IP address.
Rebind provides an external attacker access to a target router's internal Web interface. This tool works on routers that implement the weak end system model in their IP stack, have specifically configured firewall rules, and who bind their Web service to the router's WAN interface. Note that remote administration does not need to be enabled for this attack to work. All that is required is that a user inside the target network surf to a Web site that is controlled, or has been compromised, by the attacker.
Download rebind
Tested Routers (Affected + Not affected)
Rebind FAQ
Defcon Slides
Kind of interesting vector and I guess many are vulnerable out there.
Read more...
Rebind provides an external attacker access to a target router's internal Web interface. This tool works on routers that implement the weak end system model in their IP stack, have specifically configured firewall rules, and who bind their Web service to the router's WAN interface. Note that remote administration does not need to be enabled for this attack to work. All that is required is that a user inside the target network surf to a Web site that is controlled, or has been compromised, by the attacker.
Important Links
Download rebind
Tested Routers (Affected + Not affected)
Rebind FAQ
Defcon Slides
Kind of interesting vector and I guess many are vulnerable out there.
Read more...
Bookmark this post: |
|
Friday 30 November 2012
Nmap 6.25 Holiday Season Released
After five months of the release of NMAP 6.01, a newer version 6.25 has been released yesterday.
Nmap 6.25 contains hundreds of improvements, including 85 new NSE scripts, nearly 1,000 new OS and service detection fingerprints, performance enhancements such as the new kqueue and poll I/O engines, better IPv6 traceroute support, Windows 8 improvements, and much more! It also includes the work of five Google Summer of Code interns who worked full time with Nmap mentors during the summer.
Nmap 6.25 source code and binary packages for Linux, Windows, and Mac are available for free download from:
http://nmap.org/download.html
Release details
Read more...
Bookmark this post: |
|
Wednesday 28 November 2012
How To Export LibreOffice Impress Slides As Images
I was trying to export individual slides from LibreOffice Impress but I had to select each of the slide and then export it which was getting really really irritating with larger slides. With a quick search, I found an Impress extension that lets you export all the slides at once.
So the addon I was talking about is Export as Images extension which lets you export all the Impress slides or Draw pages into different image formats. The formats supported are JPG, PNG, GIF, BMP and TIFF format.
Once you install the extension, it adds a menu entry "Export as images..." to File menu and allows you to choose a file name for exported images, image size as well as some other parameters.
First grab the extension from HERE or see if newer version is available from HERE.
Once you have downloaded the extension, the installation is pretty straightforward. Open up the Extension Manager from Tools menu and then click on Add. Now navigate to the folder containing your newly downloaded extension and select it. Once the installation succeeds, make sure to restart your LibreOffice Impress to make sure the extension gets activated.
Now open any presentation and to export all the slides as images, go to Files menu where you'll find a new entry Export as images... just below the Export... option.

The GUI for the extension is self explanatory. I hope this proves useful to you :)
Read more...
So the addon I was talking about is Export as Images extension which lets you export all the Impress slides or Draw pages into different image formats. The formats supported are JPG, PNG, GIF, BMP and TIFF format.
Once you install the extension, it adds a menu entry "Export as images..." to File menu and allows you to choose a file name for exported images, image size as well as some other parameters.
Installing Export as Images extension
First grab the extension from HERE or see if newer version is available from HERE.
Once you have downloaded the extension, the installation is pretty straightforward. Open up the Extension Manager from Tools menu and then click on Add. Now navigate to the folder containing your newly downloaded extension and select it. Once the installation succeeds, make sure to restart your LibreOffice Impress to make sure the extension gets activated.
Now open any presentation and to export all the slides as images, go to Files menu where you'll find a new entry Export as images... just below the Export... option.

The GUI for the extension is self explanatory. I hope this proves useful to you :)
Read more...
Bookmark this post: |
|
Tuesday 27 November 2012
Basic Guide To Crontab
Well it has been a busy week and now I am back with this basic guide to running cron jobs in linux.
Cron is a time-based job scheduling program which comes shipped with most linux distributions and enables users to execute commands or set of scripts automatically at the specified time. Cron is particularly important for system administration and maintenance though it can be used for any general purpose such as scheduling your porn downloads. My post is based on the Vixie Cron, a popular implementation of Cron by Paul Vixie which is by default the cron program in Ubuntu. Other implementations of the cron are anacron, fcron, and dcron.
The cron daemon runs automatically during the startup and consults the crontabs (shorthand for cron tables) for jobs to executed. Crontabs are nothing but files containing the commands to be run at the specified time, however there is a particular (& simple to remember) syntax for cronjobs to be run. You could directly edit these cron tables files but that's not the recommended way. You should always use the crontab editor to add/update jobs to the crontabs.
Cron searches its spool area (located at /var/spool/cron/crontabs) for crontab files which are named after the user accounts from /etc/passwd. As a matter of precaution, you should not directly manipulate the files in there. Additionally, cron reads the /etc/crontab file and all the files in /etc/cron.d. Also, there are other folders: /etc/cron.daily, /etc/cron.hourly, /etc/cron.monthly, and /etc/cron.weekly. And, the name of folders are obvious so if you put the scripts in one of these folders, your script will run either daily or hourly or monthly or weekly.
Since you got several files associated with cron, you have bunch of options on running the cron jobs in your system. First lets start with the crontab tool which is used to install, deinstall or list the tables used to drive the cron daemon. If the /etc/cron.allow file exists, then you must be listed (one user per line) therein in order to be allowed to use this command. If the /etc/cron.allow file does not exist but the /etc/cron.deny file does exist, then you must not be listed in the /etc/cron.deny file in order to use this command.
The crontab command provides following options:
crontab can be configured to use any of the editors.
To list the user's crontab, use the following command:
To delete existing cron table, type:
To install new cron table, type:
If you are wishing to add commands that require root privilege for execution, make sure you prepend sudo in the above command to add such commands to crontabs. The cron table expects each line of cron job in the following format:
These columns take the values in the range below:
Apart from these values, the cron entries accept other special characters. In each of these five columns:
Now we know the format of how should each line of cron entry should look like, lets see some examples.
The information below is taken directly from man 5 crontab and can serve as a good reference for special strings in place of the 5 columns:
Now that you are feeling better with cronjobs, we will see how we can add cronjobs in the /etc/crontab file. The different thing about this crontab file is that there is an extra column for user field so that the particular cron entry is executed as the specified user.
The format for cron entry is similar to what we've seen already, with an extra column for user.
You can use any text editor such as nano or vi to edit the /etc/crontab file.
Finally, once you update crons, make sure to restart the cron daemon to ensure your new cron entries get read by the daemon.
I hope this primer for crontab helps you in your job scheduling job :D
Read more...
Cron is a time-based job scheduling program which comes shipped with most linux distributions and enables users to execute commands or set of scripts automatically at the specified time. Cron is particularly important for system administration and maintenance though it can be used for any general purpose such as scheduling your porn downloads. My post is based on the Vixie Cron, a popular implementation of Cron by Paul Vixie which is by default the cron program in Ubuntu. Other implementations of the cron are anacron, fcron, and dcron.
The cron daemon runs automatically during the startup and consults the crontabs (shorthand for cron tables) for jobs to executed. Crontabs are nothing but files containing the commands to be run at the specified time, however there is a particular (& simple to remember) syntax for cronjobs to be run. You could directly edit these cron tables files but that's not the recommended way. You should always use the crontab editor to add/update jobs to the crontabs.
Cron searches its spool area (located at /var/spool/cron/crontabs) for crontab files which are named after the user accounts from /etc/passwd. As a matter of precaution, you should not directly manipulate the files in there. Additionally, cron reads the /etc/crontab file and all the files in /etc/cron.d. Also, there are other folders: /etc/cron.daily, /etc/cron.hourly, /etc/cron.monthly, and /etc/cron.weekly. And, the name of folders are obvious so if you put the scripts in one of these folders, your script will run either daily or hourly or monthly or weekly.
Since you got several files associated with cron, you have bunch of options on running the cron jobs in your system. First lets start with the crontab tool which is used to install, deinstall or list the tables used to drive the cron daemon. If the /etc/cron.allow file exists, then you must be listed (one user per line) therein in order to be allowed to use this command. If the /etc/cron.allow file does not exist but the /etc/cron.deny file does exist, then you must not be listed in the /etc/cron.deny file in order to use this command.
The crontab command provides following options:
        -e edit user's crontab
 -l list user's crontab
 -r delete user's crontab
 -i prompt before deleting user's crontab
crontab can be configured to use any of the editors.
To list the user's crontab, use the following command:
$ crontab -l
To delete existing cron table, type:
$ crontab -ir
To install new cron table, type:
$ crontab -e
If you are wishing to add commands that require root privilege for execution, make sure you prepend sudo in the above command to add such commands to crontabs. The cron table expects each line of cron job in the following format:
m h dom mon dow command
i.e.
minute hour day_of_month month day_of_week command_to_run
i.e.
minute hour day_of_month month day_of_week command_to_run
These columns take the values in the range below:
  Minute (0 - 59)
  Hour (0 - 23)
  Day of month (1 - 31)
  Month (1 - 12)
  Day of the week (0 - 6, 0 representing sunday, 6 saturday)
Apart from these values, the cron entries accept other special characters. In each of these five columns:
- An asterisk (*) stands for "every".
- Slashes (/) are used to describe increments of ranges eg. */15 in minutes column would execute the specified command regularly and repeatedly after 15 minute.
- Commas (,) are used to separate items of a list. eg. using 1,2,3 in the 5th field (day of week) would mean Mondays, Tuesday, and Wednesday.
- Hyphens (-) are used to define ranges. For example, 2-5 in the 5th field would indicate Tuesday to Friday.
Now we know the format of how should each line of cron entry should look like, lets see some examples.
Run backup at 5 a.m every Monday
0 5 * * 1 /bin/mybackup
Run backup at 12:01 a.m monday-thursday
1 0 * * 1-4 /bin/mybackup
Run backup at 12:01 a.m on monday and thursday
1 0 * * 1,4 /bin/mybackup
Run backup every minute
* * * * * /bin/mybackup
Run backup every 15 minutes repeatedly
*/15 * * * * /bin/mybackup
The information below is taken directly from man 5 crontab and can serve as a good reference for special strings in place of the 5 columns:
              @reboot        Run once, at startup.
              @yearly        Run once a year, "0 0 1 1 *".
              @annually      (same as @yearly)
              @monthly       Run once a month, "0 0 1 * *".
              @weekly        Run once a week, "0 0 * * 0".
              @daily         Run once a day, "0 0 * * *".
              @midnight      (same as @daily)
              @hourly        Run once an hour, "0 * * * *".
Now that you are feeling better with cronjobs, we will see how we can add cronjobs in the /etc/crontab file. The different thing about this crontab file is that there is an extra column for user field so that the particular cron entry is executed as the specified user.
The format for cron entry is similar to what we've seen already, with an extra column for user.
m h dom mon dow user command
You can use any text editor such as nano or vi to edit the /etc/crontab file.
Finally, once you update crons, make sure to restart the cron daemon to ensure your new cron entries get read by the daemon.
$ sudo service cron restart
I hope this primer for crontab helps you in your job scheduling job :D
Read more...
Bookmark this post: |
|
Friday 23 November 2012
Video Transcoding With HandBrake In Linux
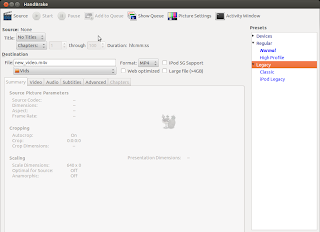
HandBrake is a GPL-licensed, multiplatform, multithreaded video transcoder available for major platforms: linux, mac, and windows. HandBrake converts video from nearly any format to a handful of modern ones.

Handbrake can save output in two containers, MP4 and MKV and I've been using it as a MKV transcoder for a while and I'm quite satisfied with it. Even though the official wiki says its not a ripper, I can see it to be quite useful DVD ripper.
Handbrake is available in CLI (HandBrakeCLI) and GUI (ghb) mode. Hence this offers the flexibility to choose the appropriate version according to your linux personality. As of now, we can install HandBrake from PPA and the latest version is v. 0.9.8 released back in July this year.
HandBrake can be installed from PPA. Issue the following commands in your terminal
Or if you wish to install the GUI version, type:
I recommend using the CLI version since you can transcode/convert videos much more efficiently if you use the CLI version. But if you are not comfortable with the command line interfaces, the GUI version of HandBrake is also quite good.
Only problem I have felt is the naming convention of the commands for both the GUI and CLI versions of the tool. In order to run two versions of this tool, you need to type HandBrakeCLI for CLI version and ghb for the GUI version. The problem here is with the naming convention for the binaries. I mean, the names handbrake-cli and handbrake-gtk would be more straightforward than these badly chosen names. Otherwise, the tool does pretty good job of video conversion and can be good alternative if you are not comfortable with ffmpeg. Note that ffmpeg is also capable of video conversions of different formats and is a great tool. :)
Read more...
Handbrake can save output in two containers, MP4 and MKV and I've been using it as a MKV transcoder for a while and I'm quite satisfied with it. Even though the official wiki says its not a ripper, I can see it to be quite useful DVD ripper.
Handbrake is available in CLI (HandBrakeCLI) and GUI (ghb) mode. Hence this offers the flexibility to choose the appropriate version according to your linux personality. As of now, we can install HandBrake from PPA and the latest version is v. 0.9.8 released back in July this year.
HandBrake can be installed from PPA. Issue the following commands in your terminal
$ sudo add-apt-repository ppa:stebbins/handbrake-releases
$ sudo apt-get update
$ sudo apt-get install handbrake-cli
$ sudo apt-get update
$ sudo apt-get install handbrake-cli
Or if you wish to install the GUI version, type:
$ sudo apt-get install handbrake-gtk
I recommend using the CLI version since you can transcode/convert videos much more efficiently if you use the CLI version. But if you are not comfortable with the command line interfaces, the GUI version of HandBrake is also quite good.

Only problem I have felt is the naming convention of the commands for both the GUI and CLI versions of the tool. In order to run two versions of this tool, you need to type HandBrakeCLI for CLI version and ghb for the GUI version. The problem here is with the naming convention for the binaries. I mean, the names handbrake-cli and handbrake-gtk would be more straightforward than these badly chosen names. Otherwise, the tool does pretty good job of video conversion and can be good alternative if you are not comfortable with ffmpeg. Note that ffmpeg is also capable of video conversions of different formats and is a great tool. :)
Read more...
Bookmark this post: |
|
Subscribe to:
Posts (Atom)