Wednesday 12 June 2013
Simple Pie Chart Implementation In Turbo C
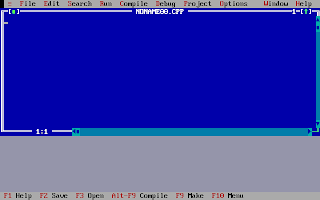
This is a very simple implementation of pie chart in Turbo C. The source code is quite easy to read through so must not be the big problem understanding the code.
This implementation makes use of pieslice() function which draws and fills the pie slice with centre x, y and radius r. The function also requires the start angle and end angle.
Below is the screenshot for sample run:

Read more...
This implementation makes use of pieslice() function which draws and fills the pie slice with centre x, y and radius r. The function also requires the start angle and end angle.
#include <stdio.h>
#include <conio.h>
#include <graphics.h>
#include <math.h>

#define MAX 20
#define X_CENTRE getmaxx()/2
#define Y_CENTRE getmaxy()/2
#define RADIUS 100

struct pie_data
{
 char desc[100];
 int freq;
 int color;
 int style;
 float angle;
};

int main()
{
 struct pie_data data[MAX];
 int gd = DETECT, gm;
 int i, j, k, n, total_freq = 0, start_angle = 0, end_angle = 0, xmax, ystart = 80, yend;
 printf("Enter the number of items: ");
 scanf("%d", &n);

 for (i = 0, j = 1, k = 1; i < n; i++)
 {
  printf("Enter the item title: ");
  scanf("%s", data[i].desc);
  printf("Enter the item frequency: ");
  scanf("%d", &data[i].freq);
  total_freq += data[i].freq;
  data[i].color = j;
  data[i].style = k;
  if (j++ >= 13) j = 1;
  if (k++ >= 11) k = 1;
 }

 for (i = 0; i < n; i++)
 {
  float angle;
  data[i].angle = 360 * (data[i].freq /(float) total_freq);
 }

 initgraph(&gd, &gm, "C:\\TurboC3\\BGI");
 xmax = getmaxx() - 150;
 setaspectratio(10000, 10000);
 for (i = 0; i < n; i++)
 {
  end_angle = start_angle + data[i].angle;
  setcolor(data[i].color);
  setfillstyle(data[i].style, data[i].color);
  pieslice(X_CENTRE, Y_CENTRE, (int)start_angle, (int)end_angle, RADIUS);
  start_angle = end_angle;
  yend = ystart + 40;
  bar(xmax, ystart, xmax + 70, yend);
  ystart = yend + 15;
  outtextxy(xmax + 80, ystart - 20, data[i].desc);
 }
 getch();
 closegraph();
 return 0;
}
Below is the screenshot for sample run:

Read more...
Bookmark this post: | 
|
Tuesday 11 June 2013
Congratulation To SLC Graduates From Iris Academy
Today, result of SLC exam 2069 was published and the first batch of Iris Academy secured 100% result with 50% distinction. Although being a relatively new school in Makar-2, Chisapani, Nawalparasi, Iris Academy secured the best result in the area.
We would like to congratulate all the SLC appeared students and the Iris Academy and wish for the bright future ahead.
We would like to congratulate all the SLC appeared students and the Iris Academy and wish for the bright future ahead.
Read more...
Bookmark this post: |
|
Tuesday 2 April 2013
Step By Step Turbo C++ IDE In Ubuntu 12.04
Well we are doing our labs based on the traditional Turbo C++ IDE and I decided to write this blog post with the information on how I installed it on my Ubuntu box.
First thing first, download Turbo C from internet. For your ease, I've uploaded it HERE.
We will have to install dosbox to run the windows dos mode applications so lets install it:
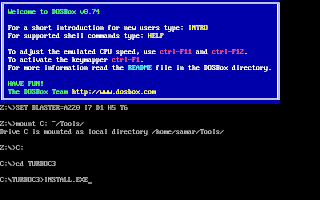
Once you install dosbox, unzip the content to somewhere in your $HOME directory. In my example, I unzipped the content of the Turbo C zip file into ~/Tools/TurboC3/. Now launch the dosbox by typing dosbox in the terminal. A dosbox emulation window will appear which will look like your old DOS system.
In the window, type the following (make sure you type appropriate path for your installation):
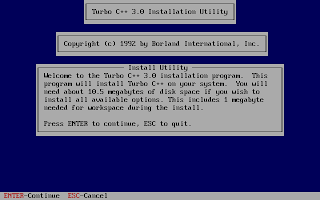
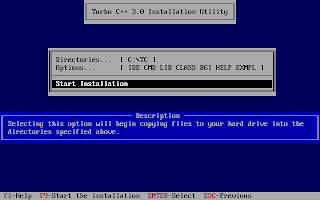
And, then follow the on-screen information. Refer to the screenshots below:


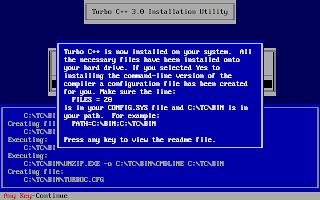
Once the installation finishes, you can then run the Turbo C by mounting the drive again and then navigation to C:\TC (cd C:\TC\BIN). If you need to use the Turbo C++ IDE frequently, my suggestion would be to add an autoexec entry in your dosbox configuration. The default configuration file resides in ~/.dosbox/dosbox-0.74.conf (My version of dosbox is 0.74 hence the file name, by default). Open up this file and in the section of [autoexec], add the lines below:
Adding this entry will run the above commands during the startup of dosbox thus giving you the Turbo C IDE interface directly on running dosbox.
I hope this helps :)
Read more...
First thing first, download Turbo C from internet. For your ease, I've uploaded it HERE.
We will have to install dosbox to run the windows dos mode applications so lets install it:
samar@samar-Techgaun:~$ sudo apt-get install dosbox
Once you install dosbox, unzip the content to somewhere in your $HOME directory. In my example, I unzipped the content of the Turbo C zip file into ~/Tools/TurboC3/. Now launch the dosbox by typing dosbox in the terminal. A dosbox emulation window will appear which will look like your old DOS system.
In the window, type the following (make sure you type appropriate path for your installation):
mount C: ~/Tools/
C:
cd TurboC3
INSTALL.EXE
C:
cd TurboC3
INSTALL.EXE
And, then follow the on-screen information. Refer to the screenshots below:


Once the installation finishes, you can then run the Turbo C by mounting the drive again and then navigation to C:\TC (cd C:\TC\BIN). If you need to use the Turbo C++ IDE frequently, my suggestion would be to add an autoexec entry in your dosbox configuration. The default configuration file resides in ~/.dosbox/dosbox-0.74.conf (My version of dosbox is 0.74 hence the file name, by default). Open up this file and in the section of [autoexec], add the lines below:
[autoexec]
mount C: ~/Tools/
C:
cd TC\BIN
TC.EXE
mount C: ~/Tools/
C:
cd TC\BIN
TC.EXE
Adding this entry will run the above commands during the startup of dosbox thus giving you the Turbo C IDE interface directly on running dosbox.
I hope this helps :)
Read more...
Bookmark this post: |
|
Sunday 31 March 2013
Simple Line Drawing In Turbo C Graphics
Well this post consists of the source code for very very simple line drawing using the in-built functions.
I hope it proves useful for learning purpose.
Read more...
#include <stdio.h>
#include <conio.h>
#include <graphics.h>

int main()
{
 int gd = DETECT, gm;
 initgraph(&gd, &gm, "C:\\TurboC3\\BGI");
 line(100, 100, 350, 100);
 line(100, 100, 70, 140);
 line(70, 140, 130, 140);
 line(350, 100, 380, 140);
 rectangle(70, 140, 130, 200);
 rectangle(130, 140, 380, 200);
 getch();
 closegraph();
 return 0;
}
I hope it proves useful for learning purpose.
Read more...
Bookmark this post: |
|
Implementation Of BLA Line Drawing Algorithm
Here is the source code that makes use of the traditional DOS mode graphics to implement the Bresenham line drawing algorithm for the lines with slope |m| < 1.
1) Input two points (x1, y1) & (x2, y2).
2) Determine the differences dx = x2 - x1 and dy = y2 - y1.
3) Calculate the initial decision parameter P0 = 2dy - dx.
4) For each xk along the line starting at k = 0,
if Pk < 0,
a) put a pixel at (xk + 1, yk)
b) Pk+1 = Pk + 2dy
else
a) put a pixel at (xk + 1, yk + 1)
b) Pk+1 = Pk + 2dy - 2dx.
5) Repeat step 4 for dx time.
6) End
Make sure to provide an appropriate path for graphics library.
Read more...
Bresenham Line Drawing Algorithm for |m| < 1
Algorithm
1) Input two points (x1, y1) & (x2, y2).
2) Determine the differences dx = x2 - x1 and dy = y2 - y1.
3) Calculate the initial decision parameter P0 = 2dy - dx.
4) For each xk along the line starting at k = 0,
if Pk < 0,
a) put a pixel at (xk + 1, yk)
b) Pk+1 = Pk + 2dy
else
a) put a pixel at (xk + 1, yk + 1)
b) Pk+1 = Pk + 2dy - 2dx.
5) Repeat step 4 for dx time.
6) End
Source Code
#include <stdio.h>
#include <conio.h>
#include <graphics.h>
#include <math.h>

int main()
{
 int gd = DETECT, gm;
 int x1, y1, x2, y2, dx, dy;
 int x, y, i, p0, pk;
 printf("Enter x1, y1: ");
 scanf("%d %d", &x1, &y1);
 printf("Enter x2, y2: ");
 scanf("%d %d", &x2, &y2);

 dx = x2 - x1;
 dy = y2 - y1;

 x = x1;
 y = y1;
 p0 = ( 2 * dy - dx);
 initgraph(&gd, &gm, "C:\\TurboC3\\BGI");
 pk = p0;
 for (i = 0; i < abs(dx); i++)
 {
  if (pk < 0)
  {
   putpixel(x, y, WHITE);
   pk += (2 * dy);
  }
  else
  {
   putpixel(x, y, WHITE);
   pk += (2 * dy - 2 * dx);
  }

  (x1 < x2)?x++:x--;
  (y1 < y2)?y++:y--;

  delay(50);
 }

 getch();
 closegraph();
 return 0;
}
Make sure to provide an appropriate path for graphics library.
Read more...
Bookmark this post: |
|
Tuesday 26 March 2013
Implementation of DDA Line Drawing Algorithm
Here is a source code in traditional Turbo C that makes use of old DOS mode graphics to implement the digital differential analyzer.
2) Determine the differences dx = x2 - x1 and dy = y2 - y1.
3) Choose step size as the bigger value between the absolute values of dx and dy.
4) Determine x-increment = dx/step_size and y-increment = dy/step_size.
5) Start from (x0, y0) = (x1, y1).
6) For i -> 0 to stepsize:
a) draw pixel at (xi, yi)
b) set xk = xk + x-increment
b) set yk = yk + y-increment
Make sure to provide an appropriate path for graphics library.
Read more...
Digital Differential Analyzer
Algorithm
1) Input two points (x1, y1) & (x2, y2).2) Determine the differences dx = x2 - x1 and dy = y2 - y1.
3) Choose step size as the bigger value between the absolute values of dx and dy.
4) Determine x-increment = dx/step_size and y-increment = dy/step_size.
5) Start from (x0, y0) = (x1, y1).
6) For i -> 0 to stepsize:
a) draw pixel at (xi, yi)
b) set xk = xk + x-increment
b) set yk = yk + y-increment
Source Code
#include <stdio.h>
#include <conio.h>
#include <graphics.h>
#include <math.h>

int main()
{
 int gd = DETECT, gm;
 int x1, y1, x2, y2, dx, dy, stepsize;
 float xinc, yinc, x, y;
 int i;
 printf("Enter x1, y1: ");
 scanf("%d %d", &x1, &y1);
 printf("Enter x2, y2: ");
 scanf("%d %d", &x2, &y2);
 dx = x2 - x1;
 dy = y2 - y1;
 stepsize = (abs(dx) > abs(dy))?abs(dx):abs(dy);
 xinc = dx/(float)stepsize;
 yinc = dy/(float)stepsize;
 x = x1;
 y = y1;
 initgraph(&gd, &gm, "C:\\TC\\BGI");
 putpixel(x, y, WHITE);
 delay(10);
 for (i = 0; i < stepsize; i++)
 {
  x += xinc;
  y += yinc;
  putpixel(x, y, WHITE);
  delay(50);
 }
 getch();
 closegraph();
 return 0;
}
Make sure to provide an appropriate path for graphics library.
Read more...
Bookmark this post: |
|
Tuesday 19 March 2013
How To View Your Gmail Access History Details
I do this thing on a regular basis to know if my account got compromised or not. Well I understand the risks imposed by logging in to my gmail account but still due to several circumstances, I have to login from public PCs. Though I employ some other techniques to trick possible keyloggers/RATs, etc. I do keep running from the dangers of account hijack and hence keep on regularly checking the account history details in gmail.
In order to access the gmail history log details, you need to scroll down to the right bottom of your gmail inbox where you will notice the option to view the detail of your account which looks like below:

Moreover, it seems like that the details now include the user agents and/or access type information along with the IP address and time of access to the gmail account.
If you're concerned about unauthorized access to your mail, you'll be able to use the data in the 'Access type' column to find out if and when someone accessed your mail. For instance, if the column shows any POP access, but you don't use POP to collect your mail, it may be a sign that your account has been compromised.
For more information, refer to this page.
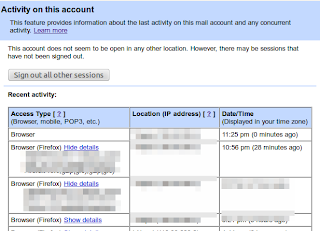
Moreover, this feature lets you log out all of your sessions other than the current session. This can come quite handy whenever you have forgotten to sign out or someone else is having an unauthorized access to your account.
Read more...
Bookmark this post: |
|
Friday 15 March 2013
Uploaded.net 48 Hours Premium Membership Coupon To Redeem
Hi all, I just bought a Ul.to account and got an extra coupon that lets free users to have 48 hours premium membership. I decided to provided the coupon to one of my readers.
I will provide the coupon to one of the people who share URL of my website in the twitter with mention to me (@techgaun). I'll decide the winner on 16th March. So start tweeting :P (You understand I need something in return for this coupon :) )
Coupon code: UBTIZYMM
Read more...
Coupon code: UBTIZYMM
Read more...
Bookmark this post: |
|
Subscribe to:
Posts (Atom)