Showing posts with label ubuntu. Show all posts
Showing posts with label ubuntu. Show all posts
Sunday 16 October 2011
Demo Of Ubuntu 11.10 Runs On Browsers Supporting HTML5
Rather than posting photos and video stuffs, this time ubuntu has made a very interactive demo of newly released ubuntu 11.10. You can use the online tour just like a real ubuntu OS installed in your PC. This online tour feature is pretty impressive and helps people understand how the look, feel and functionality of ubuntu 11.10 is.

Visit the online tour.
Read more...

Visit the online tour.
Read more...
Bookmark this post: | 
|
Wednesday 28 September 2011
Tools For Customizing Ubuntu Into Your Custom Distro
Hello everybody, I'm listing some of the tools that can be used to customize the ubuntu distro and create your own flavour of ubuntu. I'm saying ubuntu specifically because I've tested them on ubuntu but some work for all debian based distro and maybe some work for all linux distro.
If you want to customize the ubuntu distro, you need an ISO file of the ubuntu of your preferred version. For the terminal lovers, the following two links are very helpful:
Ubuntu Live CD Customization
Ubuntu Install CD Customization
Now for those people who hate terminal and would like to the same thing using GUI, I'm listing here few of the tools that you can use.
1) Ubuntu Customization Kit: UCK is a tool that helps you customizing official Ubuntu Live CDs (including Kubuntu/Xubuntu and Edubuntu) to your needs. You can add any package to the live system like, for example, language packs, applications, etc.
2) RemasterSys: This script creates a livecd of the installed system. You can either make a distributable livecd or backup of your system. The resulting iso file can be used on any other PC that still meets the original minimum requirements of Ubuntu or Debian. Things like the graphics card and other hardware will be configured and setup automatically and you do not have to use identical hardware. Ubuntu's live boot tool, casper, currently blacklists Nvidia and AMD proprietary drivers so they will not be available on the live system and will need to be reinstalled after installation of your custom system.
3) Reconstructor Engine: Reconstructor is a GNU/Linux distribution customization and creation toolkit. It allows for the customization of the Ubuntu GNU/Linux distribution. Customizations include boot logo image and text color, wallpaper, themes, icons, applications, and more. Personally, I didn't like this one very much. Check this site.
4) Live Magic: Live-helper is a collection of programs that can be used to build Debian Live system images. The philosophy behind live-helper is to provide a collection of small, simple, and easily understood tools that can be used in your own program to automate building of a Live system.
5) Live Scripts: Linux Live is a set of shell scripts which allows you to create your own Live Linux from an already installed Linux distribution. The Live system you create will be bootable from CD-ROM or a disk device, for example USB Flash Drive, USB Pen Drive, Camera connected to USB port, and so on. People use Linux Live scripts to boot Linux from iPod as well.
6) Revisor For Fedora: Revisor enables you to customize and compose your own Fedora based installation and live media. It does so by presenting you a GUI with all options you can click your way through, a command-line interface and extended configuration files for more advanced users. Features that Revisor has vary from customizing the packages available during the installation and/or installed on the live media, to fully customizing the desktop environment for the live media.
I hope these helps. :)
Read more...
Bookmark this post: |
|
Shutter : Advanced Screenshot Tool For Linux
The default screenshot tool in linux(I'm using ubuntu 10.10) does not have much features as some of you might have desired but there exists yet another tool known as Shutter that has lots of functionalities as a screenshot tool. Shutter is a feature rich screenshot tool available for many flavours of linux distribution.
With shutter, you can take a screenshot of a specific area, window, your whole screen, or even of a website – apply different effects to it, draw on it to highlight points, and then upload to an image hosting site, all within one window. There are numerous plugins written in Perl and bash included within the shutter as plugins and you can give different sexy looks to your screenshot. So for a blogger, writer and screen-sharer, this tool is a must if you are using linux.
To install shutter, either open the software centre according to your distro, search for shutter and install from there. For ubuntu, you can alternatively type the following from your terminal to install shutter:
To open shutter, click on Applications -> Accessories -> Shutter. Then you can use various features of shutter to take screenshots of window, selection, websites and full screen and then edit your screenshot, hide the sensitive areas and apply effects of your choice to the screenshots.
Some sample screenshots of the tool itself:
GUI of shutter:
Screenshot of website:

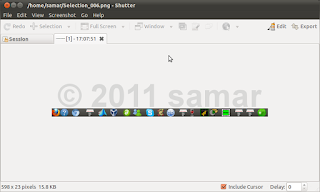
Screenshot of selection:

Read more...
With shutter, you can take a screenshot of a specific area, window, your whole screen, or even of a website – apply different effects to it, draw on it to highlight points, and then upload to an image hosting site, all within one window. There are numerous plugins written in Perl and bash included within the shutter as plugins and you can give different sexy looks to your screenshot. So for a blogger, writer and screen-sharer, this tool is a must if you are using linux.
To install shutter, either open the software centre according to your distro, search for shutter and install from there. For ubuntu, you can alternatively type the following from your terminal to install shutter:
sudo apt-get install shutter
To open shutter, click on Applications -> Accessories -> Shutter. Then you can use various features of shutter to take screenshots of window, selection, websites and full screen and then edit your screenshot, hide the sensitive areas and apply effects of your choice to the screenshots.
Some sample screenshots of the tool itself:
GUI of shutter:

Screenshot of website:

Screenshot of selection:
Read more...
Bookmark this post: |
|
Friday 19 August 2011
Wally: Advanced Utility To Change Wallpaper
Wally is a Qt4 wallpaper changer using multiple sources like files, folders, FTP remote folders, Flickr, Yahoo!, Panoramio, Pikeo, Ipernity, Photobucket, Buzznet, Picasa and Smugmug images. It is available in many languages. Supported Linux window managers are GNOME, KDE 3, KDE 4, Xfce 4, BlackBox, FluxBox, Window Maker, and FVWM.
Features
· Runs on Win32, Linux and MacOSX platforms
· History support
· Many wallpaper layouts available on all platforms
· EXIF data available over picture and in system tray tooltip
· Save downloaded photos
· Proxy support
Wally Download Page
It is available in ubuntu repository so you can install easily from ubuntu software center.
Read more...
Bookmark this post: |
|
Wednesday 29 June 2011
Ubuntu PPA Managing With PPABuilder
While reading stuffs on internet I came across this. You can manage your ubuntu PPA using the PPABuilder tool.
To install the tool, type the following commands from terminal:
The complete guide for this is available here.
Read more...
To install the tool, type the following commands from terminal:
sudo apt-add-repository ppa:lkjoel/ppabuilder
sudo apt-get update
sudo apt-get install ppabuilder
sudo apt-get update
sudo apt-get install ppabuilder
The complete guide for this is available here.
Read more...
Bookmark this post: |
|
Search, Stream, and/or Download Audios/Videos From Youtube and Other Sites With GMediaFinder
GMediaFinder is a new GTK based desktop application that allows you to search, stream and download audios and videos from different sites. Both the windows and linux version of the tool are available and it can be great alternative to Minitube for linux.
It support fullscreen mode (double click on the video or F2/esc), visualisations and use the gstreamer engine to play sounds and videos. This tool also allows searching and streaming of audio and video from several other websites such as azmp3s.com, Tagoo, etc.
It is available for ubuntu through PPA so to install the tool, type the following commands in your terminal.
I hope this info is useful. :)
Read more...
It support fullscreen mode (double click on the video or F2/esc), visualisations and use the gstreamer engine to play sounds and videos. This tool also allows searching and streaming of audio and video from several other websites such as azmp3s.com, Tagoo, etc.
It is available for ubuntu through PPA so to install the tool, type the following commands in your terminal.
sudo apt-add-repository ppa:s-lagui/ppa
sudo apt-get update
sudo apt-get install gmediafinder
sudo apt-get update
sudo apt-get install gmediafinder
I hope this info is useful. :)
Read more...
Bookmark this post: |
|
Friday 24 June 2011
how to split a file in linux
If you need to split a single large file into smaller pieces to transfer the files through small memory drives(I had to transfer 4.6 GB matlab ISO using two 4 GB pendrives), there's this simple command line tool called "split" developed by Torbjorn Granlund and Richard M. Stallman.
Fire up the terminal and navigate to the directory in which the file to be splitted is present.
Then, we'll use the split command as below:
After executing the above command, the iso is divided into smaller chunks of specified file size. The --bytes option can take various different arguments such as 2K, 2M, etc.
To recombine the files into a single file, open the terminal and type the following after navigating to the proper directory.
For more information on the command, type man split.
Read more...
Fire up the terminal and navigate to the directory in which the file to be splitted is present.
Then, we'll use the split command as below:
split --bytes=2G matlab.iso matlab_
After executing the above command, the iso is divided into smaller chunks of specified file size. The --bytes option can take various different arguments such as 2K, 2M, etc.
To recombine the files into a single file, open the terminal and type the following after navigating to the proper directory.
cat matlab_* > matlab.iso
For more information on the command, type man split.
Read more...
Bookmark this post: |
|
Thursday 2 June 2011
Install New Nvidia Driver 270.41.19 in Ubuntu
NVIDIA has released the new versions of unix drivers recently and many bugs have been fixed in this release.
To install this recent driver in ubuntu 11.xx, open the terminal and type the following:
Also the packages are available for download from following links:
http://www.nvidia.com/object/unix.html
ftp://download.nvidia.com/XFree86/Linux-x86/270.41.19/
ftp://download.nvidia.com/XFree86/Linux-x86_64/270.41.19/
Read more...
To install this recent driver in ubuntu 11.xx, open the terminal and type the following:
sudo apt-add-repository ppa:ubuntu-x-swat/x-updates
sudo apt-get update
sudo apt-get install nvidia-current
sudo apt-get update
sudo apt-get install nvidia-current
Also the packages are available for download from following links:
http://www.nvidia.com/object/unix.html
ftp://download.nvidia.com/XFree86/Linux-x86/270.41.19/
ftp://download.nvidia.com/XFree86/Linux-x86_64/270.41.19/
Read more...
Bookmark this post: |
|
Sunday 29 May 2011
Fix GPG Key Errors For Bad Keys
Today I tried to update my ubuntu 10.10 but unfortunately, I found the error regarding the GPG keys saying the signature could not be verified. A simple solution for this is presented in this post.
The error I got was as below:
My solution was to update the keys using the same hex number shown in the error.
This simply worked as a charm. I hope this works for you as well. :)
Read more...
The error I got was as below:
W: GPG error: http://ppa.launchpad.net maverick Release: The following signatures couldn't be verified because the public key is not available: NO_PUBKEY 5A9A06AEF9CB8DB0
My solution was to update the keys using the same hex number shown in the error.
sudo apt-key adv --keyserver keyserver.ubuntu.com --recv-keys 5A9A06AEF9CB8DB0
This simply worked as a charm. I hope this works for you as well. :)
Read more...
Bookmark this post: |
|
Saturday 28 May 2011
Fixing No Init Found. Try Passing Init: Bootarg Error in Ubuntu
Today I encountered this error and I thought it was related to HDD issues. So I used fsck which is a command line tool to check and repair the linux filesystem. So I am writing this short how to so that it might be helpful for you as well.
The error encountered is something like below:
You need to boot your system with the Ubuntu live CD. After booting from live CD, open the terminal and then enter the following command:
Replace /dev/sda1 with your target filesystem partition and press enter. Whenever any fix or overwrite permissions are asked, press y. After finishing the repairing, reboot your system from hard disk. The system should boot without any error now.
I hope this helps you. :)
Read more...
The error encountered is something like below:
mount: mounting /dev on /root/dev failed: No such file or directory
mount: mounting /sys on /root/sys failed: No such file or directory
mount: mounting /proc on /root/proc failed: No such file or directory
Target file system doesn't have requested /sbin/init
No init found. Try passing init: bootarg
mount: mounting /sys on /root/sys failed: No such file or directory
mount: mounting /proc on /root/proc failed: No such file or directory
Target file system doesn't have requested /sbin/init
No init found. Try passing init: bootarg
You need to boot your system with the Ubuntu live CD. After booting from live CD, open the terminal and then enter the following command:
sudo fsck /dev/sda1
Replace /dev/sda1 with your target filesystem partition and press enter. Whenever any fix or overwrite permissions are asked, press y. After finishing the repairing, reboot your system from hard disk. The system should boot without any error now.
I hope this helps you. :)
Read more...
Bookmark this post: |
|
Tuesday 24 May 2011
Fix Counter Strike Sound Problem Under WINE [How To]
I've been playing counter strike for a while through wine and so far, most of it works well. With getting more and more better with the game, I've learnt the importance of sound in this game. Unfortunately, the sound was not working properly and with some experiments, I've found the solution for me. I hope it also works for you.
By default, my wine's audio is configured to use ALSA driver with the settings as below:

Now, you need to edit the settings to match as in the following image.

After changing the audio configuration, click on Apply and then restart Counter-strike. I guess this will work for you as well.
Read more...
Bookmark this post: |
|
Tuesday 10 May 2011
Reset Forgotten Ubuntu Password [How To]
If you've forgotten your ubuntu user password, it is still possible to recover the account by resetting the password. The recovery mode option in the grub menu can be used to reset the ubuntu user password as this mode lets us drop to the root shell prompt.
To reset the password, first select the recovery mode from grub menu. And then you'll have to select the "Drop to shell prompt" option. Now you can simply reset your password by using the passwd command.
Replace yourusername field with your username for ubuntu login and then you'll be prompted twice for new password. Enter the new password and you're done. Just reboot the system and this will successfully reset the password and you'll be able to access your ubuntu account. I hope this helps. :)
Read more...
To reset the password, first select the recovery mode from grub menu. And then you'll have to select the "Drop to shell prompt" option. Now you can simply reset your password by using the passwd command.
passwd <yourusername>
Replace yourusername field with your username for ubuntu login and then you'll be prompted twice for new password. Enter the new password and you're done. Just reboot the system and this will successfully reset the password and you'll be able to access your ubuntu account. I hope this helps. :)
Read more...
Bookmark this post: |
|
Saturday 7 May 2011
Graphical Tools To Determine PCI Devices In Linux
We can use lspci command to list and determine the PCI devices from the terminal but most of us want some graphical way to view the PCI devices connected to our system. In this post, we will discuss two such GUI tools.
1. GNOME Device Manager
This is a GNOME program to manage devices and device drivers. It's inspired by hal-device-manager, from the HAL project, but rewritten in C for efficiency and an outlook to actually make it manage devices rather than just show information.
To install it, type the following apt-get command:
You can open the program from Applications -> System Tools -> Device Manager

2. Hardinfo
HardInfo is a small system profiler and benchmark application that displays information about your hardware and operating system. Currently it knows about PCI, ISA PnP, USB, IDE, SCSI, Serial and parallel port devices.
To install hardinfo, type the following in your terminal:
You can open the program from Applications -> System Tools -> System Profiler and Benchmark

If you know any other such GUI tool, please do comment.
Read more...
1. GNOME Device Manager
This is a GNOME program to manage devices and device drivers. It's inspired by hal-device-manager, from the HAL project, but rewritten in C for efficiency and an outlook to actually make it manage devices rather than just show information.
To install it, type the following apt-get command:
sudo apt-get install gnome-device-manager
You can open the program from Applications -> System Tools -> Device Manager

2. Hardinfo
HardInfo is a small system profiler and benchmark application that displays information about your hardware and operating system. Currently it knows about PCI, ISA PnP, USB, IDE, SCSI, Serial and parallel port devices.
To install hardinfo, type the following in your terminal:
sudo apt-get install hardinfo
You can open the program from Applications -> System Tools -> System Profiler and Benchmark

If you know any other such GUI tool, please do comment.
Read more...
Bookmark this post: |
|
Monday 25 April 2011
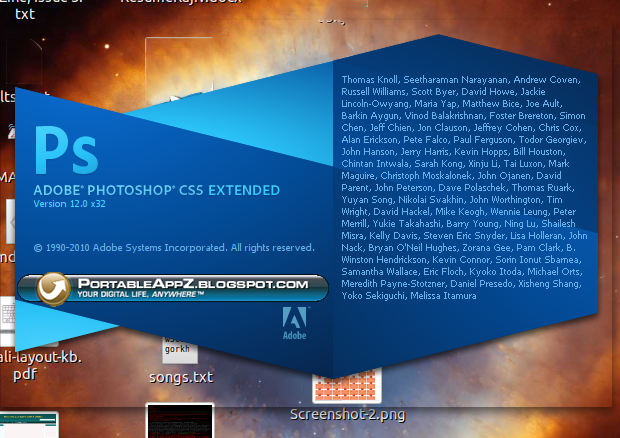
Installing Adobe Photoshop CS5 In Ubuntu [How To]
In this tutorial, I will guide you through how to install and fully run Adobe Photoshop CS5 without any errors. We will be installing the Adobe Photoshop CS5 Portable version available for free in internet.

After downloading the installer for Adobe Photoshop CS5 Portable, you will have to first chmod the exe file so that it can be executed.
Now, run the installer and the photoshop installation will complete without any errors. The problem with this portable photoshop cs5 installation is that it will install correctly but might produce the runtime error complaining about the incorrect loading of C runtime environment. The error you are likely to encounter is similar to something below:
To fix this error, I copied all the files from WinSxS folder from my windows XP OS to the wine's C:\windows\WinSxS\. For this, copy all the files of WinSxS folder to USB and then to your Ubuntu OS(or if you are on VM like me, copy paste via the Virtual Shared folders feature). Now, go to Applications - Wine - Browse C: Drive and then navigate to Windows - WinSxS folder. Paste all the WinSxS contents you just copied from windows OS to this folder. See the screenshots below if you are confused from where to copy and where to paste:


Now try to run photoshop portable and you will probably face the error as below:
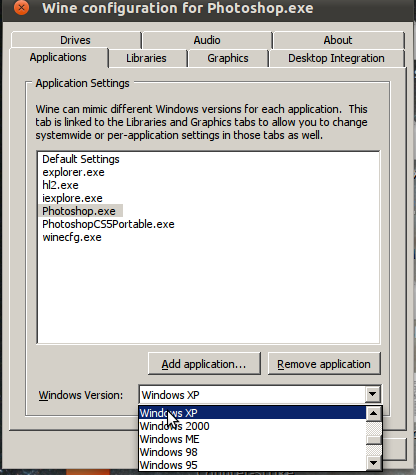
Now, go to Applications - Wine - Configure Wine and then from the Applications tab, click on Add Application and add the photoshop portable's executable located at $HOME/.wine/dosdevices/c:/PhotoshopPortable/App/PhotoshopCS5. After adding application, select Windows XP from Windows Version dropdown list. Click on Apply and now your photoshop CS5 portable should work without any error in Ubuntu.

I hope this helps. :)
Read more...
After downloading the installer for Adobe Photoshop CS5 Portable, you will have to first chmod the exe file so that it can be executed.
chmod +x Photoshop_Portable_12.0_en-fr-de-es-it-ru-zh-tw.paf.exe
Now, run the installer and the photoshop installation will complete without any errors. The problem with this portable photoshop cs5 installation is that it will install correctly but might produce the runtime error complaining about the incorrect loading of C runtime environment. The error you are likely to encounter is similar to something below:
Microsoft Visual C++ Runtime Library
Runtime Error!
Program C:\PhotoshopPortable\PhotoshopPortable.exe
R6034
An application has made an attempt to load the C runtime library incorrectly.
Please contact the application's support team for more information
Runtime Error!
Program C:\PhotoshopPortable\PhotoshopPortable.exe
R6034
An application has made an attempt to load the C runtime library incorrectly.
Please contact the application's support team for more information
To fix this error, I copied all the files from WinSxS folder from my windows XP OS to the wine's C:\windows\WinSxS\. For this, copy all the files of WinSxS folder to USB and then to your Ubuntu OS(or if you are on VM like me, copy paste via the Virtual Shared folders feature). Now, go to Applications - Wine - Browse C: Drive and then navigate to Windows - WinSxS folder. Paste all the WinSxS contents you just copied from windows OS to this folder. See the screenshots below if you are confused from where to copy and where to paste:


Now try to run photoshop portable and you will probably face the error as below:
Could not complete your request Unable to initialize windowing system. Terminating.
Now, go to Applications - Wine - Configure Wine and then from the Applications tab, click on Add Application and add the photoshop portable's executable located at $HOME/.wine/dosdevices/c:/PhotoshopPortable/App/PhotoshopCS5. After adding application, select Windows XP from Windows Version dropdown list. Click on Apply and now your photoshop CS5 portable should work without any error in Ubuntu.
I hope this helps. :)
Read more...
Bookmark this post: |
|
Tuesday 19 April 2011
Enable Network Play Without Lag/Freezes In Counter Strike [How To]
Recently I had posted about how to have counter strike 1.6 run under linux but today when I was just testing to see how well the network play works, I found that the game freezes after connecting to the CT server. I searched on google and found a perfect solution for it.
I've tested this on the installation of Counter Strike : Condition Zero but should also work in Counter Strike 1.6.
The motd.txt file in the cstrike and czero can not be rendered properly by WINE so the game freezes. To solve this problem, we remove the motd.txt file and then, we create a new read only file with the name motd_temp.html which should be empty and there should be no problem rendering this new file as its just an empty file.
If there already exists the motd_temp.html in those directories, be sure to delete them and create a new empty file. To change the permission to read only, you can use the chmod command as below:
Now, you can play the counter strike in lan or with any server without any lag or freezes. Happy gaming. :)
Read more...
I've tested this on the installation of Counter Strike : Condition Zero but should also work in Counter Strike 1.6.
The motd.txt file in the cstrike and czero can not be rendered properly by WINE so the game freezes. To solve this problem, we remove the motd.txt file and then, we create a new read only file with the name motd_temp.html which should be empty and there should be no problem rendering this new file as its just an empty file.
If there already exists the motd_temp.html in those directories, be sure to delete them and create a new empty file. To change the permission to read only, you can use the chmod command as below:
chmod +r-wx motd_temp.html
Now, you can play the counter strike in lan or with any server without any lag or freezes. Happy gaming. :)
Read more...
Bookmark this post: |
|
Saturday 16 April 2011
gufw - A Graphical User Interface To Manage UFW Firewall
Gufw is an easy to use Ubuntu / Linux firewall, powered by ufw.
Gufw is an easy, intuitive, way to manage your Linux firewall. It supports common tasks such as allowing or blocking pre-configured, common p2p, or individual ports port(s), and many others! Gufw is powered by ufw , runs on Ubuntu, and anywhere else Python, GTK, and Ufw are available. Iptables is already a very powerful tool by itself, but it's syntax can get awkward at times and hard to figure out, so Ubuntu developers decided to make ufw ("The reason ufw was developed is that we wanted to create a server-level firewalling utility that was a little bit more for `human beings`"), which was to be simpler. Now, on the graphical side of things, Firestarer already existed. But why not make an even easier to use GUI for desktop `human beings`, powered by ufw? This is where Gufw comes in.
To install Gufw in ubuntu, type the following in your terminal:
You can run Gufw in GNOME menu: /System/Administration/Firewall configuration. To know more about gufw and ufw, you can check the manpage with man gufw and man ufw.
Read more...
Gufw is an easy, intuitive, way to manage your Linux firewall. It supports common tasks such as allowing or blocking pre-configured, common p2p, or individual ports port(s), and many others! Gufw is powered by ufw , runs on Ubuntu, and anywhere else Python, GTK, and Ufw are available. Iptables is already a very powerful tool by itself, but it's syntax can get awkward at times and hard to figure out, so Ubuntu developers decided to make ufw ("The reason ufw was developed is that we wanted to create a server-level firewalling utility that was a little bit more for `human beings`"), which was to be simpler. Now, on the graphical side of things, Firestarer already existed. But why not make an even easier to use GUI for desktop `human beings`, powered by ufw? This is where Gufw comes in.
To install Gufw in ubuntu, type the following in your terminal:
sudo apt-get install gufw
You can run Gufw in GNOME menu: /System/Administration/Firewall configuration. To know more about gufw and ufw, you can check the manpage with man gufw and man ufw.
Read more...
Bookmark this post: |
|
Counter Strike 1.6 Under Ubuntu Using WINE [How To]
WINE is a very useful software that helps you run windows applications in linux, BSD and MAC OS. If you have just switched to ubuntu and can't find any interesting games like counterstrike for linux then you don't have to worry. The WINE will help you play the games like counter-strike under your ubuntu linux.
First of all, install WINE and in this tutorial, I assume that you've installed the WINE. Now, change the permission of your counter-strike 1.6 executable's permission by issuing the command chmod +x Counter-Strike1.6.exe
After finishing the installation, the shortcut icons will be created in your desktop and you might need to edit the shortcut for fully working counter strike installation. Otherwise, the game will just freeze in a window. To edit the shortcut, open the Counter-Strike 1.6.desktop file with gedit and replace all the contents with the content below:
Also, be sure to edit this file according to your home folder. You'll have to replace samar with your home folder name in the above content.
Now, you are ready to go. The game will play well without any noticiable errors. Have fun. :)
Read more...
First of all, install WINE and in this tutorial, I assume that you've installed the WINE. Now, change the permission of your counter-strike 1.6 executable's permission by issuing the command chmod +x Counter-Strike1.6.exe
After finishing the installation, the shortcut icons will be created in your desktop and you might need to edit the shortcut for fully working counter strike installation. Otherwise, the game will just freeze in a window. To edit the shortcut, open the Counter-Strike 1.6.desktop file with gedit and replace all the contents with the content below:
[Desktop Entry]
Name=Counter-Strike 1.6
Exec=env WINEPREFIX="/home/samar/.wine" wine hl.exe -game C:\\\\Program\\ Files\\\\Counter-Strike\\ 1.6\\\\cstrike.exe -gl -gldrv Default -w 800 -h 600
Type=Application
StartupNotify=true
Path=/home/samar/.wine/dosdevices/c:/Program Files/Counter-Strike 1.6
Icon=BBDA_cstrike.0
Also, be sure to edit this file according to your home folder. You'll have to replace samar with your home folder name in the above content.
Now, you are ready to go. The game will play well without any noticiable errors. Have fun. :)
Read more...
Bookmark this post: |
|
How to find MAC address of PC/device In Your Network
The MAC address of other PCs in LAN can be quite useful for some network protection bypassing such as internet access, etc. Today, I will show you how you can find the MAC address of any PC in your network.
Method 1: This method works in both windows and Linux. So open your terminal(in linux) or command prompt(in windows) and type:
Here, in place of <hostname>, type either computer's name or IP address whose MAC address you want to know.
Now, type the following command:
This will give you the arp entry cache of the specified hostname and this information also includes the MAC address of the PC. Sample output would be something like below:
You can clearly spot the MAC address in the above output.
Method 2: This method is pretty useful and I do frequently use this tool to gather NetBIOS information of PCs in network. The tool I use is nbtscan and nbtscan is a program for scanning IP networks for NetBIOS name information. It sends NetBIOS status query to each address in supplied range and lists received information in human readable form. For each responded host it lists IP address, NetBIOS computer name, logged-in user name and MAC address (such as Ethernet).
The tool is available for download for windows and different distros of Linux from HERE.
Also, you can install it under ubuntu by issuing following command from terminal.
Now, the usage of this tool is pretty straightforward.
This will give the NetBIOS information of the requested hostname. But, this isn't the only thing. We can also mass-scan the network by giving the IP range.
This scans all the devices within the range 192.168.0.1 - 192.168.0.255 and displays the NetBIOS information of the computers in network.
I hope this helps some of you. Thanks :)
Read more...
Method 1: This method works in both windows and Linux. So open your terminal(in linux) or command prompt(in windows) and type:
ping <hostname>
Here, in place of <hostname>, type either computer's name or IP address whose MAC address you want to know.
Now, type the following command:
arp -a <hostname>
This will give you the arp entry cache of the specified hostname and this information also includes the MAC address of the PC. Sample output would be something like below:
techgaun.local (192.168.0.49) at 90:fb:a6:27:b7:6a [ether] on eth1
You can clearly spot the MAC address in the above output.
Method 2: This method is pretty useful and I do frequently use this tool to gather NetBIOS information of PCs in network. The tool I use is nbtscan and nbtscan is a program for scanning IP networks for NetBIOS name information. It sends NetBIOS status query to each address in supplied range and lists received information in human readable form. For each responded host it lists IP address, NetBIOS computer name, logged-in user name and MAC address (such as Ethernet).
The tool is available for download for windows and different distros of Linux from HERE.
Also, you can install it under ubuntu by issuing following command from terminal.
sudo apt-get install nbtscan
Now, the usage of this tool is pretty straightforward.
nbtscan <hostname>
This will give the NetBIOS information of the requested hostname. But, this isn't the only thing. We can also mass-scan the network by giving the IP range.
nbtscan 192.168.0.1-255
This scans all the devices within the range 192.168.0.1 - 192.168.0.255 and displays the NetBIOS information of the computers in network.
I hope this helps some of you. Thanks :)
Read more...
Bookmark this post: |
|
Thursday 14 April 2011
Single Window Mode In GIMP
One of the basic problems GIMP has is lack of the single window mode and its so boring to see the multiple windows for each components of GIMP. Today, I'll list few of the ways to achieve single window mode in GIMP.
Method 1: Install the current development verion of GIMP i.e. 2.7 or higher and you'll have an option to run GIMP as single window mode. So you can install all the core dependencies (GEGL and BABL) and then install the GIMP2.7 from its source.
Method 2: Installing GIMPBox. GIMPBox is a python script that enables you to run gimp in the single window mode. To install it, type the following in the terminal.
Now, you can run GIMP in single window mode by just typing gimpbox in run command(ALT+F2).
Method 3: The third method is discussed in the ubuntuforums HERE
I hope these were helpful. Thanks. :)
Read more...
Method 1: Install the current development verion of GIMP i.e. 2.7 or higher and you'll have an option to run GIMP as single window mode. So you can install all the core dependencies (GEGL and BABL) and then install the GIMP2.7 from its source.
Method 2: Installing GIMPBox. GIMPBox is a python script that enables you to run gimp in the single window mode. To install it, type the following in the terminal.
sudo wget http://gimpbox.googlecode.com/hg/gimpbox.py -O /usr/local/bin/gimpbox && sudo chmod +x /usr/local/bin/gimpbox
Now, you can run GIMP in single window mode by just typing gimpbox in run command(ALT+F2).
Method 3: The third method is discussed in the ubuntuforums HERE
I hope these were helpful. Thanks. :)
Read more...
Bookmark this post: |
|
Tuesday 12 April 2011
How to add Alt key support in Photoshop Under Ubuntu
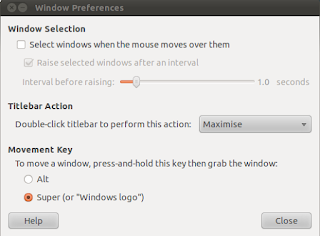
If you are using wine to run photoshop under your linux distribution, you might have come across this unfriendly problem of Alt key not working in photoshop. Alt key combination is very useful in photoshop as the shortcut to different tasks such as subtraction from selection and other tools and you might want to see this alt key working as per your wish.
The fix is pretty simple. By default, the window movement key is set to Alt because of which you can't use Alt key as you wish. But we can change this setting by going to System->Preferences->Windows. Under the Movement key, select the Super(i.e. windows logo) as the default movement key and now you can use the Alt key normally in photoshop. I've tested this in CS2 under ubuntu 10.10 but I guess it would work with any other versions as well.
I hope this helps some of you. :)
Read more...
The fix is pretty simple. By default, the window movement key is set to Alt because of which you can't use Alt key as you wish. But we can change this setting by going to System->Preferences->Windows. Under the Movement key, select the Super(i.e. windows logo) as the default movement key and now you can use the Alt key normally in photoshop. I've tested this in CS2 under ubuntu 10.10 but I guess it would work with any other versions as well.

I hope this helps some of you. :)
Read more...
Bookmark this post: |
|
Subscribe to:
Posts (Atom)