Monday 20 August 2012
Build A Sample Custom Packet [Embedded Systems]
This code snippet was my submission for embedded systems assignment from the embedded system black book by Dr. K.V.K.K. Prasad. It is in no way a real packet and is not meant to represent the IP layer.
Question: Write a C program that takes the filename as input and generates packets of 100 bytes. Develop a simple packet format of your own.
Compilation:
Read more...
Question: Write a C program that takes the filename as input and generates packets of 100 bytes. Develop a simple packet format of your own.
Compilation:
gcc -Wall -lm -o custom_packet custom_packet.c
//custom_packet.c
//
//eg: ./custom_packet /home/samar/Desktop/cs_rules.txt
//Compilation: gcc -Wall -lm -o custom_packet custom_packet.c
//Custom Packet: Header -> 20 bytes and Data -> 80 bytes
//Find me on http://www.techgaun.com

#include <stdio.h>
#include <string.h>
#include <stdlib.h>
#include <math.h>
#include <sys/types.h>
#include <sys/stat.h>
#include <fcntl.h>
#include <unistd.h>

typedef struct
{
        int8_t fragment_offset;
        int8_t ttl;
        int32_t source_ip;
        int32_t dest_ip;
} custom_packet_header;

typedef struct
{
        custom_packet_header header;
        char data[80];
} custom_packet;

long int get_file_size(char fname[])
{
        int fd;
        int count;
        if ((fd = open(fname, O_RDONLY)) == -1)
        {
                perror("Error reading the file\n");
                exit(EXIT_FAILURE);
        }

        struct stat buf;
    fstat(fd, &buf);
    count = buf.st_size;
        close(fd);
        return count;
}

int decimalip2numeric(int a, int b, int c, int d)
{
        return (a * 16777216 + b * 65536 + c * 256 + d);
}

/*char * numericip2decimal(int num)
{
        char strs[4];
        strs[0] = (char *) num / 1677;
}*/

int main(int argc, char **argv)
{
        FILE *fp;
        //char fname[256];      //255 bytes is the limit of filename in extN filesystems
        custom_packet * packets;
        long int fsize;
        int num_of_packet, i;
        if (argc != 2)
        {
                printf("Usage: %s filename\n", argv[0]);
                exit(1);
        }

        fsize = get_file_size(argv[1]);
        num_of_packet = ceil((double)fsize / 80.0);
        printf("%ld => %d",fsize, num_of_packet);

        if ((fp = fopen(argv[1], "rb")) == NULL)
        {
                perror("Error opening the file");
                exit(1);
        }

        packets = (custom_packet *) malloc(sizeof(custom_packet) * num_of_packet);
        for (i = 0; i < num_of_packet; i++)
        {
                packets[i].header.source_ip = decimalip2numeric(127, 0, 0, 1); //storing source ip as 127.0.0.1 for now
                packets[i].header.dest_ip = decimalip2numeric(127, 0, 0, 1); //storing dest ip as 127.0.0.1 for now
                packets[i].header.ttl = 127;
                packets[i].header.fragment_offset = i;
        }
        i = 0;
        while (!feof(fp))
        {
                fread((void *)packets[i].data, 80, 1, fp);
                i++;
        }

        fclose(fp);

        printf("\n\n----- Printing all the crafted packets -----\n\n");
        for (i = 0; i < num_of_packet; i++)
        {
                printf("[---- Packet Fragment no. %d ----", packets[i].header.fragment_offset);
                printf("\nSource IP -> %d\nDestination IP -> %d\nTime to live -> %d\n", packets[i].header.source_ip, packets[i].header.dest_ip, packets[i].header.ttl);
                printf("Packet data -> %s", packets[i].data);
                printf("\n---- End of Packet no. %d ----]\n\n", packets[i].header.fragment_offset);
        }

        return 0;
}
Read more...
Bookmark this post: | 
|
Friday 17 August 2012
Bypass Android Pattern Lock In Easy Steps
Android devices has this security feature known as pattern lock which prevents the access of other people in your device. One of the senior members at XDA has revealed a way to bypass this pattern lock feature completely.
There have been several attempts on finding different methods for bypassing pattern unlocking in the android devices. Early methods were tracking the smudges on the screen and guessing since human are more likely to use the patterns they have already seen.
This method, posted in XDA developers forum by m.sabra, requires the USB debugging to be enabled in the android device and then you can use ADB (Android Debug Bridge), a part of Android SDK to easily bypass the pattern unlock with few lines of commands. The user has revealed two methods for bypassing this, the first one involves running few SQLite queries and the second one requires deleting the associated key.
You will need to download the Android SDK in order to continue with this hack.
Method 1:
AND/OR
Method 2:
You can either choose one of the methods or perform both of the methods (method 1 first and method 2 second). Be sure to reboot once you perform any of the above mentioned methods.
Users have said that this method is not working on the latest Android Jelly Bean and other custom ROMs such as Cyanogen Mod. But, earlier android versions are vulnerable to this hack.
Even if the USB debugging is disabled, you can still run these methods if custom recovery was installed in the android device. You will have to mount the working partition. Just go to 'Mounts and Storage' and mount /data. Then you can follow the above methods to bypass the lock.
Read more...
There have been several attempts on finding different methods for bypassing pattern unlocking in the android devices. Early methods were tracking the smudges on the screen and guessing since human are more likely to use the patterns they have already seen.
This method, posted in XDA developers forum by m.sabra, requires the USB debugging to be enabled in the android device and then you can use ADB (Android Debug Bridge), a part of Android SDK to easily bypass the pattern unlock with few lines of commands. The user has revealed two methods for bypassing this, the first one involves running few SQLite queries and the second one requires deleting the associated key.
You will need to download the Android SDK in order to continue with this hack.
Method 1:
adb shell
cd /data/data/com.android.providers.settings/databases
sqlite3 settings.db
update system set value=0 where name='lock_pattern_autolock';
update system set value=0 where name='lockscreen.lockedoutpermanently';
.quit
cd /data/data/com.android.providers.settings/databases
sqlite3 settings.db
update system set value=0 where name='lock_pattern_autolock';
update system set value=0 where name='lockscreen.lockedoutpermanently';
.quit
AND/OR
Method 2:
adb shell rm /data/system/gesture.key
You can either choose one of the methods or perform both of the methods (method 1 first and method 2 second). Be sure to reboot once you perform any of the above mentioned methods.
Users have said that this method is not working on the latest Android Jelly Bean and other custom ROMs such as Cyanogen Mod. But, earlier android versions are vulnerable to this hack.
Even if the USB debugging is disabled, you can still run these methods if custom recovery was installed in the android device. You will have to mount the working partition. Just go to 'Mounts and Storage' and mount /data. Then you can follow the above methods to bypass the lock.
Read more...
Bookmark this post: |
|
Monday 13 August 2012
Screen Recording Software Solutions For Linux
Windows users have several options to choose from when it comes to the desktop recording (and only paid ones are good generally) but Linux users have fewer options but robust, simple, and best of all, free and open source desktop screen recording tools that we can trust on.
Below are some of the screen recording tools you might want to try:
recordMyDesktop is a desktop session recorder for GNU/Linux written in C. recordMyDesktop itself is a command-line tool and few GUI frontends are also available for this tool. There are two frontends, written in python with pyGtk (gtk-recordMyDesktop) and pyQt4 (qt-recordMyDesktop). recordMyDesktop offers also the ability to record audio through ALSA, OSS or the JACK audio server. Also, recordMyDesktop produces files using only open formats. These are theora for video and vorbis for audio, using the ogg container.
Installation under debian and ubuntu:
XVidCap is a small tool to capture things going on on an X-Windows display to either individual frames or an MPEG video. It enables you to capture videos off your X-Window desktop for illustration or documentation purposes.It is intended to be a standards-based alternative to tools like Lotus ScreenCam.
Istanbul is a desktop session recorder for the Free Desktop. It records your session into an Ogg Theora video file. To start the recording, you click on its icon in the notification area. To stop you click its icon again. It works on GNOME, KDE, XFCE and others. It was named so as a tribute to Liverpool's 5th European Cup triumph in Istanbul on May 25th 2005.
Vnc2flv is a cross-platform screen recording tool for UNIX, Windows or Mac. It captures a VNC desktop session (either your own screen or a remote computer) and saves as a Flash Video (FLV) file.
Wink is a Tutorial and Presentation creation software, primarily aimed at creating tutorials on how to use software (like a tutor for MS-Word/Excel etc). Using Wink you can capture screenshots, add explanations boxes, buttons, titles etc and generate a highly effective tutorial for your users. It requires GTK 2.4 or higher and unfortunately is just a freeware(could not find any source code for it).
Screenkast is a screen capturing program that records your screen-activities, supports commentboxes and exports to all video formats.
If you got any more suggestions, please drop the comment. :)
Read more...
Below are some of the screen recording tools you might want to try:
recordMyDesktop
recordMyDesktop is a desktop session recorder for GNU/Linux written in C. recordMyDesktop itself is a command-line tool and few GUI frontends are also available for this tool. There are two frontends, written in python with pyGtk (gtk-recordMyDesktop) and pyQt4 (qt-recordMyDesktop). recordMyDesktop offers also the ability to record audio through ALSA, OSS or the JACK audio server. Also, recordMyDesktop produces files using only open formats. These are theora for video and vorbis for audio, using the ogg container.
Installation under debian and ubuntu:
sudo apt-get install gtk-recordmydesktop
XVidCap
XVidCap is a small tool to capture things going on on an X-Windows display to either individual frames or an MPEG video. It enables you to capture videos off your X-Window desktop for illustration or documentation purposes.It is intended to be a standards-based alternative to tools like Lotus ScreenCam.
sudo apt-get install xvidcap
Istanbul
Istanbul is a desktop session recorder for the Free Desktop. It records your session into an Ogg Theora video file. To start the recording, you click on its icon in the notification area. To stop you click its icon again. It works on GNOME, KDE, XFCE and others. It was named so as a tribute to Liverpool's 5th European Cup triumph in Istanbul on May 25th 2005.
sudo apt-get install istanbul
Vnc2Flv
Vnc2flv is a cross-platform screen recording tool for UNIX, Windows or Mac. It captures a VNC desktop session (either your own screen or a remote computer) and saves as a Flash Video (FLV) file.
Wink
Wink is a Tutorial and Presentation creation software, primarily aimed at creating tutorials on how to use software (like a tutor for MS-Word/Excel etc). Using Wink you can capture screenshots, add explanations boxes, buttons, titles etc and generate a highly effective tutorial for your users. It requires GTK 2.4 or higher and unfortunately is just a freeware(could not find any source code for it).
Screenkast
Screenkast is a screen capturing program that records your screen-activities, supports commentboxes and exports to all video formats.
If you got any more suggestions, please drop the comment. :)
Read more...
Bookmark this post: |
|
Download Youtube Videos From Command-Line With Youtube-dl
youtube-dl is a small command-line program to download videos from YouTube.com and few more sites. All it requires is the Python interpreter version 2.5 or higher, and it is not platform specific.
This small tool is simple and offers everything you would love to have, but not the GUI. It supports several websites listed as below:
Supported sites
YouTube.com.
YouTube.com playlists (playlist URLs in "view_play_list" form).
YouTube.com searches
YouTube.com user videos, using user page URLs or the specifc "ytuser" keyword.
metacafe.com.
Google Video.
Google Video searches ("gvsearch" keyword).
Photobucket videos.
Yahoo! video.
Yahoo! video searches ("ybsearch" keyword).
Dailymotion.
DepositFiles.
blip.tv.
vimeo.
myvideo.de.
The Daily Show / Colbert Nation.
The Escapist.
A generic downloader that works in some sites.
You can download the tool from GitHub. For more information about the tool, check the documentation. The standalone executable for windows is also available for download from the same github repository.
Read more...
Bookmark this post: |
|
Sunday 12 August 2012
Rootbeer - High Performance GPU Computing in JAVA
Good news for JAVA guys that the high performance GPU compiler has been released that aims to bring high performance GPU computing to the Java Programming Language with the minimal effort from the developer.
Rootbeer is more advanced than CUDA or OpenCL Java Language Bindings. With bindings the developer must serialize complex graphs of objects into arrays of primitive types. With Rootbeer this is done automatically. Also with language bindings, the developer must write the GPU kernel in CUDA or OpenCL. With Rootbeer a static analysis of the Java Bytecode is done (using Soot) and CUDA code is automatically generated.
Rootbeer was created using Test Driven Development and testing is essentially important in Rootbeer. Rootbeer is 20k lines of product for and 7k of test code and all tests pass on both Windows and Linux. The Rootbeer test case suite covers every aspect of the Java Programming language except:
1. native methods
2. reflection
3. dynamic method invocation
4. sleeping while inside a monitor.
This means that all of the familar Java code you have been writing can be executed on the GPU.
GitHub of Rootbeer
Read more...
Bookmark this post: |
|
Thursday 9 August 2012
Slalom Canoe 2012 Google Doodle Trick
Google has been releasing the doodles with the Olympic themes and the latest one is the Slalom Canoe doodle. If you guys have not been trying these doodles, you are missing the obvious fun. In this post, I'll reveal a very very simple trick to obtain extremely short timing so that you guys can share in fb and boast with your friends :D
Most of the people have been using the HTML inspection and editing to have an awesome statistics in the doodle. The trick is to use the "Inspect Element" feature of the browsers and edit the values of different HTML elements that wrap the scores and stars.
However, many non-techies might have found that method to be cumbersome so here's even more simpler trick. The trick here is to note the system time you start canoeing and once you are near to the end of race, edit your system time to retain the value, for example, only 1 second ahead of system time you had noted while you were starting.
If you don't know how to change system time, windows users can access through the bottom right part of the Desktop where your system time is displayed and linux users should right-click and select preferences in one of the panels containing time.
You can even leave the slalom canoe tab as it is and continue your other tasks and once you feel you are to the end of the race, adjust the system time so that the difference from starting time is minimal (as you need).

The best thing about this trick is its simplicity and clean nature which leaves no trail for finding the cheating (of course, unless you decide to have too low time or negative time).
Note that this is cheating and is discouraged though :D
Original credits to Brisha for this trick.
Read more...
Bookmark this post: |
|
Saturday 28 July 2012
Download Windows Binaries For Python Packages
Someone from the University of California has made it easier for windows python users to install python extension packages easily by providing several 32-bit and 64-bit windows binaries for several scientific open source python libraries.
If you can't figure out your way in installing python libraries, you can download the binaries for several libraries from HERE.
Most binaries are built from source code found on PyPI or in the projects public revision control systems. Definitely the page to be bookmarked for the windows python'ers if you want to easily install python libraries :)
Read more...
Bookmark this post: |
|
How To Easily Install EasyInstall In 64 bit Windows
Easy Install(easy_install) is a python module (easy_install) bundled with setuptools that lets you automatically download, build, install, and manage Python packages. Easy Install gives you a quick and painless way to install packages remotely by connecting to the cheeseshop or even other websites via HTTP. It is somewhat analogous to the CPAN and PEAR tools for Perl and PHP, respectively. This How To will guide you in installing the easy_install utility easily in windows.
First download the ez_setup.py file.
Run the above script by typing in command prompt the following:
Once the script finishes, new directory "Scripts" will be created in the python installation directory and it will contain the easy_install.exe file in that directory.
Now all you have to do is add the Scripts path to system's Environment Variables to access this tool easily.
Right click on computer, go to properties, Advanced System Settings, Environment Variables, System Variables and edit the "Path" variable by adding correct path to the Scripts directory.
I hope this helps :)
Read more...
First download the ez_setup.py file.
Run the above script by typing in command prompt the following:
python.exe ez_setup.py
Once the script finishes, new directory "Scripts" will be created in the python installation directory and it will contain the easy_install.exe file in that directory.
Now all you have to do is add the Scripts path to system's Environment Variables to access this tool easily.
Right click on computer, go to properties, Advanced System Settings, Environment Variables, System Variables and edit the "Path" variable by adding correct path to the Scripts directory.
I hope this helps :)
Read more...
Bookmark this post: |
|
Friday 27 July 2012
Determine Your SATA Disk Model And Vendor In Ubuntu
Sometimes you need to determine the model and vendor of your hard disk and here is the small tips on how to find those information.
All you have to do is type one of the following commands for the respective outputs:
I hope this becomes useful sometimes. :)
Read more...
All you have to do is type one of the following commands for the respective outputs:
cat /sys/class/block/sda/device/model
cat /sys/class/block/sda/device/vendor
Read more...
Bookmark this post: |
|
Wednesday 18 July 2012
Why Alias Command With Itself
Aliasing the command to itself to suppress the original functionality of the command and provide it new added sets of functionality can come quite handy for linux users and administrators.
If you have been using linux shell for a while, I'm pretty sure you are now familiar with the `ls` command, if not I think you have just learnt to use man pages. Probably you've been using `ls -l` command to list files with the files size as well. Too bad, you won't just be able to instantly make the sense of the file size displayed using this command so why not alias `ls` command to always provide human readable file sizes. So here is my alias:
This is what I always want to see as the output with `ls` command. The same kind of alias can be used with `du` and `df` commands. There are number of other cases where aliasing a command with itself is good choice.
Another example is the less command. By default, you need to press q to exit less which can be quite annoying if the entire content can fit in a single screen. However, adding -F flag will gracefully quit after displaying the content if the content fits in a single screen. So I have my alias for less as below:
If something shoots in your mind, feel free to share here as a comment :)
Read more...
If you have been using linux shell for a while, I'm pretty sure you are now familiar with the `ls` command, if not I think you have just learnt to use man pages. Probably you've been using `ls -l` command to list files with the files size as well. Too bad, you won't just be able to instantly make the sense of the file size displayed using this command so why not alias `ls` command to always provide human readable file sizes. So here is my alias:
alias ls='ls -lh'
This is what I always want to see as the output with `ls` command. The same kind of alias can be used with `du` and `df` commands. There are number of other cases where aliasing a command with itself is good choice.
Another example is the less command. By default, you need to press q to exit less which can be quite annoying if the entire content can fit in a single screen. However, adding -F flag will gracefully quit after displaying the content if the content fits in a single screen. So I have my alias for less as below:
alias lesss='less -F'
If something shoots in your mind, feel free to share here as a comment :)
Read more...
Bookmark this post: |
|
Russian Hacker Bypasses Apple's App Store
A Russian hacker known as ZonD80 has discovered a method to retrieve apps from in-app for iOS apps free of cost. The best thing about this bypassing method is that this method does not require the i-device to be jailbroken. This method works on most of the major iOS versions from 3.0 to 6.0.
The step by step guide on using this method is available at the russian website HERE. The Russian guy has also setup a website called www.in-appstore.com.
Original Link
Watch Video About This Method
HERE is the copy of the instructions to follow.
*Take care while using this trick. I've not tested it and don't know if there are any security implications as the side effect of this bypass method.
Read more...
Bookmark this post: |
|
Friday 13 July 2012
Fast Share Your Files Using Python Script
If you were unaware, there is a command line switch for python that lets you the python library module as a script and I'm sharing a small trick on how you can easily share your files with other computers over LAN/Internet by running a python module that lets you run the tiny web server. Isn't it great when you don't have Samba?
Fire up the terminal, change to the desired directory you wish to share and type the following command:
 Be cautious with the cases of characters of module 'SimpleHTTPServer' else you'll never find your mistake with this command :D
Once you've run the above command, the HTTP server will start to listen on the port 8000 (by default) so the other parties will just have to open up their favorite web browser and type the correct address followed with the colon and port 8000(eg. 192.168.1.21:8000)
I hope this proves useful sometimes. :)
Read more...
Fire up the terminal, change to the desired directory you wish to share and type the following command:
python -m SimpleHTTPServer

Once you've run the above command, the HTTP server will start to listen on the port 8000 (by default) so the other parties will just have to open up their favorite web browser and type the correct address followed with the colon and port 8000(eg. 192.168.1.21:8000)
I hope this proves useful sometimes. :)
Read more...
Bookmark this post: |
|
Stack-based Directory Switching For Easy Reversal
So how many times have you used the `cd` command repeatedly to go back and forth of two or more directories. Probably you are already familiar to the `cd -` command which lets you switch between the current and the previous directory. But, many times this current and previous directory switching restriction will not suffice and hence a better option in such case is to use the `pushd` command instead of `cd`.
For example, just use the `pushd somedirA`, `pushd somedirB`, ... and like that. Now if you need to switch back, you can just use `popd` command and you'll be switching back easily. The `pushd` command saves the current directory path and then cds to the supplied path.
If you dig more, you'll come to know about the -n and -N switches you can combine with these commands so I will let you explore on this. Also, you can use the `dirs` command to view the stack of directories. If you are some computer student or enthusiast, you have already gotten an idea from a famous data structure called stack. Anyway, I hope this comes handy sometimes like it does to me :)
Read more...
Bookmark this post: |
|
Friday 6 July 2012
Fix "trying to overwrite '*', which is also in package *"
Today I was updating few stuffs in edubuntu and dpkg was continually throwing me the problem while trying to install kdelibs-data. The error read as "trying to overwrite 'A', which is also in package X" and the fix was pretty straightforward but still I thought it would help someone out there.
Below is the exact error I was getting while trying to install kdelibs5-data from the deb file.
The fix was pretty simple. Add the --force-overwrite switch in the dpkg command as below:
I hope this comes useful sometimes.
Read more...
Below is the exact error I was getting while trying to install kdelibs5-data from the deb file.
dpkg: error processing /var/cache/apt/archives/
kdelibs5-data_4%3a4.4.5-0ubuntu1.2_all.deb (--unpack):
trying to overwrite '/usr/share/polkit-1/actions
/org.kde.kcontrol.kcmremotewidgets.policy', which is also in package kdebase-runtime-data 4:4.6.5-0ubuntu1
kdelibs5-data_4%3a4.4.5-0ubuntu1.2_all.deb (--unpack):
trying to overwrite '/usr/share/polkit-1/actions
/org.kde.kcontrol.kcmremotewidgets.policy', which is also in package kdebase-runtime-data 4:4.6.5-0ubuntu1
The fix was pretty simple. Add the --force-overwrite switch in the dpkg command as below:
dpkg -i --force-overwrite kdelibs5-data_4.4.5-0ubuntu1.2_all.deb
I hope this comes useful sometimes.
Read more...
Bookmark this post: |
|
Sunday 24 June 2012
Flash Punisher Plugin For Counter Strike Server [New Release]
Recently I wrote a small AMX Mod X plugin that kills the player who throws flashbangs in counter strike and this post provides the plugin and source code of the plugin for the download.
At the first look, the plugin may sound stupid but we play a lot of aa_dima map and few players were continually throwing the flashbangs. There are several maps which are meant to be played by making use of shooting skills that the use of flashbangs. But some people never understand.
I chose to have death as the punishment because that would be the worst punishment any player would expect. And, they will surely be not throwing flashbangs in next rounds.
Download flash_kill.amxx
Or check the Github Repos of Flash Punisher.
Installation is similar to other plugins. Copy the flash_kill.amxx file to cstrike/addons/amxmodx/plugins/ and add a new line "flash_kill.amxx" (without quotes) in the cstrike/addons/amxmodx/configs/plugins.ini.
CVARS:
tg_flashpunish 0 - prevent the killing of player on throwing flashbang.
tg_flashpunish 1 - the plugin shows its effect i.e. the player dies on throwing flashbang.
I hope this plugin becomes useful to some of you guys. :)
Read more...
Why this plugin
Well there are probably few other flash bang punishment plugins already available for download but all I needed was a minimal plugin that would just kill the flashbanger and prevent the effect of the flashbang to other players.At the first look, the plugin may sound stupid but we play a lot of aa_dima map and few players were continually throwing the flashbangs. There are several maps which are meant to be played by making use of shooting skills that the use of flashbangs. But some people never understand.
I chose to have death as the punishment because that would be the worst punishment any player would expect. And, they will surely be not throwing flashbangs in next rounds.
Download flash_kill.amxx
Or check the Github Repos of Flash Punisher.
Installation is similar to other plugins. Copy the flash_kill.amxx file to cstrike/addons/amxmodx/plugins/ and add a new line "flash_kill.amxx" (without quotes) in the cstrike/addons/amxmodx/configs/plugins.ini.
CVARS:
tg_flashpunish 0 - prevent the killing of player on throwing flashbang.
tg_flashpunish 1 - the plugin shows its effect i.e. the player dies on throwing flashbang.
I hope this plugin becomes useful to some of you guys. :)
Read more...
Bookmark this post: |
|
Saturday 16 June 2012
IP Address Based Restriction Using Htaccess File
Sometimes you need to restrict access to files in your webserver to certain IP address or IP range only. In such case, you can apply a simple .htaccess rule and this post provides an information on how to make IP based restriction Using .htaccess.
First, be sure to enable use of htaccess in apache in your distro.
An example of .htaccess file that will block requests from all IP addresses but the subnet of 192.168.0.0/16 is as below:
Similarly, an example of .htaccess file that will allow requests from all IP addresses but the subnet of 192.168.0.0/16 is as below:
You can also specify the individual IP addresses instead of the entire subnet according to your need. Also, note that there should be no space after the comma between allow,deny.
Once you create the .htaccess file, make sure you've provided proper permission to it.
Once you have made the .htaccess file and provided the proper permission, you might need to restart the apache server(but per directory .htaccess does not require reloading the apache in most cases) so that new configurations will show an effect.
I hope this comes handy :)
Read more...
First, be sure to enable use of htaccess in apache in your distro.

An example of .htaccess file that will block requests from all IP addresses but the subnet of 192.168.0.0/16 is as below:
<limit GET>
order deny,allow
deny from all
allow from 192.168
</limit>
order deny,allow
deny from all
allow from 192.168
</limit>
Similarly, an example of .htaccess file that will allow requests from all IP addresses but the subnet of 192.168.0.0/16 is as below:
<limit GET>
order allow,deny
allow from all
deny from 192.168
</limit>
order allow,deny
allow from all
deny from 192.168
</limit>
You can also specify the individual IP addresses instead of the entire subnet according to your need. Also, note that there should be no space after the comma between allow,deny.
Once you create the .htaccess file, make sure you've provided proper permission to it.
samar@Techgaun:/var/www/samar$ chmod 0644 .htaccess
Once you have made the .htaccess file and provided the proper permission, you might need to restart the apache server(but per directory .htaccess does not require reloading the apache in most cases) so that new configurations will show an effect.
samar@Techgaun:/var/www/samar$ sudo service apache2 reload
I hope this comes handy :)
Read more...
Bookmark this post: |
|
Friday 15 June 2012
NCell Introduces Ncell Sapati For Credit Based Recharge
Everytime ncell introduces a new service, it understands what its customer are looking for. Sometimes Recharging your phone becomes imposslible due to outreach of shop , sometime it may be late night or too early , reaching for the card sounds tough. But now ncell has extended it service by introducing Ncell sapati.
To get Ncell sapati of Rs. 20 as main balance, you will have to dial *9988#. You will be charged an extra amount of Rs. 2(Exclusive of VAT and additional taxes) while using this service.
More information is available through IVR by dialing 9980 or play the audio below to hear the full instruction.
This service will come handy lots of time to lots of customers so I welcome this service introduced by Ncell. :)
Read more...
Bookmark this post: |
|
How To Enable Use Of Htaccess In Apache In Ubuntu
This How To provides a detail on how to enable use of .htaccess file in apache in ubuntu and the similar flavors of linux distribution.
To enable use of .htaccess, you can edit the /etc/apache2/sites-available/default file. Search for the portion which contains the following lines or something similar to that(The bold line is almost always present):
All you have to do is change the bold line above to:
Now you will need to restart the apache service so that the effect of change in configuration takes place. Enter the following command to restart the apache service:
Now your .htaccess files will start to work in ubuntu. :)
Read more...
To enable use of .htaccess, you can edit the /etc/apache2/sites-available/default file. Search for the portion which contains the following lines or something similar to that(The bold line is almost always present):
<Directory /var/www/>
Options Indexes FollowSymLinks MultiViews
AllowOverride None
Order allow,deny
allow from all
</Directory>
Options Indexes FollowSymLinks MultiViews
AllowOverride None
Order allow,deny
allow from all
</Directory>
All you have to do is change the bold line above to:
<Directory /var/www/>
Options Indexes FollowSymLinks MultiViews
AllowOverride All
Order allow,deny
allow from all
</Directory>
Options Indexes FollowSymLinks MultiViews
AllowOverride All
Order allow,deny
allow from all
</Directory>
Now you will need to restart the apache service so that the effect of change in configuration takes place. Enter the following command to restart the apache service:
samar@Techgaun:~$ sudo service apache2 reload
Now your .htaccess files will start to work in ubuntu. :)
Read more...
Bookmark this post: |
|
Recover Deleted Files From An NTFS Volume Using Ntfsundelete
Ntfsundelete is a part of ntfsprogs, a suite of NTFS utilities based around a shared library. It lets us recover the deleted files from any NTFS volumes without making any changes in the NTFS volume itself.
Generally when a file is deleted from disks, it is some kind of pointer to the physical file that gets deleted and the actual content still remains in the disk unless it is overwritten by new files so it is possible to recover those files.
ntfsundelete has three modes of operation: scan, undelete and copy. By default, it will run in the scan mode which simply reads an NTFS volume and looks for the files that have been deleted.

To use ntfsundelete, you'll have to install the ntfsprogs suite with following command in ubuntu and debian-based distros:
You'll have to first figure out which drive you want to recover. A handy command for this is:
Once you know the NTFS volume you want to recover, you can first run the scan mode to list the filenames that can be recovered.
The optional -f switch can be specified for the forceful scanning. There is a nice percentage field which gives the information on how much of the file can be recovered. You can apply the time and percentage filters to scan specific files. For example, you can use the following command to search for the files which can be recovered 100%
And, you can apply the time filter to list the files altered/deleted after the specified time. For example, following command will scan and list the files deleted in the last 14 days.
Other suffices you can use are d, w, m, y for days, weeks, months or years ago respectively.
Once you get the files to be recovered, you can use the -u switch to undelete or recover the files. An example of recovering files by pattern matching is as below:
Similarly you can recover by providing inode or inodes range using the -i switch. You can get the inode values from the first column in the scan mode.
Read more...
Generally when a file is deleted from disks, it is some kind of pointer to the physical file that gets deleted and the actual content still remains in the disk unless it is overwritten by new files so it is possible to recover those files.
ntfsundelete has three modes of operation: scan, undelete and copy. By default, it will run in the scan mode which simply reads an NTFS volume and looks for the files that have been deleted.

To use ntfsundelete, you'll have to install the ntfsprogs suite with following command in ubuntu and debian-based distros:
samar@Techgaun:~$ sudo apt-get install ntfsprogs
You'll have to first figure out which drive you want to recover. A handy command for this is:
samar@Techgaun:~$ sudo fdisk -l
Once you know the NTFS volume you want to recover, you can first run the scan mode to list the filenames that can be recovered.
samar@Techgaun:~$ sudo ntfsundelete /dev/sda4
The optional -f switch can be specified for the forceful scanning. There is a nice percentage field which gives the information on how much of the file can be recovered. You can apply the time and percentage filters to scan specific files. For example, you can use the following command to search for the files which can be recovered 100%
samar@Techgaun:~$ sudo ntfsundelete -p 100 /dev/sda4
And, you can apply the time filter to list the files altered/deleted after the specified time. For example, following command will scan and list the files deleted in the last 14 days.
samar@Techgaun:~$ sudo ntfsundelete -p 100 -t 2d /dev/sda4
Other suffices you can use are d, w, m, y for days, weeks, months or years ago respectively.
Once you get the files to be recovered, you can use the -u switch to undelete or recover the files. An example of recovering files by pattern matching is as below:
samar@Techgaun:~$ sudo ntfsundelete -u -m *.jpg /dev/sda4
Similarly you can recover by providing inode or inodes range using the -i switch. You can get the inode values from the first column in the scan mode.
samar@Techgaun:~$ sudo ntfsundelete -u -i 161922 /dev/sda4
Read more...
Bookmark this post: |
|
Monday 11 June 2012
Graphical Frontends To Sopcast Client For Linux
As all of you know the official Sopcast client for linux is only the command line version and many people find it difficult to use the CLI version. However, many good people have made an effort to write the graphical frontends to the Sopcast client for linux. Here you will find some of such GUI frontends for sopcast.
Sopcast Player: SopCast Player is designed to be an easy to use Linux GUI front-end for the p2p streaming technology developed by SopCast. SopCast Player features an integrated video player, a channel guide, and bookmarks. Once SopCast Player is installed it simply "just works" with no required configuration.
qsopcast: qsopcast is a QT GUI front-end of the Linux command line executive of P2P TV sopcast.
gsopcast: gsopcast is a GTK based GUI front-end for p2p TV sopcast.
TV-Maxe: TV-MAXE is an application which provides the ability to watch TV stations and listen radio via different streams, such is SopCast. Currently it has a large number of channels, both romanian and international.
SCPlayer: SCPlayer is a simple and lightweight GUI frontend for sopcast supporting only linux GNOME3 platform.
Pysopcast: It is a simple GUI for sopcast made using PyGTK.
totem-sopcast: A totem plugin to let you browse and play sopcast streams.
wxsopcast: A sopcast GUI for linux written in python and wxPython. Note that the channel URL needs to be changed to http://www.sopcast.com/gchlxml at first.
jsopcast: jsopcast is a simple GUI to see P2P TV sopcast made in Java.
If you know of any other GUI frontend for sopcast, please feel free to leave a comment. :)
Read more...
Bookmark this post: |
|
Download Full Package Of Winetricks And Fonts To Remove Checksum Mismatch Error
While trying to install allfonts from winetricks, I got a sha checksum mismatch error and soon I started fixing them manually. In order to make it easier for the wine users out there, I've slightly edited(changed the sha checksums) the winetricks file and packaged the font files.
You can download the package from HERE.
After downloading the file, unzip the file and then copy winetricks to /usr/bin/winetricks as below:
Now copy all the fcontents of dotcache/winetricks directory to ~/.cache/winetricks/
Now re-run the winetricks and install the allfonts. This time, you'll not get any error. I hope this helps :)
Read more...
You can download the package from HERE.
After downloading the file, unzip the file and then copy winetricks to /usr/bin/winetricks as below:
cp -f winetricks /usr/bin/winetricks
Now copy all the fcontents of dotcache/winetricks directory to ~/.cache/winetricks/
Now re-run the winetricks and install the allfonts. This time, you'll not get any error. I hope this helps :)
Read more...
Bookmark this post: |
|
Sunday 10 June 2012
Sopcast Player With GUI In Linux
SopCast is a simple, free way to broadcast video and audio or watch the video and listen to radio on the Internet. Adopting P2P(Peer-to-Peer) technology, It is very efficient and easy to use. The GUI for sopcast player for linux works pretty well and this post gives you the step by step process of installation of sopcast player in linux.

Follow the steps as below for easy installation under ubuntu. Instructions should be similar in many variants:

Now everything should work fine. I hope this helps. :)
Read more...
Follow the steps as below for easy installation under ubuntu. Instructions should be similar in many variants:
samar@Techgaun:~/Desktop$ su
root@Techgaun:/home/samar/Desktop/# mkdir sopcast && cd sopcast/
root@Techgaun:/home/samar/Desktop/sopcast# wget http://www.sopcast.com/download/libstdcpp5.tgz
root@Techgaun:/home/samar/Desktop/sopcast# wget http://sopcast-player.googlecode.com/files/sp-auth-3.2.6.tar.gz
root@Techgaun:/home/samar/Desktop/sopcast# wget http://sopcast-player.googlecode.com/files/sopcast-player-0.8.5.tar.gz
root@Techgaun:/home/samar/Desktop/sopcast# tar -xvf sopcast-player-0.8.5.tar.gz
root@Techgaun:/home/samar/Desktop/sopcast# tar -xvf sp-auth-3.2.6.tar.gz
root@Techgaun:/home/samar/Desktop/sopcast# tar -xvf libstdcpp5.tgz
root@Techgaun:/home/samar/Desktop/sopcast# apt-get install gettext python-setuptools libvlc-dev
root@Techgaun:/home/samar/Desktop/sopcast# cd sopcast-player
root@Techgaun:/home/samar/Desktop/sopcast# make
root@Techgaun:/home/samar/Desktop/sopcast# make install
root@Techgaun:/home/samar/Desktop/sopcast# cd ../sp-auth
root@Techgaun:/home/samar/Desktop/sopcast/sp-auth# cp sp-sc-auth /usr/bin/
root@Techgaun:/home/samar/Desktop/sopcast# cd ../usr/lib/
root@Techgaun:/home/samar/Desktop/sopcast/usr/lib/# cp -a libstdc++.so.5* /usr/lib/
root@Techgaun:/home/samar/Desktop/sopcast/usr/lib/# sopcast-player

Now everything should work fine. I hope this helps. :)
Read more...
Bookmark this post: |
|
How Does Windows 7 Determine Internet Access Status
So I was curious on how Microsoft is managing to determine the status of internet access. I am a linux user and I have been thinking of having something similar to windows in ubuntu as well. Due to curiosity, I was tempted to dig further upon this and here is my finding.
What tool would be better than wireshark to analyze network traffics so I fired up wireshark in my friend's laptop. I took out the ethernet cable, started the capture in the ethernet interface, and then plugged in the ethernet cable back. I waited till the internet access status was shown at the right bottom(right part of taskbar) and stopped the live capture.
Now to the fun part, I analyzed the capture with my noob skill.
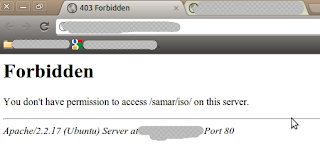
One particular entry was the DNS query for . Curios, I opened the site to find 403 forbidden error. I was now starting to think that Microsoft does the DNS lookup for this particular site and if it fails, Windows shows No Internet Access sign.
Wait!!! There's something more. Further analysis showed that a GET request is made for the file ncsi.txt to that website. Following the stream, I found out that the page contained the text Microsoft NCSI.
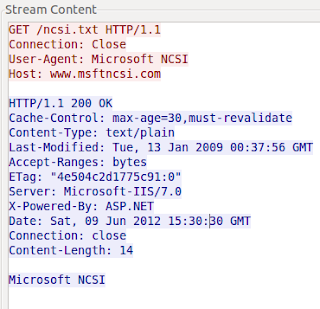
So this is what I concluded after this analysis:
Windows performs a dns lookup for www.msftncsi.com then after it succeeds, a request is made to http://msftncsi.com/ncsi.txt which should contain the text Microsoft NCSI.
I did a google search on Microsoft NCSI and THIS PAGE gives a detailed description on NCSI which stands for Network Connectivity Status Indicator.
If you guys have researched on this and found something different, please let us know by throwing a comment.
Read more...
What tool would be better than wireshark to analyze network traffics so I fired up wireshark in my friend's laptop. I took out the ethernet cable, started the capture in the ethernet interface, and then plugged in the ethernet cable back. I waited till the internet access status was shown at the right bottom(right part of taskbar) and stopped the live capture.
Now to the fun part, I analyzed the capture with my noob skill.
One particular entry was the DNS query for . Curios, I opened the site to find 403 forbidden error. I was now starting to think that Microsoft does the DNS lookup for this particular site and if it fails, Windows shows No Internet Access sign.
Wait!!! There's something more. Further analysis showed that a GET request is made for the file ncsi.txt to that website. Following the stream, I found out that the page contained the text Microsoft NCSI.

So this is what I concluded after this analysis:
Windows performs a dns lookup for www.msftncsi.com then after it succeeds, a request is made to http://msftncsi.com/ncsi.txt which should contain the text Microsoft NCSI.
I did a google search on Microsoft NCSI and THIS PAGE gives a detailed description on NCSI which stands for Network Connectivity Status Indicator.
If you guys have researched on this and found something different, please let us know by throwing a comment.
Read more...
Bookmark this post: |
|
Saturday 9 June 2012
How To Undo Sent Mail In Gmail
This is a how to on undoing the sent mail in gmail. However, this method has severe limitation at the time of writing this post since we are allowed to have maximum time of 30 seconds as a cancellation period but lets hope this gmail lab feature gets integrated in gmail with longer cancellation period.
Sometimes we send an e-mail to somebody and later realize that we should not have sent that particular e-mail. Though not so helpful, the "Undo Send" feature from Gmail Labs can be useful sometimes.
By default, you will not have Undo link after you just sent the message.

Click on the icon(see screenshot below) at the top left corner of your gmail interface and then click on Settings

Click on the Labs Tab and then in the lab search box, type Undo Send.
Now select the Enable radio button and then Save changes.
By default, the cancellation period is 10 seconds(at the time of writing). To change the default time to 30 seconds, again go to settings and in general tab, you will find the Cancellation period dropdown list. Choose any value you want.
Now you can undo the just sent emails as below:

Read more...
Sometimes we send an e-mail to somebody and later realize that we should not have sent that particular e-mail. Though not so helpful, the "Undo Send" feature from Gmail Labs can be useful sometimes.
By default, you will not have Undo link after you just sent the message.
Click on the icon(see screenshot below) at the top left corner of your gmail interface and then click on Settings

Click on the Labs Tab and then in the lab search box, type Undo Send.
Now select the Enable radio button and then Save changes.
By default, the cancellation period is 10 seconds(at the time of writing). To change the default time to 30 seconds, again go to settings and in general tab, you will find the Cancellation period dropdown list. Choose any value you want.
Now you can undo the just sent emails as below:
Read more...
Bookmark this post: |
|
Friday 8 June 2012
Now NTC Hosts Ubuntu Repository For Nepal
As most of the ubuntu users know that the previous nepali repository hosted by Mitra Network Pvt. Ltd. had lots of problem in packages and later went down for a long time. This time, it is NTC who has taken a good initiative and has started providing local ubuntu repository for us.
As seen on foss nepal's mailing list, everybody seems to be happy with the effort of NTC to promote linux and open source software tools in Nepal.
The np.archive.ubuntu.com is now resolving to ubuntu.ntc.net.np now. You can edit your sources.list and choose the nepali repository now. :)
Also, lots of ubuntu distros are available for download. See THIS. Now I can download ubuntu ISO's in around one or two minutes(Thanks NPIX for keeping local traffic local)
In case anyone wants my copy of sources.list file, here it is: sources.list or get it from HERE in case you hate registering on 4shared.
Once you copy the sources.list to /etc/apt/sources.list, make sure to run sudo apt-get update to update the package database.
Read more...
Bookmark this post: |
|
Sunday 3 June 2012
Check Your Plugins To Keep Firefox Updated and Safe
Mozilla foundation is now providing an online tool to check if the plugins you've installed are up to date or not using simple interface. The objective of this service is to keep your third-party plugins up to date which helps Firefox run safely and smoothly.
The service lets you check all the plugins and update the outdated ones from a simple UI in two major steps:
Step 1: Click Update to update a plugin.
Step 2: Complete all recommended updates before restarting your browser.
Head on to Firefox Browser Plugin Check & Updates.
Stay safe :)
Read more...
The service lets you check all the plugins and update the outdated ones from a simple UI in two major steps:
Step 1: Click Update to update a plugin.
Step 2: Complete all recommended updates before restarting your browser.
Head on to Firefox Browser Plugin Check & Updates.
Stay safe :)
Read more...
Bookmark this post: |
|
Saturday 2 June 2012
Torbutton works differently now: you can't turn it off any more
The way torbutton works has been changed and it can not be disabled anymore when the addon is active. You'll have to disable or remove the addon itself to not use the torbutton in firefox.
Whenever you try to click on the tor button icon to disable tor, you'll see the following information:
Torbutton works differently now: you can't turn it off any more.
We made this change because it isn't safe to use Torbutton in a browser that's also used for non-Tor browsing. There were too many bugs there that we couldn't fix any other way.
If you want to keep using Firefox normally, you should uninstall Torbutton and download Tor Browser Bundle. The privacy properties of Tor Browser are also superior to those of normal Firefox, even when Firefox is used with Torbutton.
To remove Torbutton, go to Tools->Addons->Extensions and then click the Remove button next to Torbutton.
If you don't like to have torbutton always enabled in firefox, you can instead use the tor browser bundle which consists of patched version of firefox made to work with better privacy. The Tor Browser Bundle lets you use Tor on Windows, Mac OS X, or Linux without needing to install any software. It can run off a USB flash drive, comes with a pre-configured web browser to protect your anonymity, and is self-contained.
You may continue to use tor by disabling the torbutton but manually configuring the tor proxy configuration by going to Edit menu - Preferences - Advanced - Network - Settings from where you can choose Manual Proxy Configuration(This may be different in windows OS, probably in Tools menu).
First uncheck the Use this proxy for all protocols if it checked. Then in the Socks Host field, type 127.0.0.1 and 9050 in the corresponding port field. Screenshot below can help you.
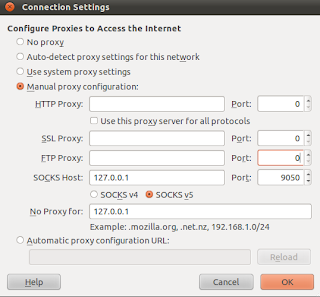
Now you can use tor connection without any need to install torbutton. I hope this helps. :)
Read more...
Bookmark this post: |
|
Friday 1 June 2012
100% Internet Explorer 6 Clone In HTML5
Well I came across this website via some referral online and thought of sharing with you guys. A funny 100% IE6 clone done in HTML5 that MAKES sense :D.
IE6 Clone in HTML5
Read more...
IE6 Clone in HTML5
Read more...
Bookmark this post: |
|
Installing Podbot MM With Counter Strike Dedicated Server
Podbot MetaMod(MM) is probably the best metamod plugin that adds computer players(bots) in the Counter-Strike. Since number of players were decreasing day by day in hostel, I decided to add Podbot MM so that I could play while no other human is joining in the local dedicated server. This How To will provide step by step explanation on the installation of Podbot MM for dedicated server in linux powered with metamod plugin.
I assume you've already installed the metamod plugin. Get podbot MM from official website. At the time of writing this, the link for latest version was not working, so you can also downlod it from HERE
.
Once you've downloaded the podbot files, extract it to cstrike/addons/ directory of your hlds installation.
Now, we'll have to add the podbot reference in the metamod's plugins.ini located at cstrike/addons/metamod/ directory of your hlds installation. Add a new line(one of the below) according to your system:
That should do the job. To verify if the installation worked properly, open the console(by typing ~) and type meta list in-game. You should see podbot MM loaded in that list without any errors(errors like Badf are usually seen).
Now that installation of podbot has gone fine, we'll set the password so that only authorized players can access podbot administration such as adding or kicking bot. Open the podbot.cfg file located at cstrike/addons/podbot directory and search for pb_passwordkey and set the key as below:
Few lines below, you will see pb_password field. Put your password in there.
You can go through the podbot.cfg file to change various configurations for your bot. You can also edit other files in podbot folder as per your necessity.
Now you'll have to enter the password information in your own PC's cstrike folder(NOT the cstrike folder of HLDS). Edit (or create) autoexec.cfg in the cstrike folder with following lines:
Now you can use the = (equals to sign) as the bind key to access podbot menu. Soon after playing a while with podbots, you'll come to know about waypoints. You can create or edit waypoints by accessing waypoint menu by typing pb wpmenu in the console.
I hope this helps. Enjoy fragging :D
Read more...
I assume you've already installed the metamod plugin. Get podbot MM from official website. At the time of writing this, the link for latest version was not working, so you can also downlod it from HERE
.
Once you've downloaded the podbot files, extract it to cstrike/addons/ directory of your hlds installation.
Now, we'll have to add the podbot reference in the metamod's plugins.ini located at cstrike/addons/metamod/ directory of your hlds installation. Add a new line(one of the below) according to your system:
linux addons/podbot/podbot_mm_i386.so
linux addons/podbot/podbot_mm_amd64.so
win32 addons/podbot/podbot_mm.dll
linux addons/podbot/podbot_mm_amd64.so
win32 addons/podbot/podbot_mm.dll
That should do the job. To verify if the installation worked properly, open the console(by typing ~) and type meta list in-game. You should see podbot MM loaded in that list without any errors(errors like Badf are usually seen).
Now that installation of podbot has gone fine, we'll set the password so that only authorized players can access podbot administration such as adding or kicking bot. Open the podbot.cfg file located at cstrike/addons/podbot directory and search for pb_passwordkey and set the key as below:
pb_passwordkey "pwpodbot"
Few lines below, you will see pb_password field. Put your password in there.
pb_password "mypassword"
You can go through the podbot.cfg file to change various configurations for your bot. You can also edit other files in podbot folder as per your necessity.
Now you'll have to enter the password information in your own PC's cstrike folder(NOT the cstrike folder of HLDS). Edit (or create) autoexec.cfg in the cstrike folder with following lines:
setinfo "pwpodbot" "mypassword"
bind "=" "pb menu"
bind "=" "pb menu"
Now you can use the = (equals to sign) as the bind key to access podbot menu. Soon after playing a while with podbots, you'll come to know about waypoints. You can create or edit waypoints by accessing waypoint menu by typing pb wpmenu in the console.
I hope this helps. Enjoy fragging :D
Read more...
Bookmark this post: |
|
Thursday 31 May 2012
JSUnpack - A Generic Javascript Unpacker
JSUnpack is an online service that can unpack different kinds of obfuscated and packed javascript source codes. It is designed for security researchers and computer professionals.
You can either supply the source code or link to the javascript file to unpack it. The site also supports uploading and unpacking of PDF, pcap, HTML, or JavaScript file.
JSUNPACK website
I hope it comes handy to you as it did to me. :)
Read more...
You can either supply the source code or link to the javascript file to unpack it. The site also supports uploading and unpacking of PDF, pcap, HTML, or JavaScript file.
JSUNPACK website
I hope it comes handy to you as it did to me. :)
Read more...
Bookmark this post: |
|
Sunday 27 May 2012
Accelerate Download Speed In Linux Using Axel
Axel is a lightweight command line download accelerator for linux. Axel is a program that downloads a file from a FTP or HTTP server through multiple connection, each connection downloads its own part of the file.
Unlike most other programs, Axel downloads all the data directly to the destination file, using one single thread. It just saves some time at the end because the program doesn't have to concatenate all the downloaded parts.
Axel tries to accelerate downloads by using multiple connections (possibly to multiple servers) for one download. Because of its size, it might be very useful on bootdisks or other small systems as a wget replacement.
One useful implementation of axel is in the apt-fast tool, a fusion of apt-get and axel to accelerate downloads of packages.
Installation under ubuntu and other debian distros: Open the terminal and type:
Similarly, a graphical frontend axel-kapt is also available for download for GUI lovers. Also, flashgot plugin for firefox lets you make use of axel to download files. I should say, axel is a small yet good download accelerator for linux systems.
Read more...
Unlike most other programs, Axel downloads all the data directly to the destination file, using one single thread. It just saves some time at the end because the program doesn't have to concatenate all the downloaded parts.
Axel tries to accelerate downloads by using multiple connections (possibly to multiple servers) for one download. Because of its size, it might be very useful on bootdisks or other small systems as a wget replacement.
One useful implementation of axel is in the apt-fast tool, a fusion of apt-get and axel to accelerate downloads of packages.
Installation under ubuntu and other debian distros: Open the terminal and type:
sudo apt-get install axel
Similarly, a graphical frontend axel-kapt is also available for download for GUI lovers. Also, flashgot plugin for firefox lets you make use of axel to download files. I should say, axel is a small yet good download accelerator for linux systems.
Read more...
Bookmark this post: |
|
How To Supply Password With Connect Command In CS
So here is my scenario. My friend creates a counter strike server that uses the older engine and I play counter strike from 1.6. Unfortunately, the password protected server created by my friend does not appear in my LAN list. I try the connect command in console but I get the message that the password I gave was incorrect. If you guys are having similar scenarios, this post will help you out..
The trick is simple. There is another cvar called password in counter strike. First, we set the password and then use connect command.
Open console(Type ~) and then type:
password serverpass
and then,
connect IP
I hope this helps some of the gamers out there. :)
Read more...
The trick is simple. There is another cvar called password in counter strike. First, we set the password and then use connect command.
Open console(Type ~) and then type:
password serverpass
and then,
connect IP
I hope this helps some of the gamers out there. :)
Read more...
Bookmark this post: |
|
Useful AMXMODX Plugins For Counter strike Server
If you are setting up some counter strike 1.6 server, you are most likely going to have AMX MOD X plugin(which is a metamod plugin) for your server. AMX MOD X is a very useful plugin not just for the server administration but also for customized gameplay, statistics and fun stuffs. The basic plugins are already there in the AMX MOD X installation but in this post, I'm sharing some of the useful AMX MOD X plugins you can download and put in your server.

Advanced ResetScore
A simple but usefull plugin: players can reset their score and money (controled by a cvar). There's a limit for score reseting and an interval between resets. Players can't reset their score if it's 0 - 0 (already reseted). Admins have a command to reset players score.
Record Demo ClanMod Style
This plugins lets you record the demo and take screenshots of your score. Its an useful plugin to have.
Headshot Only Mode
The name of the plugin is self-explanatory. Pretty useful for practising aim in your server.
Show IP of Players
This plugin enables an admin to find out a player's ip by typing in amx_ip. The ip prints in the console.
Speedometer
This plugin shows player speed when your are moving, jumping, climbing a ladder, or in air. Useful for knowing if you are doing bunnyhop right or not :D
[AIOS] (All In One Slap/Slay)
A fun to use plugin with different features for slapping/slaying the players in-game. AIOS is an all in one slap/slap plugin that will meet ALL of you Slap/Slay needs.
Sniper Control
Useful plugin to limit the number of mags per team. It is useful for the pub servers; kind of punishment for AWP campers :D
CSDM
Counter Strike Death Match(CSDM) is a useful amxmodx plugin that adds deathmatch style gameplay to Counter-Strike 1.6.
Aimbot Detection
Think someone in your server is using aimbots to make amazing frags? This plugin can help you find such culprits :)
These were few of the plugins that I've been using in my newly created counter strike server and so far, I've been loving them. I am positive that there are more other useful plugins so throw them as a comment over here. Enjoy fragging :)
Read more...

Advanced ResetScore
A simple but usefull plugin: players can reset their score and money (controled by a cvar). There's a limit for score reseting and an interval between resets. Players can't reset their score if it's 0 - 0 (already reseted). Admins have a command to reset players score.
Record Demo ClanMod Style
This plugins lets you record the demo and take screenshots of your score. Its an useful plugin to have.
Headshot Only Mode
The name of the plugin is self-explanatory. Pretty useful for practising aim in your server.
Show IP of Players
This plugin enables an admin to find out a player's ip by typing in amx_ip
Speedometer
This plugin shows player speed when your are moving, jumping, climbing a ladder, or in air. Useful for knowing if you are doing bunnyhop right or not :D
[AIOS] (All In One Slap/Slay)
A fun to use plugin with different features for slapping/slaying the players in-game. AIOS is an all in one slap/slap plugin that will meet ALL of you Slap/Slay needs.
Sniper Control
Useful plugin to limit the number of mags per team. It is useful for the pub servers; kind of punishment for AWP campers :D
CSDM
Counter Strike Death Match(CSDM) is a useful amxmodx plugin that adds deathmatch style gameplay to Counter-Strike 1.6.
Aimbot Detection
Think someone in your server is using aimbots to make amazing frags? This plugin can help you find such culprits :)
These were few of the plugins that I've been using in my newly created counter strike server and so far, I've been loving them. I am positive that there are more other useful plugins so throw them as a comment over here. Enjoy fragging :)
Read more...
Bookmark this post: |
|
Tuesday 22 May 2012
Cool Facebook Chat Emoticons For Fun
Chatting is even more fun when you can send emoticons to your friends and amaze those friends who have not used such emoticons before. So today after having loads of fun on exchanging these sorts of emoticons, I decided to post an entry here.
1. Profile picture in chat
Type [[techgaunnepal]] where techgaunnepal is the profile id. You can get such profile ID from the respective URL.
2. Shark
Type (^^^)
3. Penguin
Type <(")
4. Man
Type [[putman]]
5. Spongebob
Type [[spongebob]]
6. Facebook like-like button
Type (y)
7. Mask
Type
[[255006724575192]] [[255006727908525]] [[255006737908524]] [[255006734575191]] [[255006731241858]]
[[255006827908515]] [[255006831241848]] [[255006824575182]] [[255006817908516]] [[255006821241849]]
[[255006874575177]] [[255006871241844]] [[255006884575176]] [[255006877908510]] [[255006881241843]]
[[255006934575171]] [[255006931241838]] [[255006941241837]] [[255006944575170]] [[255006937908504]]
[[255007004575164]] [[255007001241831]] [[255006994575165]] [[255006997908498]] [[255006991241832]]
[[255007084575156]] [[255007101241821]] [[255007077908490]] [[255007091241822]] [[255007081241823]]
8. Elmo
Type
[[302117289844540]] [[302117283177874]] [[302117276511208]] [[302117279844541]] [[302117286511207]] [[302117366511199]]
[[302117369844532]] [[302117373177865]] [[302117383177864]] [[302117379844531]] [[302117426511193]] [[302117436511192]]
[[302117429844526]] [[302117423177860]] [[302117433177859]] [[302117523177850]] [[302117529844516]] [[302117526511183]]
[[302117536511182]] [[302117533177849]] [[302117606511175]] [[302117596511176]] [[302117599844509]] [[302117593177843]]
[[302117603177842]] [[302117646511171]] [[302117649844504]] [[302117659844503]] [[302117656511170]] [[302117653177837]]
[[302117706511165]] [[302117703177832]] [[302117699844499]] [[302117709844498]] [[302117696511166]] [[302117749844494]]
9. Jack Sparrow
Type
[[298356520217565]] [[298356516884232]] [[298356506884233]] [[298356510217566]]
[[298356513550899]] [[298356620217555]] [[298356606884223]] [[298356616884222]]
[[298356610217556]] [[298356613550889]] [[298356673550883]] [[298356676884216]]
[[298356666884217]] [[298356680217549]] [[298356670217550]] [[298356740217543]]
[[298356733550877]] [[298356743550876]] [[298356730217544]] [[298356736884210]]
[[298356823550868]] [[298356810217536]] [[298356820217535]] [[298356826884201]]
[[298356813550869]] [[298356906884193]] [[298356896884194]] [[298356900217527]]
[[298356903550860]] [[298356893550861]] [[298356950217522]] [[298356946884189]]
10. Superman
Type
[[299528860107644]] [[299528863440977]] [[299528866774310]] [[299528856774311]]
[[299528870107643]] [[299528950107635]] [[299528943440969]] [[299528946774302]]
[[299528953440968]] [[299528956774301]] [[299529013440962]] [[299529016774295]]
[[299529010107629]] [[299529003440963]] [[299529006774296]] [[299529060107624]]
[[299529063440957]] [[299529066774290]] [[299529070107623]] [[299529073440956]]
[[299529173440946]] [[299529183440945]] [[299529180107612]] [[299529176774279]]
[[299529186774278]] [[299529243440939]] [[299529236774273]] [[299529240107606]]
11. Mr. Bean
Type
[[255016264574238]] [[255016271240904]] [[255016277907570]]
[[255016267907571]] [[255016274574237]] [[255016384574226]]
[[255016387907559]] [[255016394574225]] [[255016401240891]]
[[255016391240892]] [[255016464574218]] [[255016454574219]]
[[255016457907552]] [[255016461240885]] [[255016451240886]]
[[255016537907544]] [[255016531240878]] [[255016534574211]]
[[255016541240877]] [[255016527907545]] [[255016634574201]]
12. Alt + keys combination symbols Below is the list of few symbols you can see by typing alt + respective value.(Laptop users may require to use alt + fn + value) or easier just copy from below:
Alt + 1 ☺
Alt + 2 ☻
Alt + 3 ♥
Alt + 4 ♦
Alt + 5 ♣
Alt + 6 ♠
Alt + 7 •
Alt + 8 ◘
Alt + 9 ○
Alt + 10 ◙
Alt + 11 ♂
Alt + 12 ♀
Alt + 13 ♪
Alt + 14 ♫
Alt + 15 ☼
Alt + 16 ►
Alt + 17 ◄
Alt + 18 ↕
Alt + 19 ‼
Alt + 20 ¶
Alt + 21 §
Alt + 22 ▬
Alt + 23 ↨
Alt + 24 ↑
Alt + 25 ↓
Alt + 26 →
Alt + 27 ←
Alt + 28 ∟
Alt + 29 ↔
Alt + 30 ▲
Alt + 31 ▼
These are all I have for now. If you know more, please share as a comment. :)
Read more...
Bookmark this post: |
|
NMAP 6 Released
Version 6 of nmap, one of the most widely used network exploration and security auditing tool was released on 21 May. Nmap (“Network Mapper”) is a free and open source (license) utility for network discovery and security auditing.
The nmap site says:
"The Nmap Project is pleased to announce the immediate, free availability of the Nmap Security Scanner version 6.00 from http://nmap.org/. It is the product of almost three years of work, 3,924 code commits, and more than a dozen point releases since the big Nmap 5 release in July 2009. Nmap 6 includes a more powerful Nmap Scripting Engine, 289 new scripts, better web scanning, full IPv6 support, the Nping packet prober, faster scans, and much more! We recommend that all current users upgrade."
The new version of nmap consists of 6 major improvements among several changes. Enhanced Nmap scripting engine(NSE), better web scanning, full-fledged IPv6 support, addition of nping tool, better zenmap GUI and faster scanning are the enhancements seen in the version 6 of nmap.
More Release Information
Download NMAP
Read more...
Bookmark this post: |
|
Setting Up Ncell Connect In Linux
Today I got a NCELL Connect device from my junior friend and did a quick PPP setup on linux. Later thought that this would be useful for other guys who use ubuntu(thats what I'm using) and other distros and hence am posting the steps on setting up Ncell connect in linux.
1. Install wvdial. Wvdial is a dialer that lets you to make a PPP connection in order to connect to the internet. Fire up the terminal and run the following command:
Optionally you could also install gnome-ppp(sudo apt-get install gnome-ppp) for GUI but wvdial does all the job.
2. Edit the /etc/wvdial.conf, the configuration file for wvdial which requires appropriate setting for NCell connect and replace all the text with following data.
In the above process, you can run the wvdialconf command to see if your Huawei card is being detected. The Modem = line may require appropriate value.
3. While your device is plugged in, type the following command and note the line containing huawei.
We are concerned with the vendor and product id. In the above information, 12d1 is the vendor ID and 1446 is the product id. Now perform the following in the terminal:
4. Now we must be all good. All we have to do is dial the connection. Type the following in the terminal:
If everything is fine, your connection will be successful showing the information such as IP address and primary and secondary DNS information. I hope this helps. Enjoy the NCELL connect in linux :)
Read more...
1. Install wvdial. Wvdial is a dialer that lets you to make a PPP connection in order to connect to the internet. Fire up the terminal and run the following command:
samar@Techgaun:~$ sudo apt-get install wvdial
Optionally you could also install gnome-ppp(sudo apt-get install gnome-ppp) for GUI but wvdial does all the job.
2. Edit the /etc/wvdial.conf, the configuration file for wvdial which requires appropriate setting for NCell connect and replace all the text with following data.
[Dialer Defaults]
Stupid Mode = 1
Modem Type = Analog Modem
ISDN = 0
Phone = *99#
Modem = /dev/ttyUSB0
Username = web
Dial Command = ATDT
Password = web
Baud = 460800
Init1 = ATZ
Init2 = ATQ0 V1 E1 S0=0 &C1 &D2 +FCLASS=0
Stupid Mode = 1
Modem Type = Analog Modem
ISDN = 0
Phone = *99#
Modem = /dev/ttyUSB0
Username = web
Dial Command = ATDT
Password = web
Baud = 460800
Init1 = ATZ
Init2 = ATQ0 V1 E1 S0=0 &C1 &D2 +FCLASS=0
In the above process, you can run the wvdialconf command to see if your Huawei card is being detected. The Modem = line may require appropriate value.
3. While your device is plugged in, type the following command and note the line containing huawei.
samar@Techgaun:~$ lsusb
Bus 002 Device 005: ID 12d1:1446 Huawei Technologies Co., Ltd. E1552 (HSPA modem)
Bus 002 Device 004: ID 0408:03f1 Quanta Computer, Inc.
Bus 002 Device 003: ID 138a:0005 DigitalPersona, Inc
Bus 002 Device 002: ID 8087:0020 Intel Corp. Integrated Rate Matching Hub
Bus 002 Device 001: ID 1d6b:0002 Linux Foundation 2.0 root hub
Bus 001 Device 025: ID 04f3:0210 Elan Microelectronics Corp. AM-400 Hama Optical Mouse
Bus 001 Device 002: ID 8087:0020 Intel Corp. Integrated Rate Matching Hub
Bus 001 Device 001: ID 1d6b:0002 Linux Foundation 2.0 root hub
We are concerned with the vendor and product id. In the above information, 12d1 is the vendor ID and 1446 is the product id. Now perform the following in the terminal:
samar@Techgaun:~$ sudo modprobe usbserial vendor=0x12d1 product=0x1446
4. Now we must be all good. All we have to do is dial the connection. Type the following in the terminal:
samar@Techgaun:~$ sudo wvdial
If everything is fine, your connection will be successful showing the information such as IP address and primary and secondary DNS information. I hope this helps. Enjoy the NCELL connect in linux :)
Read more...
Bookmark this post: |
|
Friday 11 May 2012
Download libSteamValidateUserIDTickets_i386.so For Counter Strike Servers
I was setting up a hlds non-steam server and I was getting an error regarding the absence of this file "libSteamValidateUserIDTickets_i386.so" and hence thought of uploading it so that others can download for their own server.
The error you will receive is something like below:
Download libSteamValidateUserIDTicket.so
Read more...
The error you will receive is something like below:
Error:Error:libSteamValidateUserIDTickets_i386.so: cannot open shared object file: No such file or directory
Download libSteamValidateUserIDTicket.so
Read more...
Bookmark this post: |
|
Sunday 6 May 2012
How To Fix An Unknown Error Occurred(0xE8008001) While Installing Apps From Itunes
While installing apps on the jailbroken ipod, I got this unknown error with error code 0xE8008001 and the apple's help was not of much use. This was driving me crazy since I could not install few apps from itunes to my jailbroken ipod. However with some googling, I found a fix for it.
All you have to do is install a Cydia app known as AppSync available from hackulo.us. You can either use Cydia from your device or Cyder from your PC.
You will have to add the new source: http://cydia.hackulo.us/ either in Cydia or Cyder and then you will find the AppSync in the list. Download and install it and then reboot the device once.
After installing AppSync, this error will not occur. So enjoy installing plethoras of apps in your jailbroken device.
Read more...
Bookmark this post: |
|
Fixing Cyder 2 For Smooth Running
If you have started using Cyder v.2, some of you might find this tool throwing few errors about some DLLs. If so, go through this post to fix the problem and use the Cyder 2 smoothly. This also fixes "No iphone/ipod found" error in Cyder.
Error 1: The procedure entry point sqlite3_wal_checkpoint could not be located in the dynamic link library SQLite3.dll
Fix: Copy SQLite3.dll file from C:\Program Files\Common Files\Apple\Apple Application Support to your cyder2 directory. Replace if prompted.
Error 2: Could not load iTunesMobileDevice.dll, check your iTunes installation.
Fix: Download iTunesMobileDevice.dll and copy it to the cyder2 directory.
Now close any instance of Cyder 2 and restart Cyder 2. The errors will go away and your device will be detected. Alternatively, some users may want to put the above DLL files in the system32 folder but delete the original sqlite3.dll file that came with Cyder 2. I hope this helps. :)
Read more...
Bookmark this post: |
|
Cyder - Cydia For PC
If you have jailbroken your apple device, you are most likely to be using an app called Cydia maintained by Saurik. Cydia is a software application for iOS that enables a user to find and install software packages (including apps, interface customizations, and system extensions) on a jailbroken iPhone, iPod Touch or iPad. But what if you don't have wifi access to install apps using Cydia? Don't fear, there's an application for windows based PCs known as "Cyder".
Cyder is a windows application that allows you to install cydia apps from your PC. Just plugin your apple device and easily install any Cydia app from any Cydia source. Running cyder is very simple.
You can add the sources for Cydia apps and then select among the available packages. You can search through the huge database of apps easily with Cyder and then download them. Installing the apps to your device has been simplified by Cyder 2.
Download Cyder2-0.1-RC2.zip
Below is the result of scan of this application:
File Info
Report date: 2012-05-06 13:39:36 (GMT 1)
File name: cyder2-0-1-rc2-zip
File size: 815098 bytes
MD5 Hash: 2f26fbbae9dd7e12b957bf6ea12abce7
SHA1 Hash: 0c61e89f3cf24baae662eeef52106ad5ff7e2ab0
Detection rate: 0 on 14 (0%)
Status: CLEAN
Detections
Asquared -
Avast -
AVG -
Avira -
BitDefender -
ClamAV -
Comodo -
DrWeb -
Fprot -
IkarusT3 -
Panda -
STOPZilla -
TrendMicro -
VBA32 -
Scan report generated by
NoVirusThanks.org
Read more...
Bookmark this post: |
|
Friday 4 May 2012
Decode The Dean Edwards Javascript Packer
Well today I had to unpack some javascript code from Dean Edwards packer and started to check how this tool works. I opened the official packer page and then thought of giving some inputs and analyzing outputs. But, wait!!! there's this "decode" button(in disabled state) and probably I can decode the stuff I was given.
I used the firebug and quickly removed one attribute each of the lower textarea and decode button. You'll have to remove the "readonly" attribute of the lower textarea and "disabled" attribute of the "docode" button. Now you can paste the packed code in the lower textarea and decode the packed code easily. Not the real reversing of the algorithm itself but works perfectly.
And you can beautify the unpacked script using some online beautifiers such as this.
I hope it helps some of you guys ;)
Read more...
Bookmark this post: |
|
Sunday 29 April 2012
Answers To Introduction To Algorithms 1.2-2 and 1.2-3
Algorithm is a fun subject and we are starting from the very basics of algorithm. Here is my solution for selected questions from chapter 1 of Introduction To Algorithms by Cormen and others.
1.2-2) Suppose we are comparing implementations of insertion sort and merge sort on the same machine. For inputs of size n, insertion sort runs in 8n2 steps, while merge sort runs in 64nlg n steps. For which values of n does insertion sort beat merge sort?
Here, we need to determine the value of n such that 8n2 = 64nlgn
For the value n = 1, obviously the merge sort beats the insertion sort so we will start from 2 and find the higher limit up to which the insertion sort beats merge sort.
The above equation can be further reduced as n = 8lgn. We can now solve it to determine the value of n. A simple code in C that would do the job for us is as below:
Answer: 2 <= n < 44. 1.2-3) What is the smallest value of n such that an algorithm whose running time is 100n2 runs faster than an algorithm whose running time is 2n on the same machine?
Here, we need to determine the smallest value of n such that 100n2 < 2n. The value of n evaluates to 15. The source code for above problem is as below:
I hope this helps some of the algo beginners out there trying to solve the questions from "Introduction To Algorithms". Btw, they are basic maths however :P
Read more...
1.2-2) Suppose we are comparing implementations of insertion sort and merge sort on the same machine. For inputs of size n, insertion sort runs in 8n2 steps, while merge sort runs in 64nlg n steps. For which values of n does insertion sort beat merge sort?
Here, we need to determine the value of n such that 8n2 = 64nlgn
For the value n = 1, obviously the merge sort beats the insertion sort so we will start from 2 and find the higher limit up to which the insertion sort beats merge sort.
The above equation can be further reduced as n = 8lgn. We can now solve it to determine the value of n. A simple code in C that would do the job for us is as below:
#include <stdio.h>
#include <math.h>

int main()
{
 int i = 2;
 while (1)
 {
  int merge = 8 * log2(i);
  if (i > merge)
  {
   printf("Value of i: %d\n", i);
   break;
  }
  i++;
 }
 return 0;
}
Answer: 2 <= n < 44. 1.2-3) What is the smallest value of n such that an algorithm whose running time is 100n2 runs faster than an algorithm whose running time is 2n on the same machine?
Here, we need to determine the smallest value of n such that 100n2 < 2n. The value of n evaluates to 15. The source code for above problem is as below:
#include <stdio.h>
#include <math.h>

int main()
{
 int i = 2;
 while (1)
 {
  int x = 100 * pow(i, 2);
  int y = pow(2,i);
  if (x < y)
  {
   printf("Value of i: %d\n", i);
   break;
  }
  i++;
 }
 return 0;
}
I hope this helps some of the algo beginners out there trying to solve the questions from "Introduction To Algorithms". Btw, they are basic maths however :P
Read more...
Bookmark this post: |
|
Torrentz Offers Advanced Search Features[In Case You Didn't Know]
Until recently, I didn't know that my favorite torrent meta-search engine, Torrentz.eu, offered few advanced search features that makes it easier to spot the file we are searching for. After all, who would ever check the help page to read about a torrent meta-search engine but I would consider myself a noob for not thinking that advanced search are implemented in today's torrent meta-search engines.
Anyway, directly taken from the help page, below are the examples that can be used for making better search in Torrentz while searching for the files.
I've been finding these advanced searches useful since I discovered them. I hope you will also find them useful. ;)
Read more...
Anyway, directly taken from the help page, below are the examples that can be used for making better search in Torrentz while searching for the files.
Mozilla Firefox - search for Mozilla and Firefox anywhere in the title
"Mozilla Firefox" - search exactly for "Mozilla Firefox"
Mozilla | Linux - search for Mozilla or Linux
Mozilla Firefox -beta - search for Mozilla AND Firefox but NOT beta
^Mozilla - search for titles starting with Mozilla
movie* - match movie, movies or any other prefix - This is enabled by default on most queries
filename:Fedora iso - deep search inside torrent for file named Fedora iso
filename:Fedora size:3520802816 - deep search inside torrent for file named Fedora iso with size of 3520802816 bytes
Linux added: 7d - search for Linux added within the last 7 days - you can also use h for hours
I've been finding these advanced searches useful since I discovered them. I hope you will also find them useful. ;)
Read more...
Bookmark this post: |
|
Monday 9 April 2012
Email Obfuscation Tricks In The Age Of Spammers
Every day thousands of spam emails are propelled to our e-mail addresses and the algorithms used by the spam bots are increasingly getting sophisticated and are able to harvest few kinds of obfuscated e-mail addresses already. While this race between spammers and web users goes on, we can still use several of the obfuscation tricks either to prevent bots from harvesting the emails or to fool bots to pick completely wrong e-mail adresses. Here, I am going to illustrate some useful obfuscation tricks I've come across over.
A very basic way of obfuscating emails is by replacing the characters such as @ and . with at and dot. Following are few samples:
And, below are some examples that would be nearly impossible to harvest :P. Just be more creative with them and no automated spam bot/email harvester out there will be able to get you :D. However, this might possibly create some kind of DoS like scenario for many legitimate users.
The unicode version:
samar@techgaun.com
will properly show as:
samar@techgaun.com
you can specify the following CSS property to use this obfuscation trick.
Edit: I found this link with some good examples so I thought I would rather refer you all to this webpage.
Read more...
The Very Basics
A very basic way of obfuscating emails is by replacing the characters such as @ and . with at and dot. Following are few samples:
samar[at]techgaun[dot]com
samar (at) techgaun (dot) com
samar (at) techgaun (dot) com
And, below are some examples that would be nearly impossible to harvest :P. Just be more creative with them and no automated spam bot/email harvester out there will be able to get you :D. However, this might possibly create some kind of DoS like scenario for many legitimate users.
<myfirstname> (at) techgaun (dot) com
<myfirstname> (at) <lastname> (dot) com
<myfirstname> (at) <lastname> (dot) com
Using Image
Another method is to create a small and appropriate image that will display your e-mail address. Should be more than enough, so just create a PNG/GIF of your e-mail address.Text Encodings
You could perform text encodings and javascript obfuscations, etc. An example of this is using ascii to unicode conversion and applying other level of obfuscations again to it.The unicode version:
samar@techgaun.com
will properly show as:
samar@techgaun.com
Obfuscations using CSS
Reverse Text Direction
CSS allows you to display the text in the reverse direction. For a HTML entity,<div class="email"> moc.nuaghcet@ramas</div>
you can specify the following CSS property to use this obfuscation trick.
.email
{
     unicode-bidi: bidi-override;
     direction: rtl;
     float: left;
}
Hidden Text Within E-mail address
Another method is to put some hidden html entity between the parts of e-mail address and then set its display style as none. The spam bots while trying to extract the data from such e-mail information are subjected to get wrong information. An example is:samar@tech<span class='display: none;'>nique</span>gaun.com
Edit: I found this link with some good examples so I thought I would rather refer you all to this webpage.
Read more...
Bookmark this post: |
|
Sunday 8 April 2012
Turning The Internet Upside Down - A Prank To Play
Probably one of the best modern day april fool prank that should be played by the network admins to their users, I came acrosss this cool little trick to turn the whole internet upside down and thought to share with you guys.
With a linux gateway and some pretty basic linux skills(in fact, everything is well explained in the webpage & hence doesn't require much of skills), you can turn the internet upside down. The official webpage shows how to configure everything to play prank on your wi-fi stealing neighbours.
Ubuntu help also includes a good HowTo.
Read more...
Bookmark this post: |
|
Saturday 7 April 2012
Sexy SSH Tricks For Linux Geeks
Previously I had posted on mounting filesystem over SSh and now its time for yet another post on cool SSh tricks.
So lets see few of the several SSH tricks that we either need to use or can use for fun and making stuffs easier.

Do not supply any passphrase and keep on pressing ENTER if you are looking for password-free SSH login. This will create two files id_dsa(private key) and id_dsa.pub(public key). All we have to do is copy the public key to the remote server computer and then add the content of public key to the list of authorized keys as below(or using nano or whatever you find easier):
You can even supply passphrase if you want and this will make authentication more secure. In that case, be sure to set the following value in /etc/ssh/sshd_config:
Similarly, we can encrypt the SSH sessions using one of the different available block ciphers: aes128-ctr,aes192-ctr,aes256-ctr,arcfour256,arcfour128,aes128-cbc,3des-cbc. IMHO, using aes256-ctr would be sufficiently secure due to 256 bits key size. Below is an example of using both the compression and encryption while establishing the SSH connection.
To prevent the last login status, simply change and set as following in the configuration file(/etc/ssh/sshd_config):
And also, change the content of the file /etc/motd and /var/run/motd which by default contains the banner message that is displayed by SSH.
So that's the end. Of course, there are more sexy SSH tricks which I'll cover up once I get some free time. Also, share what you have :)
Read more...
So lets see few of the several SSH tricks that we either need to use or can use for fun and making stuffs easier.

Password-less SSH
No matter how convinient it is to use SSH to connect to remote server, people tend to seek for more ease and typing passwords each time you are on interactive shell is something most users hate. Moreover, you can even prevent the bruteforcing attacks by using password-free SSH with small extra configuration change. First we need to generate a pair of keys by using the ssh-keygen tool. ssh-keygen generates, manages and converts authentication keys for ssh. ssh-keygen can create RSA keys for use by SSH protocol version 1 and DSA, ECDSA or RSA keys for use by SSH protocol version 2. In my example, I'll generate DSA keys as below:ssh-keygen -t dsa
Do not supply any passphrase and keep on pressing ENTER if you are looking for password-free SSH login. This will create two files id_dsa(private key) and id_dsa.pub(public key). All we have to do is copy the public key to the remote server computer and then add the content of public key to the list of authorized keys as below(or using nano or whatever you find easier):
cat id_dsa.pub >> ~/.ssh/authorized_keys
You can even supply passphrase if you want and this will make authentication more secure. In that case, be sure to set the following value in /etc/ssh/sshd_config:
PasswordAuthentication no
Mount Filesystem over SSH
This is another useful trick to use while working over SSH. The details on this can be read here.Copy File Over SSH Using SCP
SCP is a SSH based tool that provides an easy way to copy files over SSH. You can copy files from and to SSH server to/from your machine and also copy files from one server to another directly. Check my previous blog post on SCP for further details.Running Graphical Softwares Over SSH
With SSH, you can configure the X11 Forwarding(set to Yes in /etc/ssh/sshd_config for global effect and host-by-host basis in /etc/ssh/ssh_config by setting ForwardX11 yes) which allows us to run the graphical softwares on server over SSH. You can run the graphical softwares over SSH by supplying the -X switch while connecting to the server. An example is shown below:ssh -X samar@192.168.0.1 -p 222
Compressed and Encrypted SSH Sessions
Another good thing to do is compress and encrypt the SSH sessions. Compression is usually a very good idea for slow networks but is not desirable for faster networks where compression and de-compression might cause more overhead. The compression algorithm used by SSH is gzip and requests compression of all data (including stdin, stdout, stderr, and data for forwarded X11 and TCP connections). The default value can be set on a host-by-host basis in the configuration files(/etc/ssh/ssh_config) by setting the Compression option. To enable compression, use the -C switch while connecting to the remote SSH server or set the Compression yes in your config file.Similarly, we can encrypt the SSH sessions using one of the different available block ciphers: aes128-ctr,aes192-ctr,aes256-ctr,arcfour256,arcfour128,aes128-cbc,3des-cbc. IMHO, using aes256-ctr would be sufficiently secure due to 256 bits key size. Below is an example of using both the compression and encryption while establishing the SSH connection.
ssh -c aes256-ctr -C hostel@192.168.0.1
Disable Root Login
Its not a good thing to allow root login in SSH so be sure root login is disabled in your SSH server. This is done by setting the configuration(/etc/ssh/sshd_config) as PermitRootLogin no. What more? Disable the password-based logins and use the key-based login. And to keep script kiddies out, you could change the default port in the configuration.Disable Last Login & Default MOTD
By default, while logging in to the SSH servers like OpenSSH, we will see some kind of banner that includes a MOTD(Message Of The Day) and last login user and time. Disabling these or changing the banner requires two modifications.To prevent the last login status, simply change and set as following in the configuration file(/etc/ssh/sshd_config):
PrintMotd no
PrintLastLog no
PrintLastLog no
And also, change the content of the file /etc/motd and /var/run/motd which by default contains the banner message that is displayed by SSH.
So that's the end. Of course, there are more sexy SSH tricks which I'll cover up once I get some free time. Also, share what you have :)
Read more...
Bookmark this post: |
|
Thursday 5 April 2012
View ASCII Table In Your Linux Terminal
You need not be browsing some online ascii table website or need not download any document containing the list of ASCII characters if you are using linux OS. You can view the ASCII characters set encoded in octal, decimal, and hexadecimal by just opening the terminal.
In order to access the ASCII table, just type:
Isn't it cool to have all the ASCII character sets in your linux terminal?
Read more...
In order to access the ASCII table, just type:
samar@Techgaun:~$ man ascii

Isn't it cool to have all the ASCII character sets in your linux terminal?
Read more...
Bookmark this post: |
|
How To Mount Folder or Filesystem Over SSh
Many times you need to interact a lot with some directory or a filesystem while working remotely on a server over SSh. Things will be way easier if you can mount the remote folder or filesystem over SSh and I am going to show how to do this thing in this very post.
SSHFS (Secure SHell FileSystem) is a file system for Linux (and other operating systems with a FUSE implementation, such as Mac OS X or FreeBSD) capable of operating on files on a remote computer using just a secure shell login on the remote computer. On the local computer where the SSHFS is mounted, the implementation makes use of the FUSE (Filesystem in Userspace) kernel module. The practical effect of this is that the end user can seamlessly interact with remote files being securely served over SSH just as if they were local files on his/her computer. On the remote computer the SFTP subsystem of SSH is used.
SSHFS can be downloaded and installed from HERE. Most linux distros have sshfs in their repositories. You can use the respective package managers to install the sshfs in the client system(i.e. your system).
Ubuntu and debian users can type the following in the terminal to install sshfs:
Once you install sshfs, you are ready to mount the remote files and folders over SSh. The syntax for mounting the remote filesystem/folder is pretty straightforward.
The syntax is: sshfs -p SSHPort [user@]host:[dir] mountpoint
An example of mounting the remote system's /opt directory in my Desktop
Unmounting can be done by using the command as below:
I hope this counts as a useful tips for you. :)
Read more...
SSHFS (Secure SHell FileSystem) is a file system for Linux (and other operating systems with a FUSE implementation, such as Mac OS X or FreeBSD) capable of operating on files on a remote computer using just a secure shell login on the remote computer. On the local computer where the SSHFS is mounted, the implementation makes use of the FUSE (Filesystem in Userspace) kernel module. The practical effect of this is that the end user can seamlessly interact with remote files being securely served over SSH just as if they were local files on his/her computer. On the remote computer the SFTP subsystem of SSH is used.
SSHFS can be downloaded and installed from HERE. Most linux distros have sshfs in their repositories. You can use the respective package managers to install the sshfs in the client system(i.e. your system).
Ubuntu and debian users can type the following in the terminal to install sshfs:
samar@Techgaun:~$ sudo apt-get install sshfs
Once you install sshfs, you are ready to mount the remote files and folders over SSh. The syntax for mounting the remote filesystem/folder is pretty straightforward.
The syntax is: sshfs -p SSHPort [user@]host:[dir] mountpoint
An example of mounting the remote system's /opt directory in my Desktop
samar@Techgaun:~$ sshfs -p 222 kubh@192.168.0.1:/opt/ ~/Desktop/remote/
Unmounting can be done by using the command as below:
samar@Techgaun:~$ fusermount -u ~/Desktop/remote/
I hope this counts as a useful tips for you. :)
Read more...
Bookmark this post: |
|
Wednesday 4 April 2012
w3m - A Text Based Commandline Web Browser
w3m is a World Wide Web text based client. It will display hypertext markup language (HTML) documents containing links to files residing on the local system, as well as files residing on remote systems. It can display HTML tables and frames. In addition, it can be used as a "pager" in much the same manner as "more" or "less". Current versions of w3m run on Unix (Solaris, SunOS, HP-UX, Linux, FreeBSD, and EWS4800) and on Microsoft Windows 9x/NT.
Linux users can install the package from their respective repositories. Following is the example of installation in ubuntu and debian based linux.
Using the w3m browser is pretty straightforward. At start up, w3m will load any local file or remote URL specified at the command line. An example usage is as below:
You can see the whole list of available operation by pressing H(Shift + h) and you will know how comprehensive this seemingly simple command line browser actually is. w3m supports all kind of features we expect from a web browser such as hyperlink navigations, tabbed browsings, file I/O operations, bookmarking, and searching.
w3m can also be used as a pager and for translating HTML files. Taken directly from w3m manpage, following are the examples:
To use w3m as a pager:
To use w3m to translate HTML files:
or
Read more...
Linux users can install the package from their respective repositories. Following is the example of installation in ubuntu and debian based linux.
samar@Techgaun:~$ sudo apt-get install w3m
Using the w3m browser is pretty straightforward. At start up, w3m will load any local file or remote URL specified at the command line. An example usage is as below:
samar@Techgaun:~$ w3m http://www.techgaun.com
You can see the whole list of available operation by pressing H(Shift + h) and you will know how comprehensive this seemingly simple command line browser actually is. w3m supports all kind of features we expect from a web browser such as hyperlink navigations, tabbed browsings, file I/O operations, bookmarking, and searching.
w3m can also be used as a pager and for translating HTML files. Taken directly from w3m manpage, following are the examples:
To use w3m as a pager:
samar@Techgaun:~$ ls | w3m
To use w3m to translate HTML files:
samar@Techgaun:~$ cat foo.html | w3m -T text/html
or
samar@Techgaun:~$ cat foo.html | w3m -dump -T text/html >foo.txt
Read more...
Bookmark this post: |
|
Monday 2 April 2012
How To Disable Password Prompts For sudo In Ubuntu
If you are one of those linux users who very frequently use the sudo command, you might have been annoyed of entering passwords each time you use this command. However with a very simple tweak, you can change this behaviour and disable the password prompts for the sudo command.

A bit of warning though, do not modify the default behavior of asking for passwords since it would drastically compromise security of your system. Following is the warning given by ubuntu help.
If you disable the sudo password for your account, you will seriously compromise the security of your computer. Anyone sitting at your unattended, logged in account will have complete Root access, and remote exploits become much easier for malicious crackers.
Now you are aware of warning, lets see how this can be done.We need to edit the /etc/sudoers file. Lets first open the file in safe editable mode using the following command:
Using visudo for editing the /etc/sudoers lets us locate the possible errors that may occur while editing the file so always use visudo.
Following is the format of disabling password prompts for specific user.
So if we are to disable password prompts for the user samar, you can make a new line with following entry:
In case you want to let all the users with admin privilege use the sudo command without having to give the password, you can edit the line that says %admin ALL=(ALL) ALL to the following:
Once you add such line for appropriate user, press Ctrl + x and save the changes. You will either have to log out and login back or restart the shell to see the modification in effect.
I hope this is useful. :)
Read more...

A bit of warning though, do not modify the default behavior of asking for passwords since it would drastically compromise security of your system. Following is the warning given by ubuntu help.
If you disable the sudo password for your account, you will seriously compromise the security of your computer. Anyone sitting at your unattended, logged in account will have complete Root access, and remote exploits become much easier for malicious crackers.
Now you are aware of warning, lets see how this can be done.We need to edit the /etc/sudoers file. Lets first open the file in safe editable mode using the following command:
samar@Techgaun:~$ sudo visudo
Using visudo for editing the /etc/sudoers lets us locate the possible errors that may occur while editing the file so always use visudo.
Following is the format of disabling password prompts for specific user.
<username> ALL=NOPASSWD: ALL
So if we are to disable password prompts for the user samar, you can make a new line with following entry:
samar ALL=(ALL)NOPASSWD: ALL
In case you want to let all the users with admin privilege use the sudo command without having to give the password, you can edit the line that says %admin ALL=(ALL) ALL to the following:
%admin ALL=(ALL)NOPASSWD: ALL
Once you add such line for appropriate user, press Ctrl + x and save the changes. You will either have to log out and login back or restart the shell to see the modification in effect.
I hope this is useful. :)
Read more...
Bookmark this post: |
|
Subscribe to:
Posts (Atom)